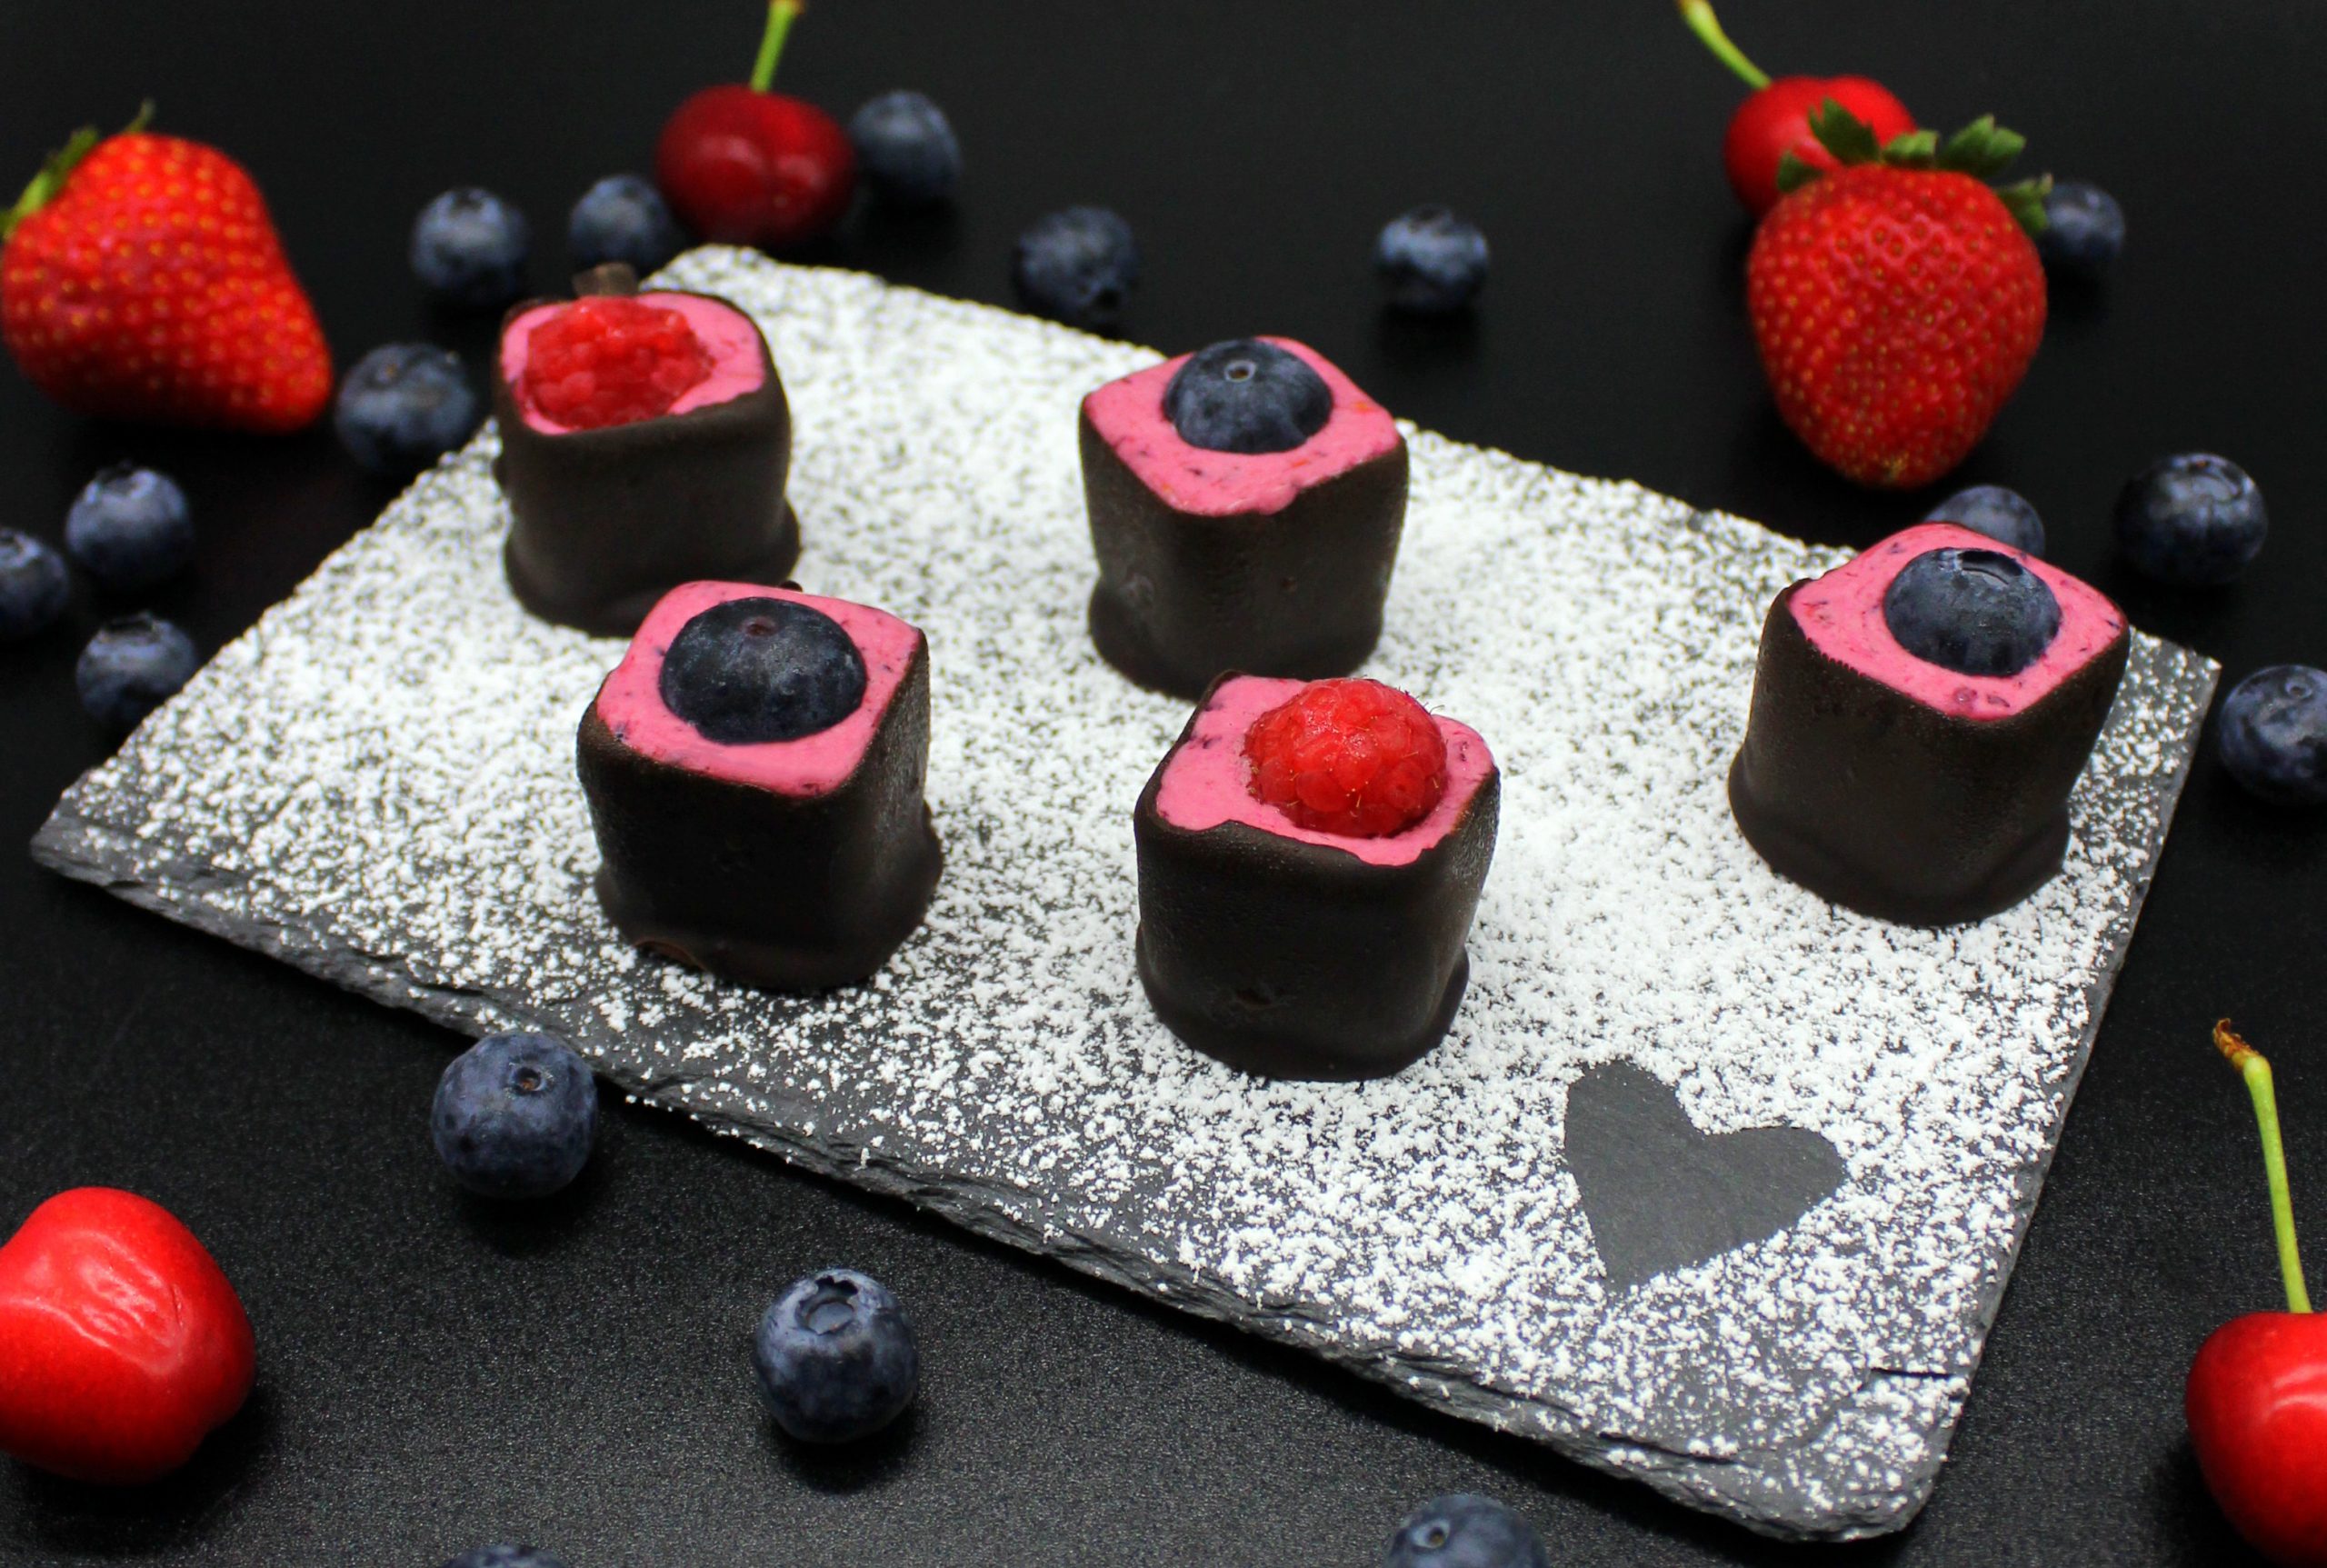
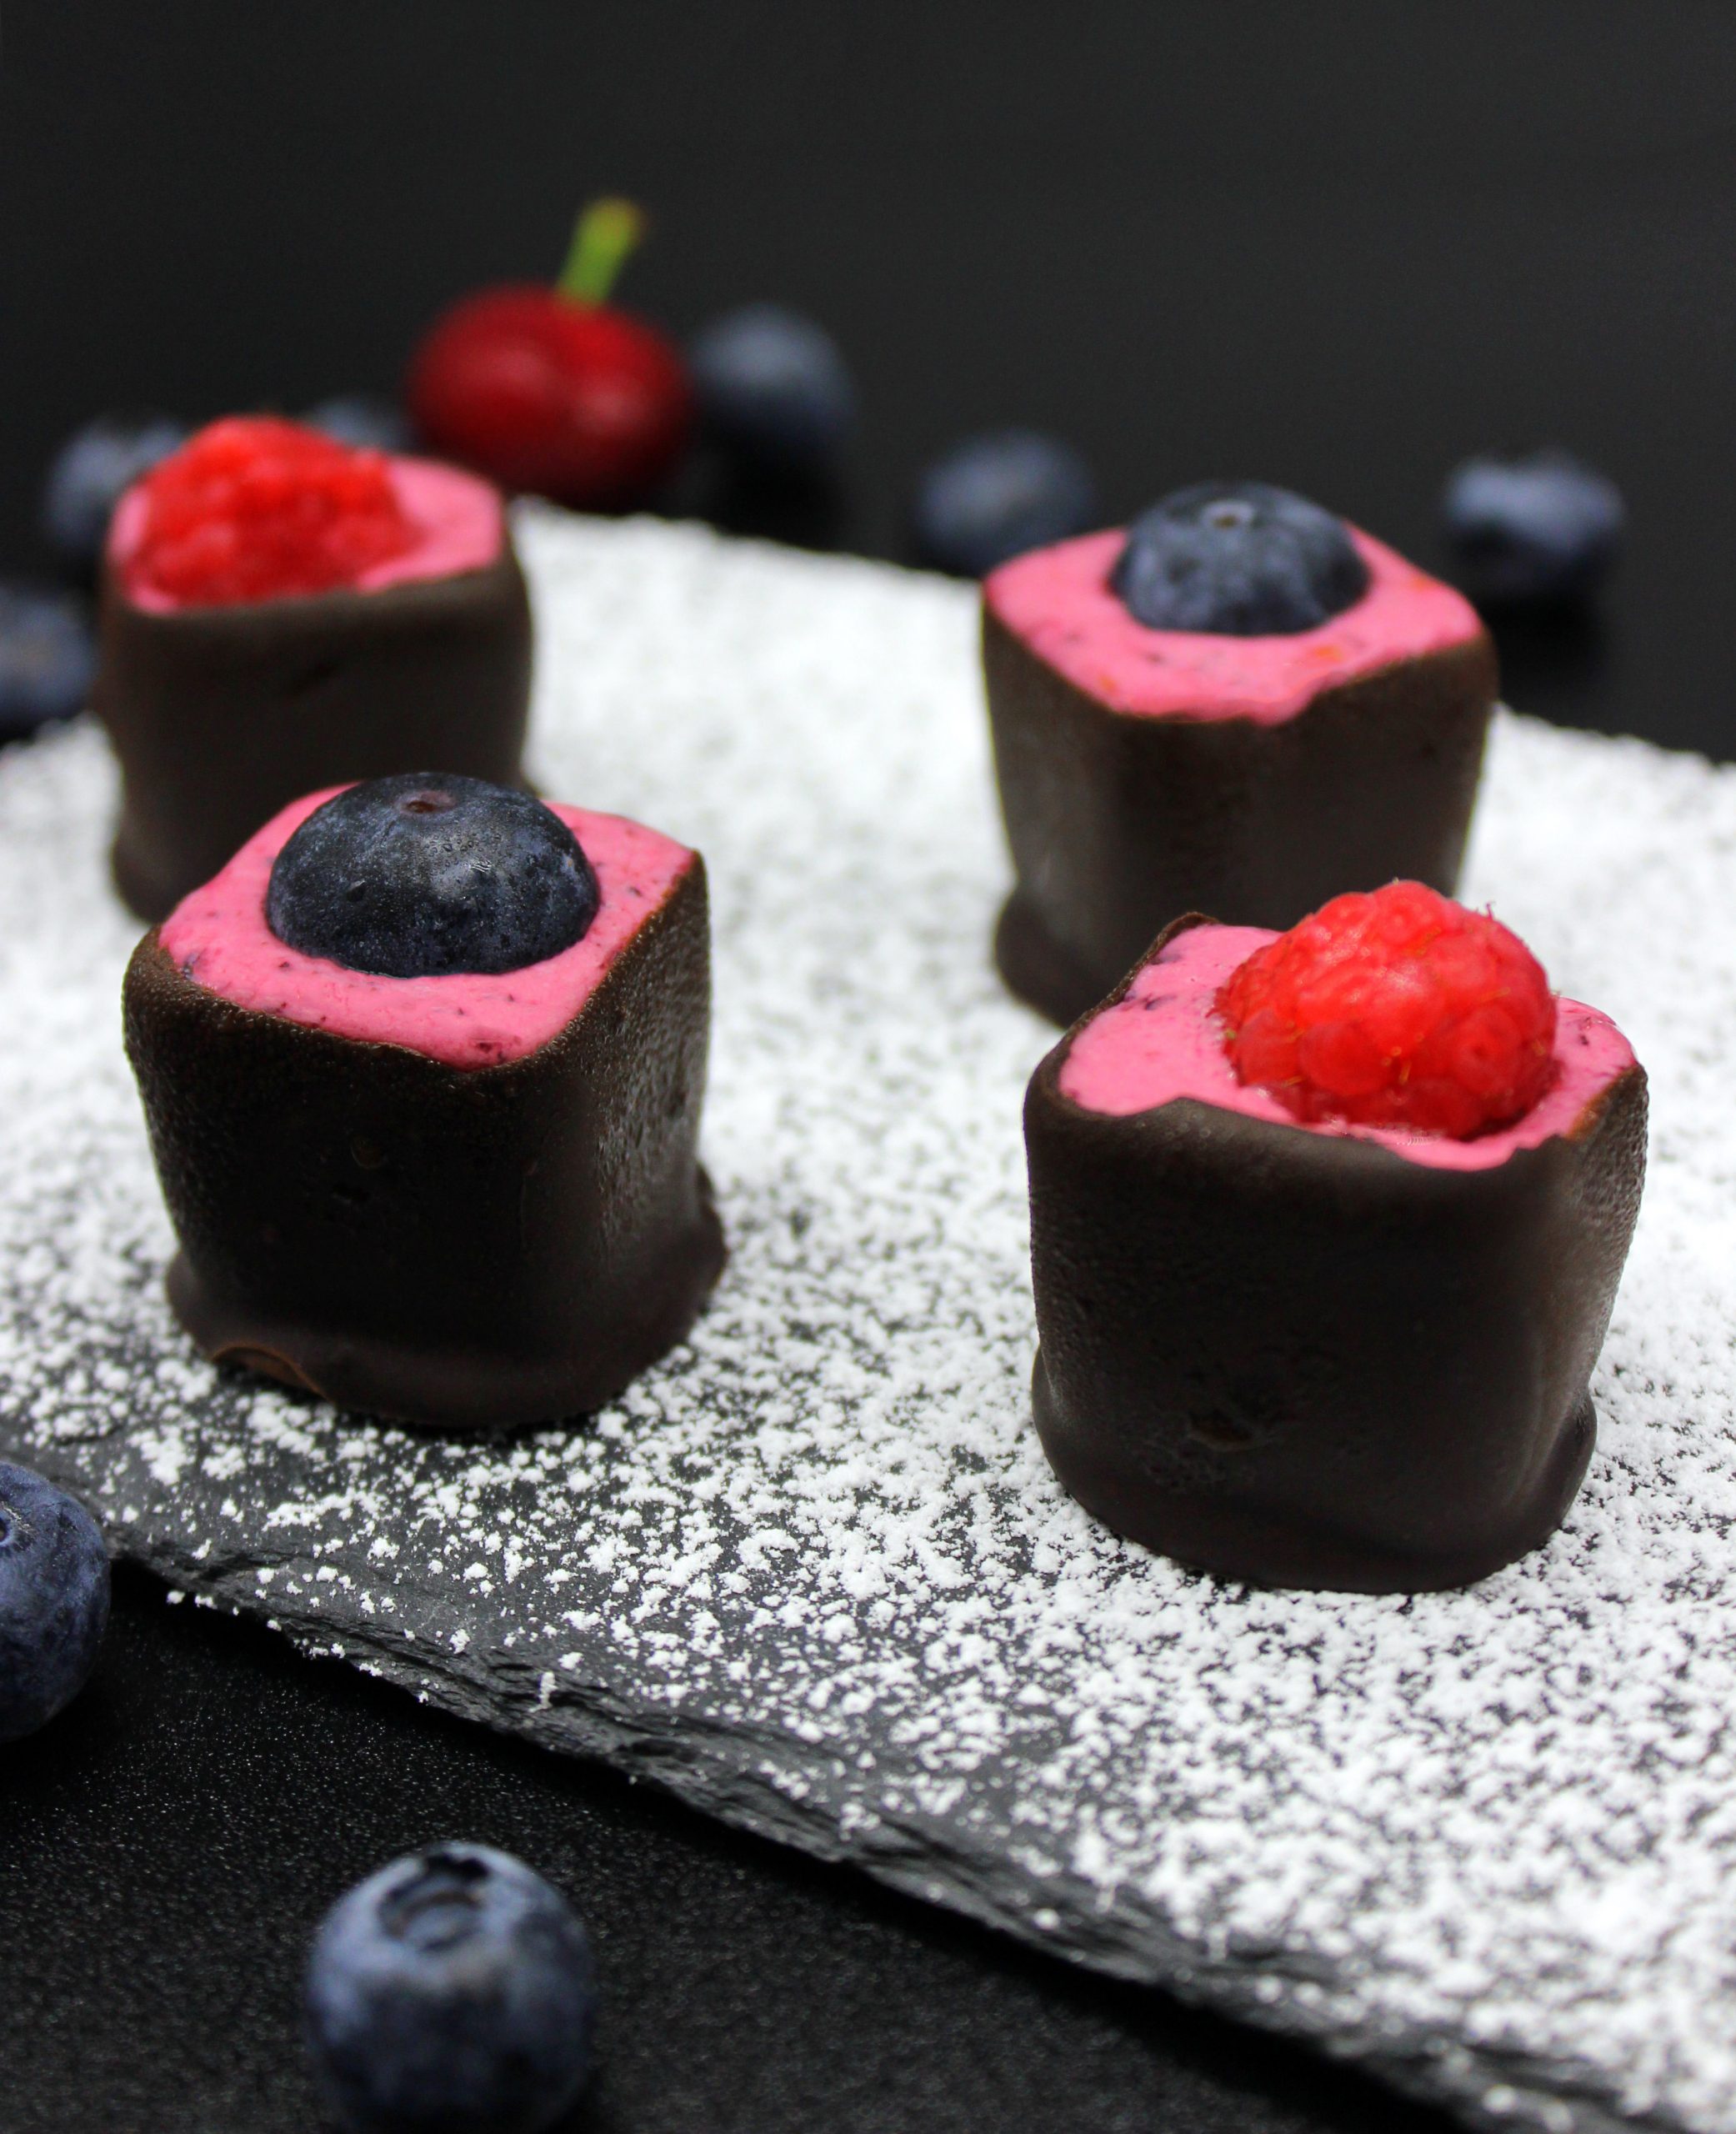
Before the delicious berry season has come to an end, let me introduce you to an easy-to-make bite-size snack. These tiny vegan sweets are not only refreshing, but they also literally taste like summer! And if you are one of the summer lovers, this recipe will be perfect for you! So, here they are – my vegan chocolate berry cups!
Necessary ingredients for vegan chocolate berry cups
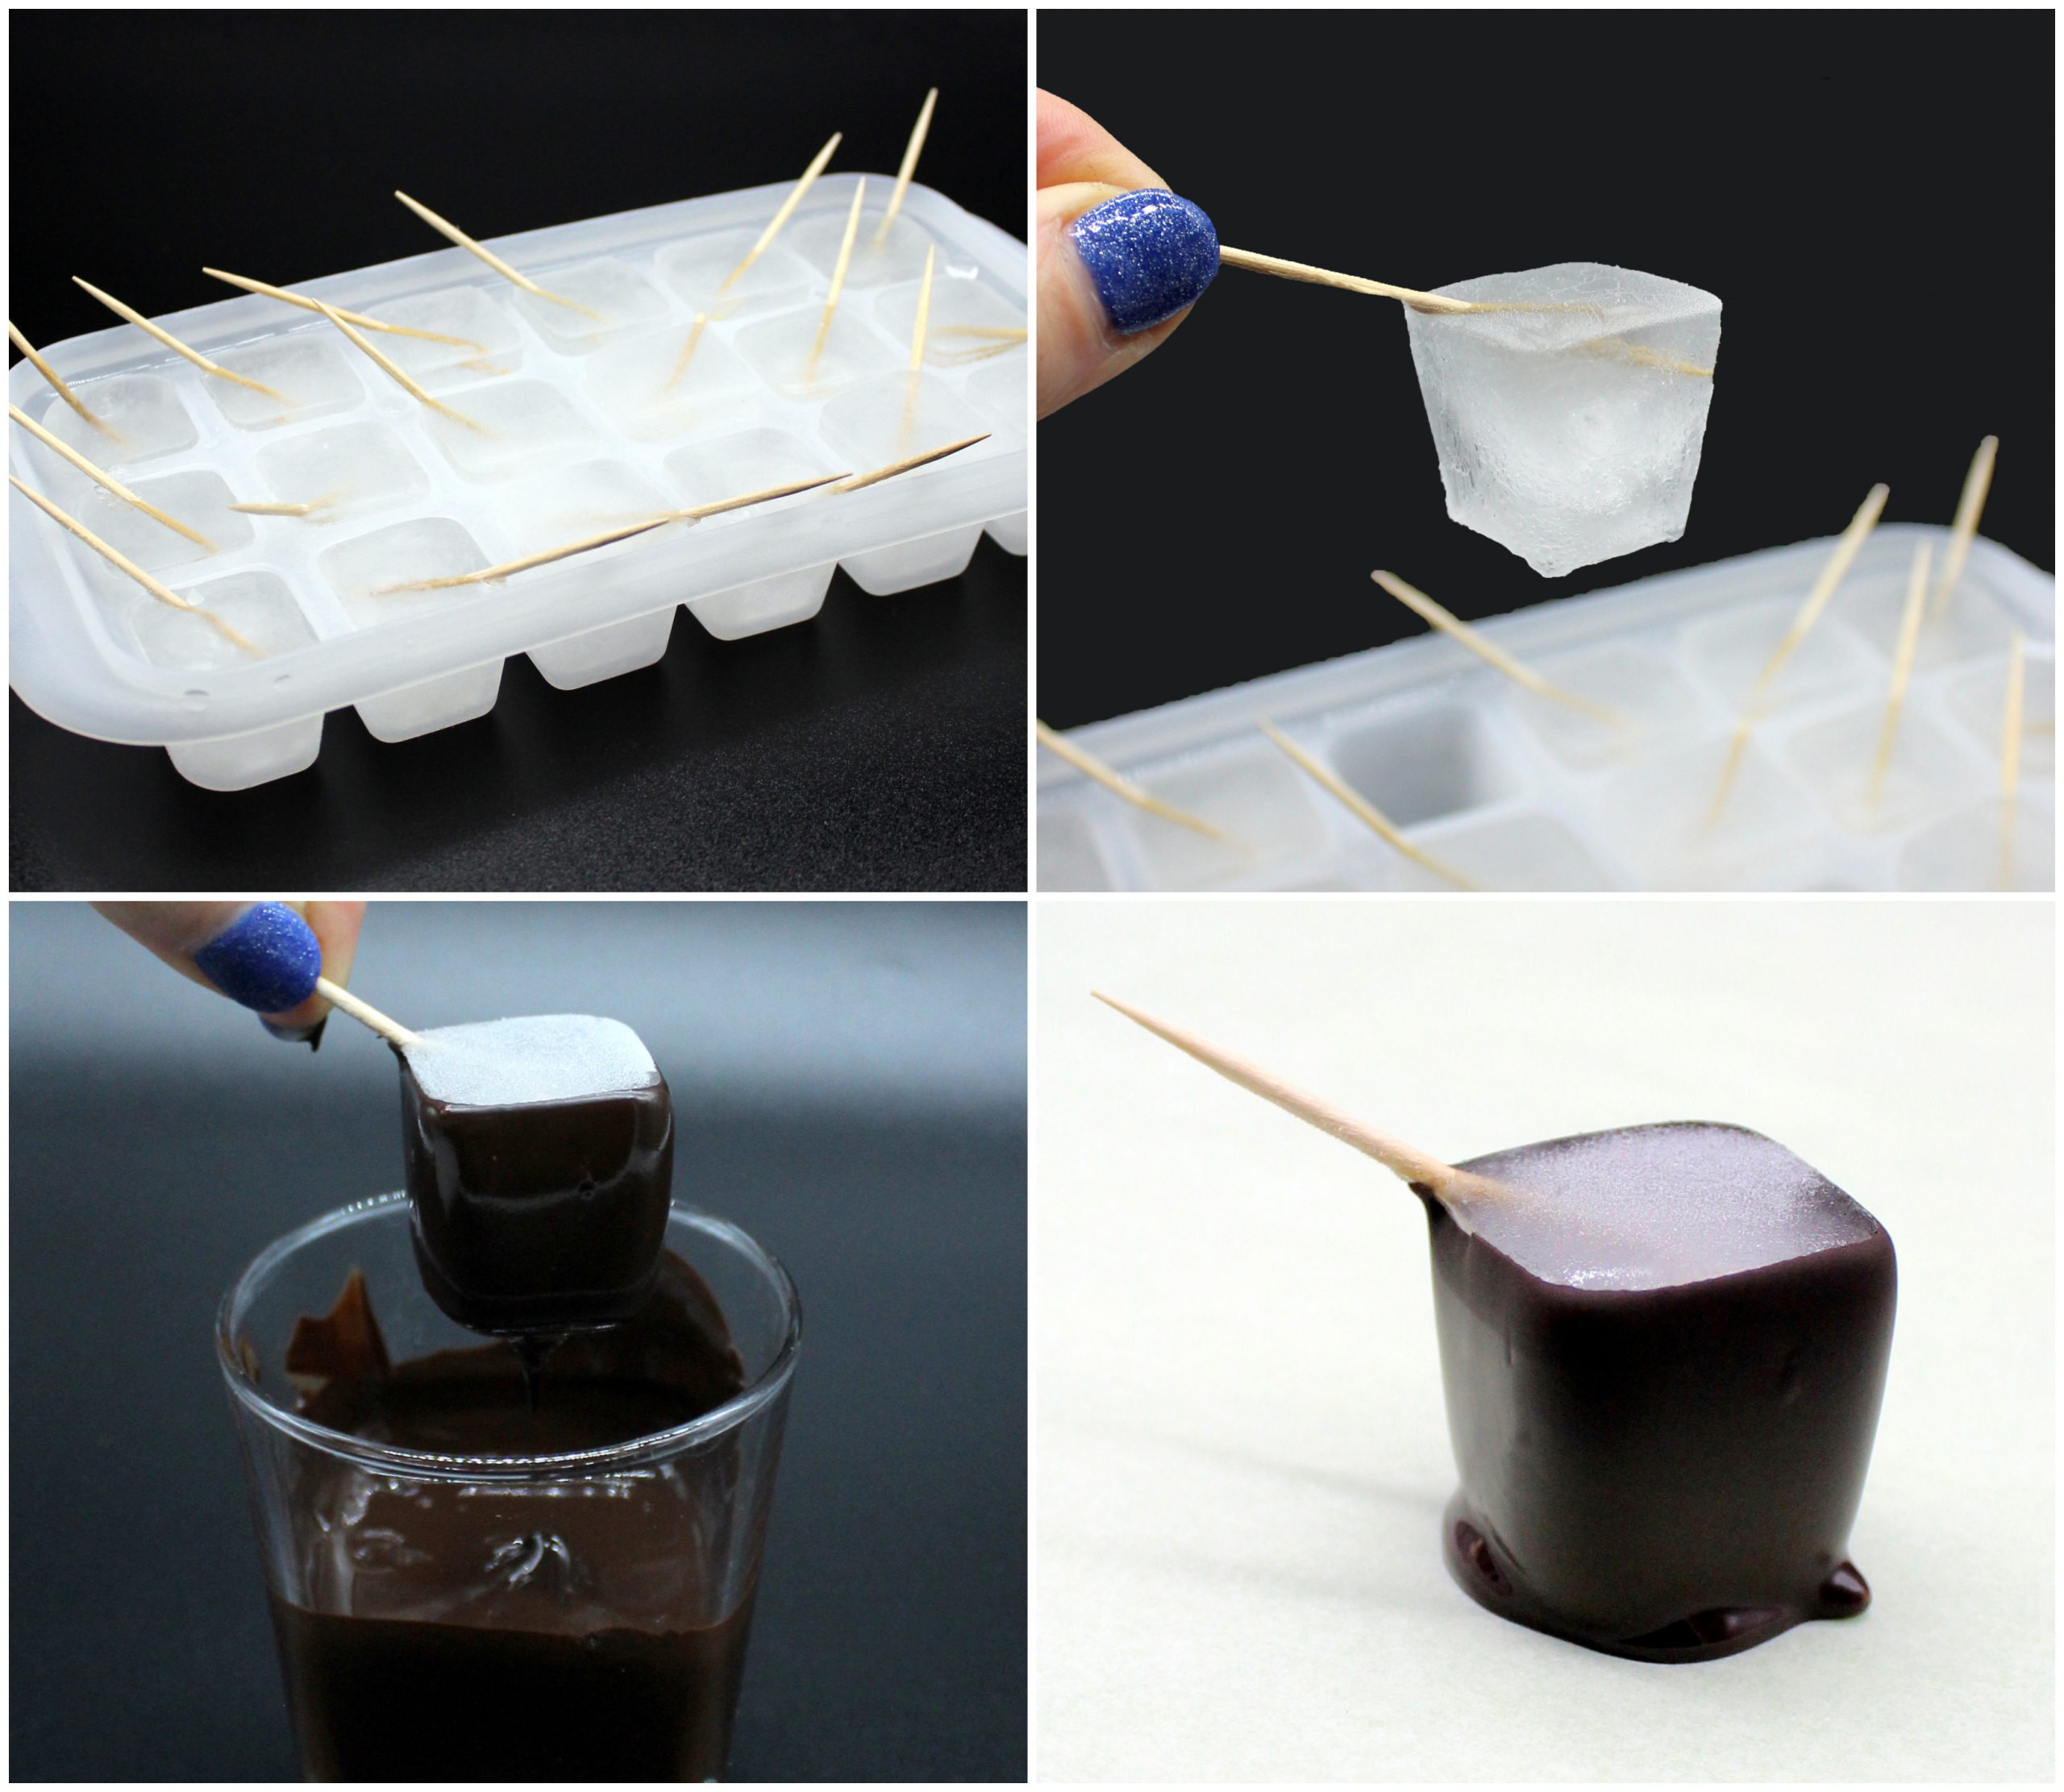
The necessary ingredients to prepare these vegan chocolate berry cups are few. You’ll need coconut cream, chocolate, water, some sweetener and berries. I used blueberries and raspberries, but you can use any other berries that you like. Two other things that you’ll definitely need for this recipe are ice cube tray and toothpicks. These two things are necessary to create the edible chocolate cups, in which you’ll then put inside the berry cream. If you don’t have toothpicks, you can use matches instead. Or anything else that once the water is frozen will serve as a holder of the ice cube, so that you can dip it in the melted chocolate. But now let’s go more in detail on how to prepare these vegan chocolate berry cups!
How to make the chocolate cups
The day before place an ice cube tray with water and a toothpick in every cube of the tray in the freezer. The next day start by melting the chocolate. I advise you not to melt all the chocolate immediately because you’ll put ice cubes in it, so it could start to become solid. Melt half of the total amount of chocolate in a tiny glass with small diameter, yet big enough to dip the ice cube in the chocolate. Once the chocolate is melted, take something with a flat surface, like a cutting board, and cover it with parchment paper. Then by holding the ice cube by the toothpick, dip it in the melted chocolate and then transfer to the parchment paper. Once you’ve finished the first half of the chocolate, put the prepared cups in the freezer. Repeat the same with the other half of the chocolate.
How to make the vegan berry cream
Once all your ice cubs with chocolate are in the freezer, it’s time to make the vegan berry cream. In a blender mix together the white solid part of the coconut cream with berries that you’ve chosen. If you want the cream to be more on the sweet side, add some sweetener of your choice. Otherwise skip the sweetener and leave the cream with its natural sweetness from the berries. Don’t overmix it to avoid that the cream becomes too liquid! Since from the mixing the cream might have become a bit warm, put it in the fridge for some minutes while you free the chocolate cups from the ice.
How to prepare the vegan chocolate berry cups
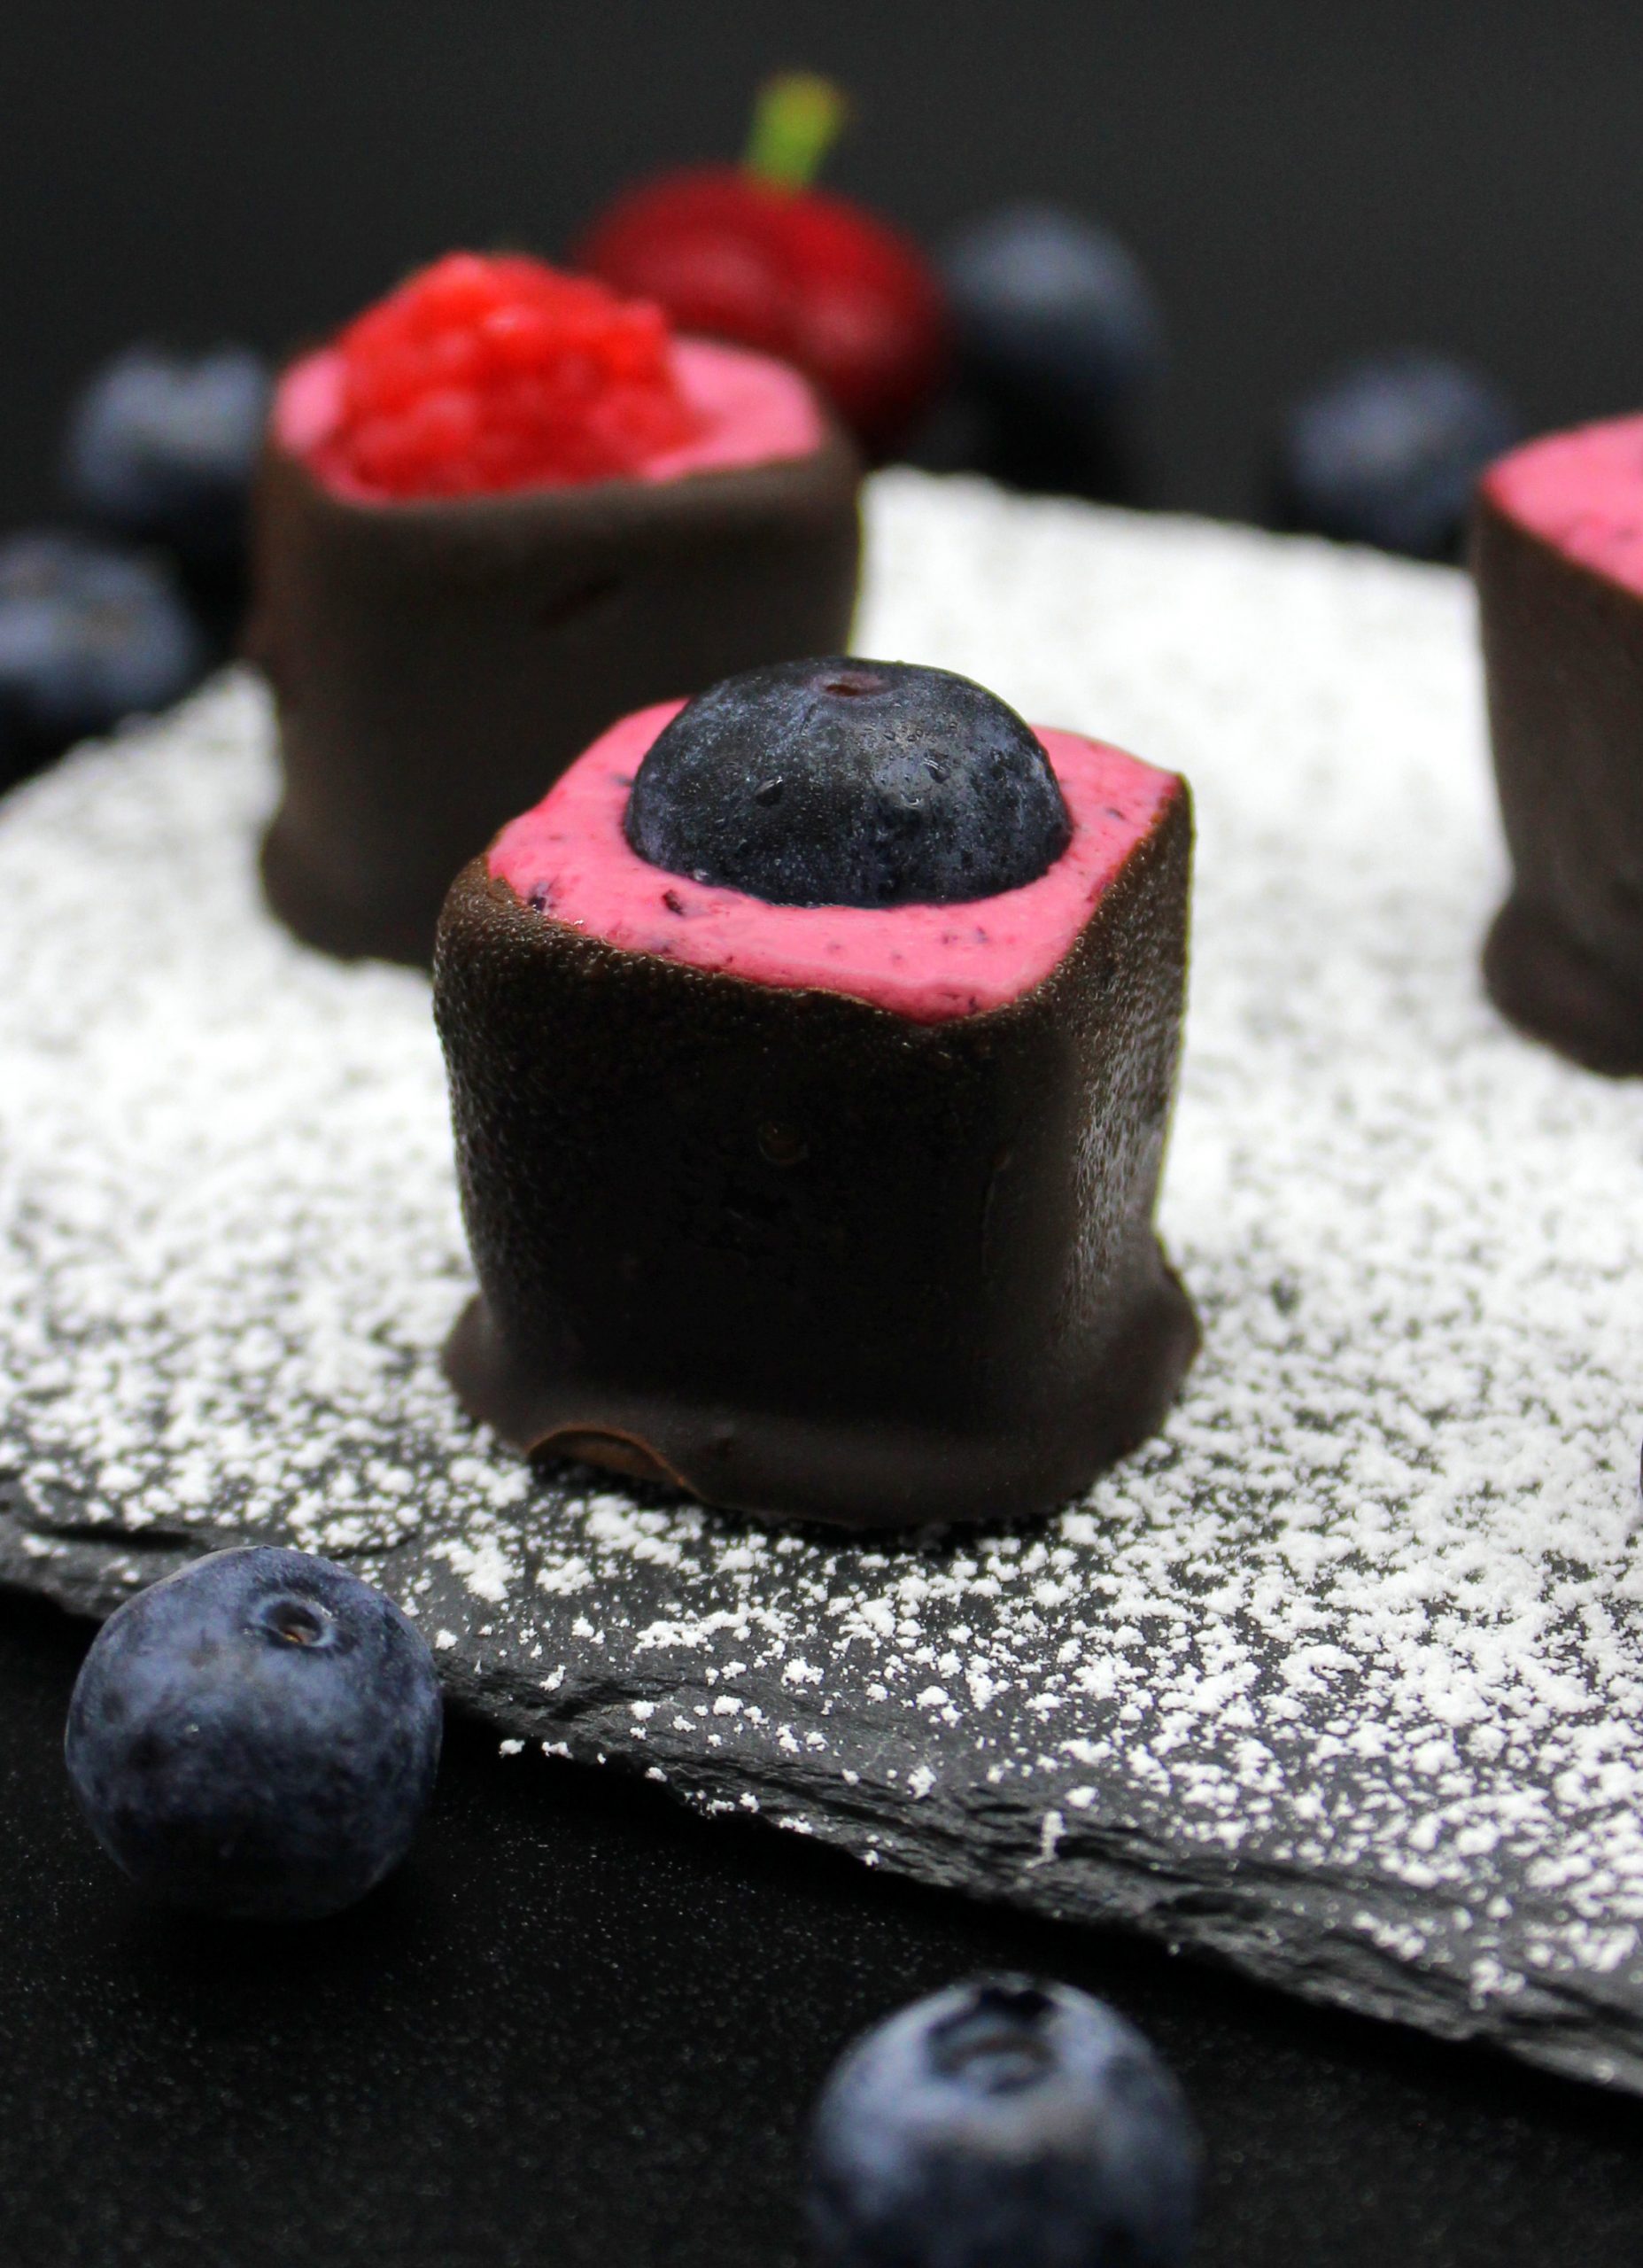
Now it’s time to check on our chocolate cups! Take them out from the freezer and pull out from each chocolate cup the ice cube. It should come out very easily, if the chocolate has hardened completely. In case there are some water drops in the chocolate cups, just turn them around for a second to let the water drop out. Once you have freed all the chocolate cups from the ice cubs, it’s time to fill them with the berry cream! Since the cups are quite tiny, I advise you to fill a pastry bag with the cream to make things easier. Fill every cup with the prepared berry cream and, if desired, place a fresh berry on top of each cup. And that’s it! Your vegan chocolate berry cups are ready!

These vegan chocolate berry cups are the perfect bite size snack for a hot summer day, so don’t hesitate to prepare them! Just remember that it’s necessary to keep them in the fridge – especially in summer! In case you are a fan of chocolate cups, I advise you in the future to try also my vegan Dalgona coffee cups! But for now, just enjoy these chocolate berry cups because they really are:
-
vegan
- juicy
- easy to make
- healthy
- bite-size
- naturally sweet
- full of vitamins
- refreshing
- and simply yummy!
Let me know, if you try this recipe! Leave a comment or even more: snap a picture of your masterpiece and post it on Instagram by tagging @vegan_bunnymommycooks or Facebook by tagging @bunnymommycooks. And feel free to let your animal family members join in the picture!
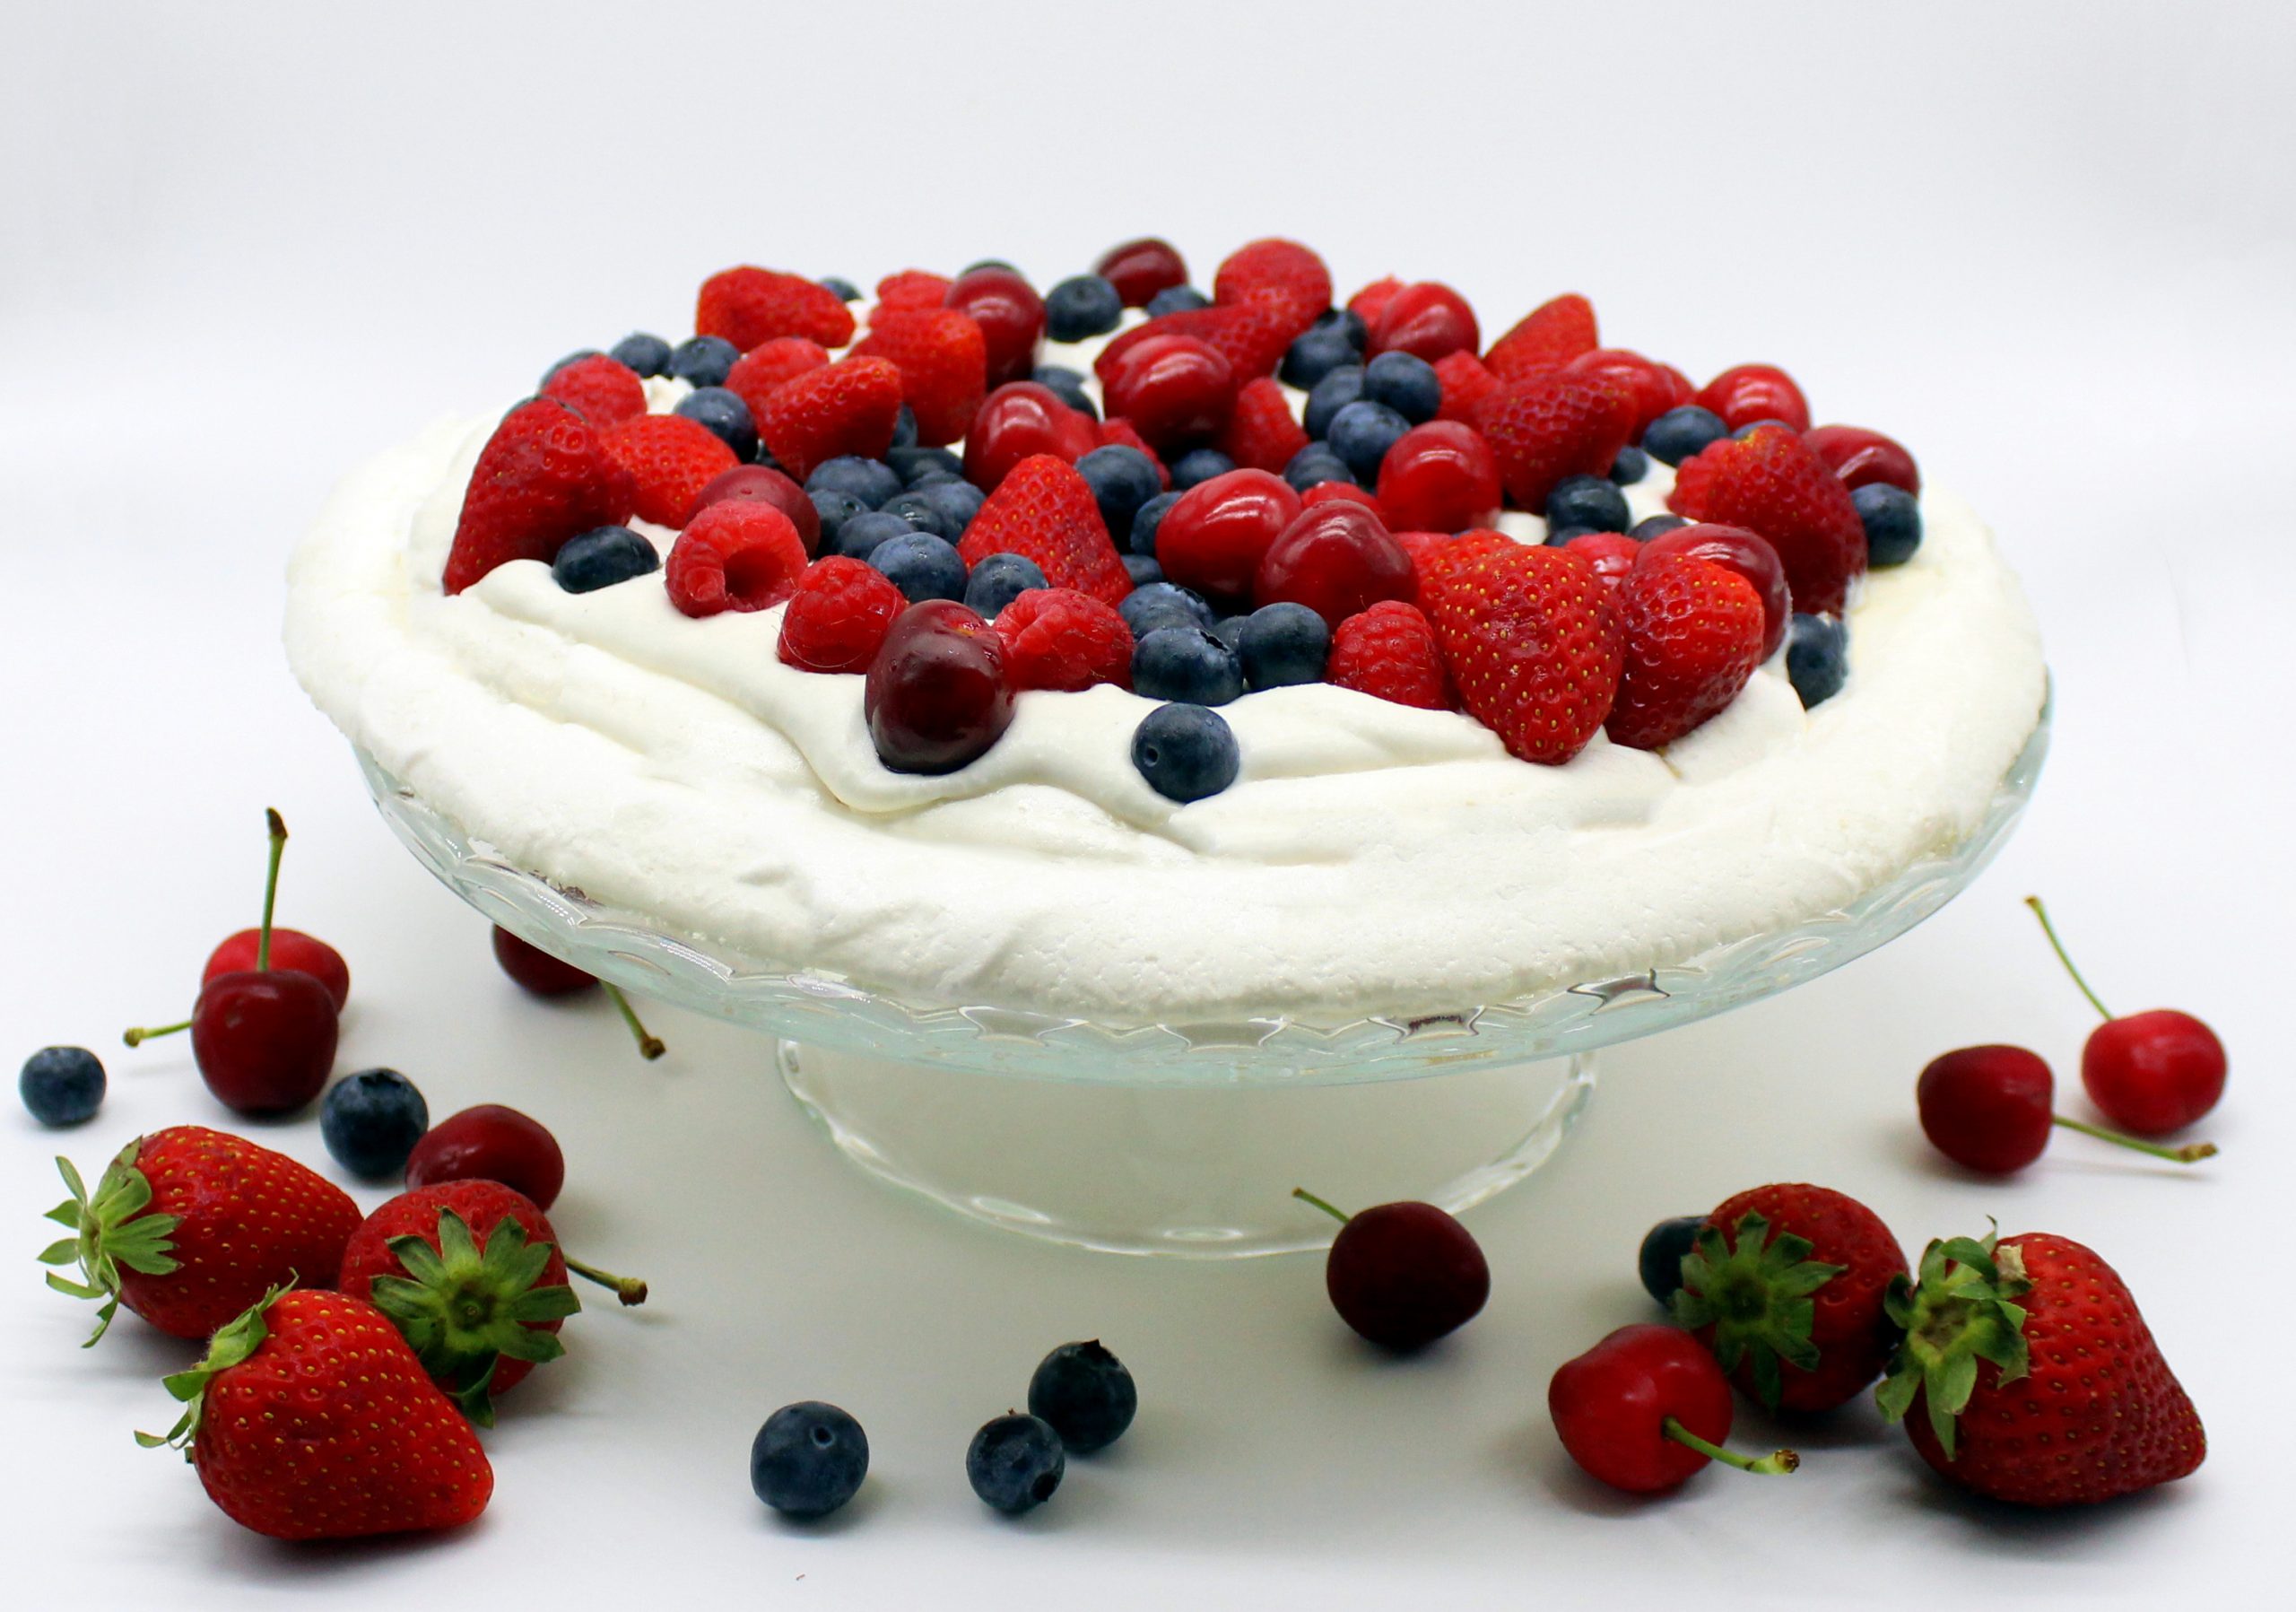
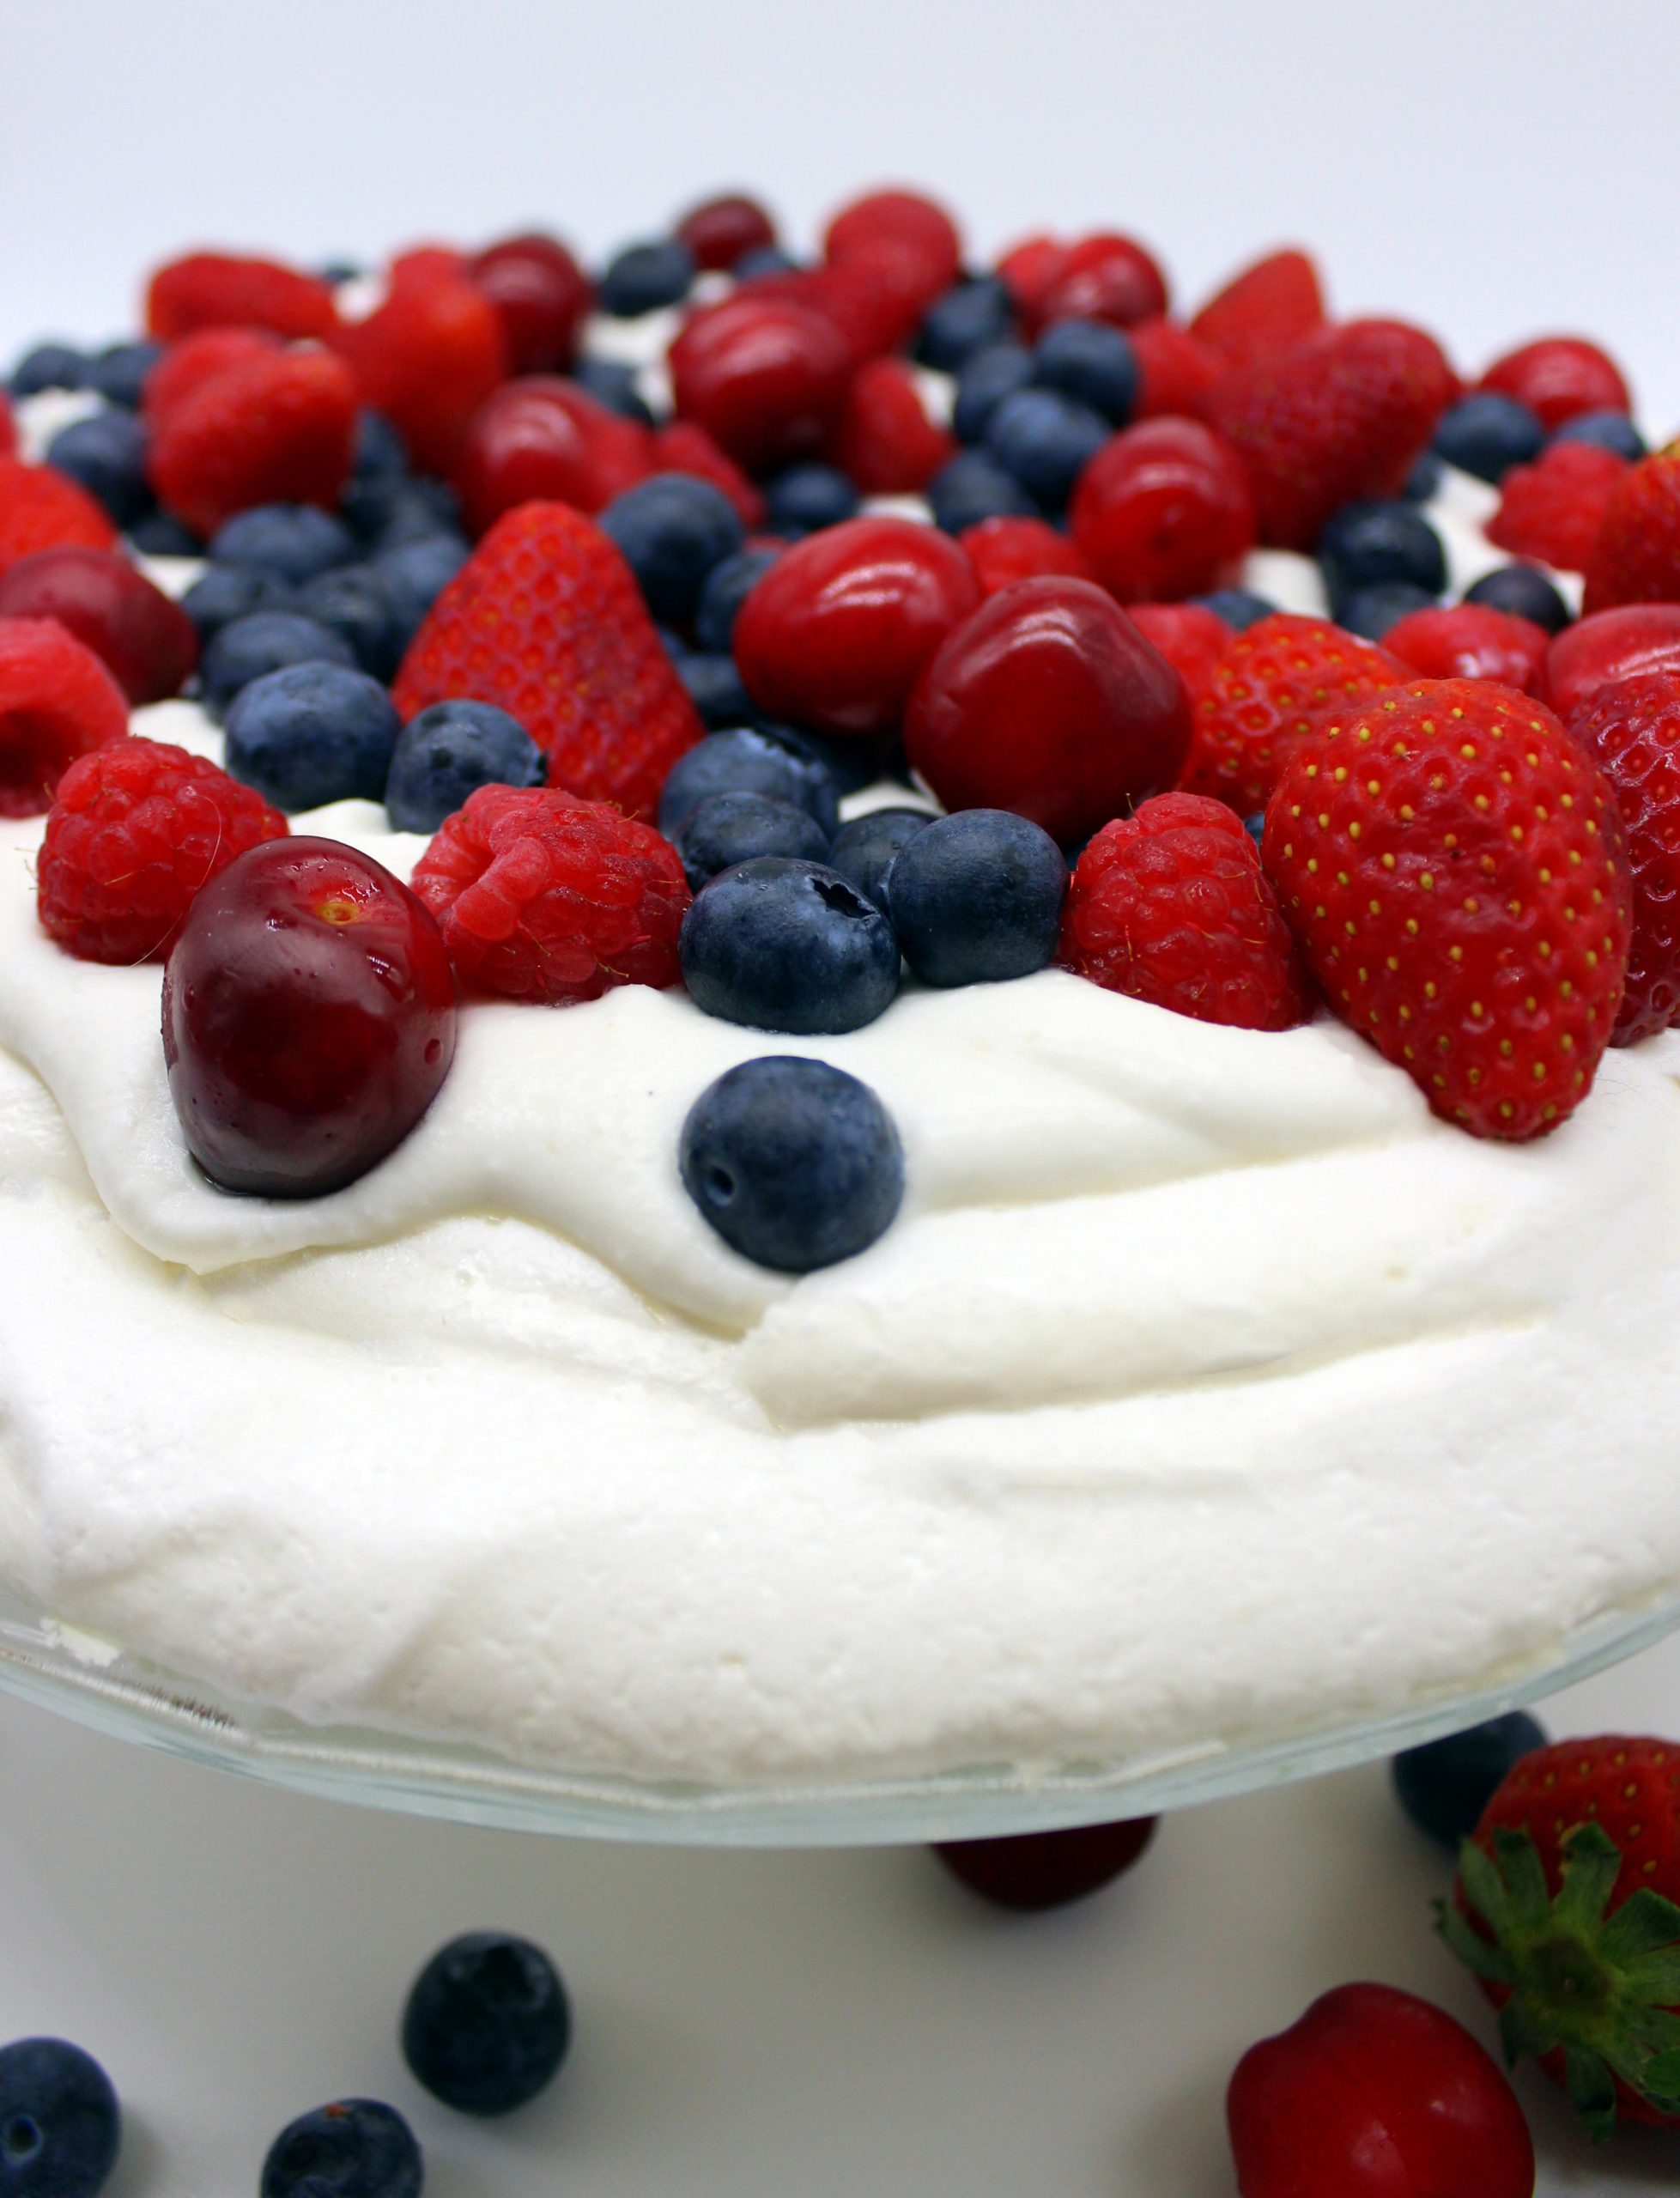
Easy vegan Pavlova cake
This recipe was posted on: 26/06/2021
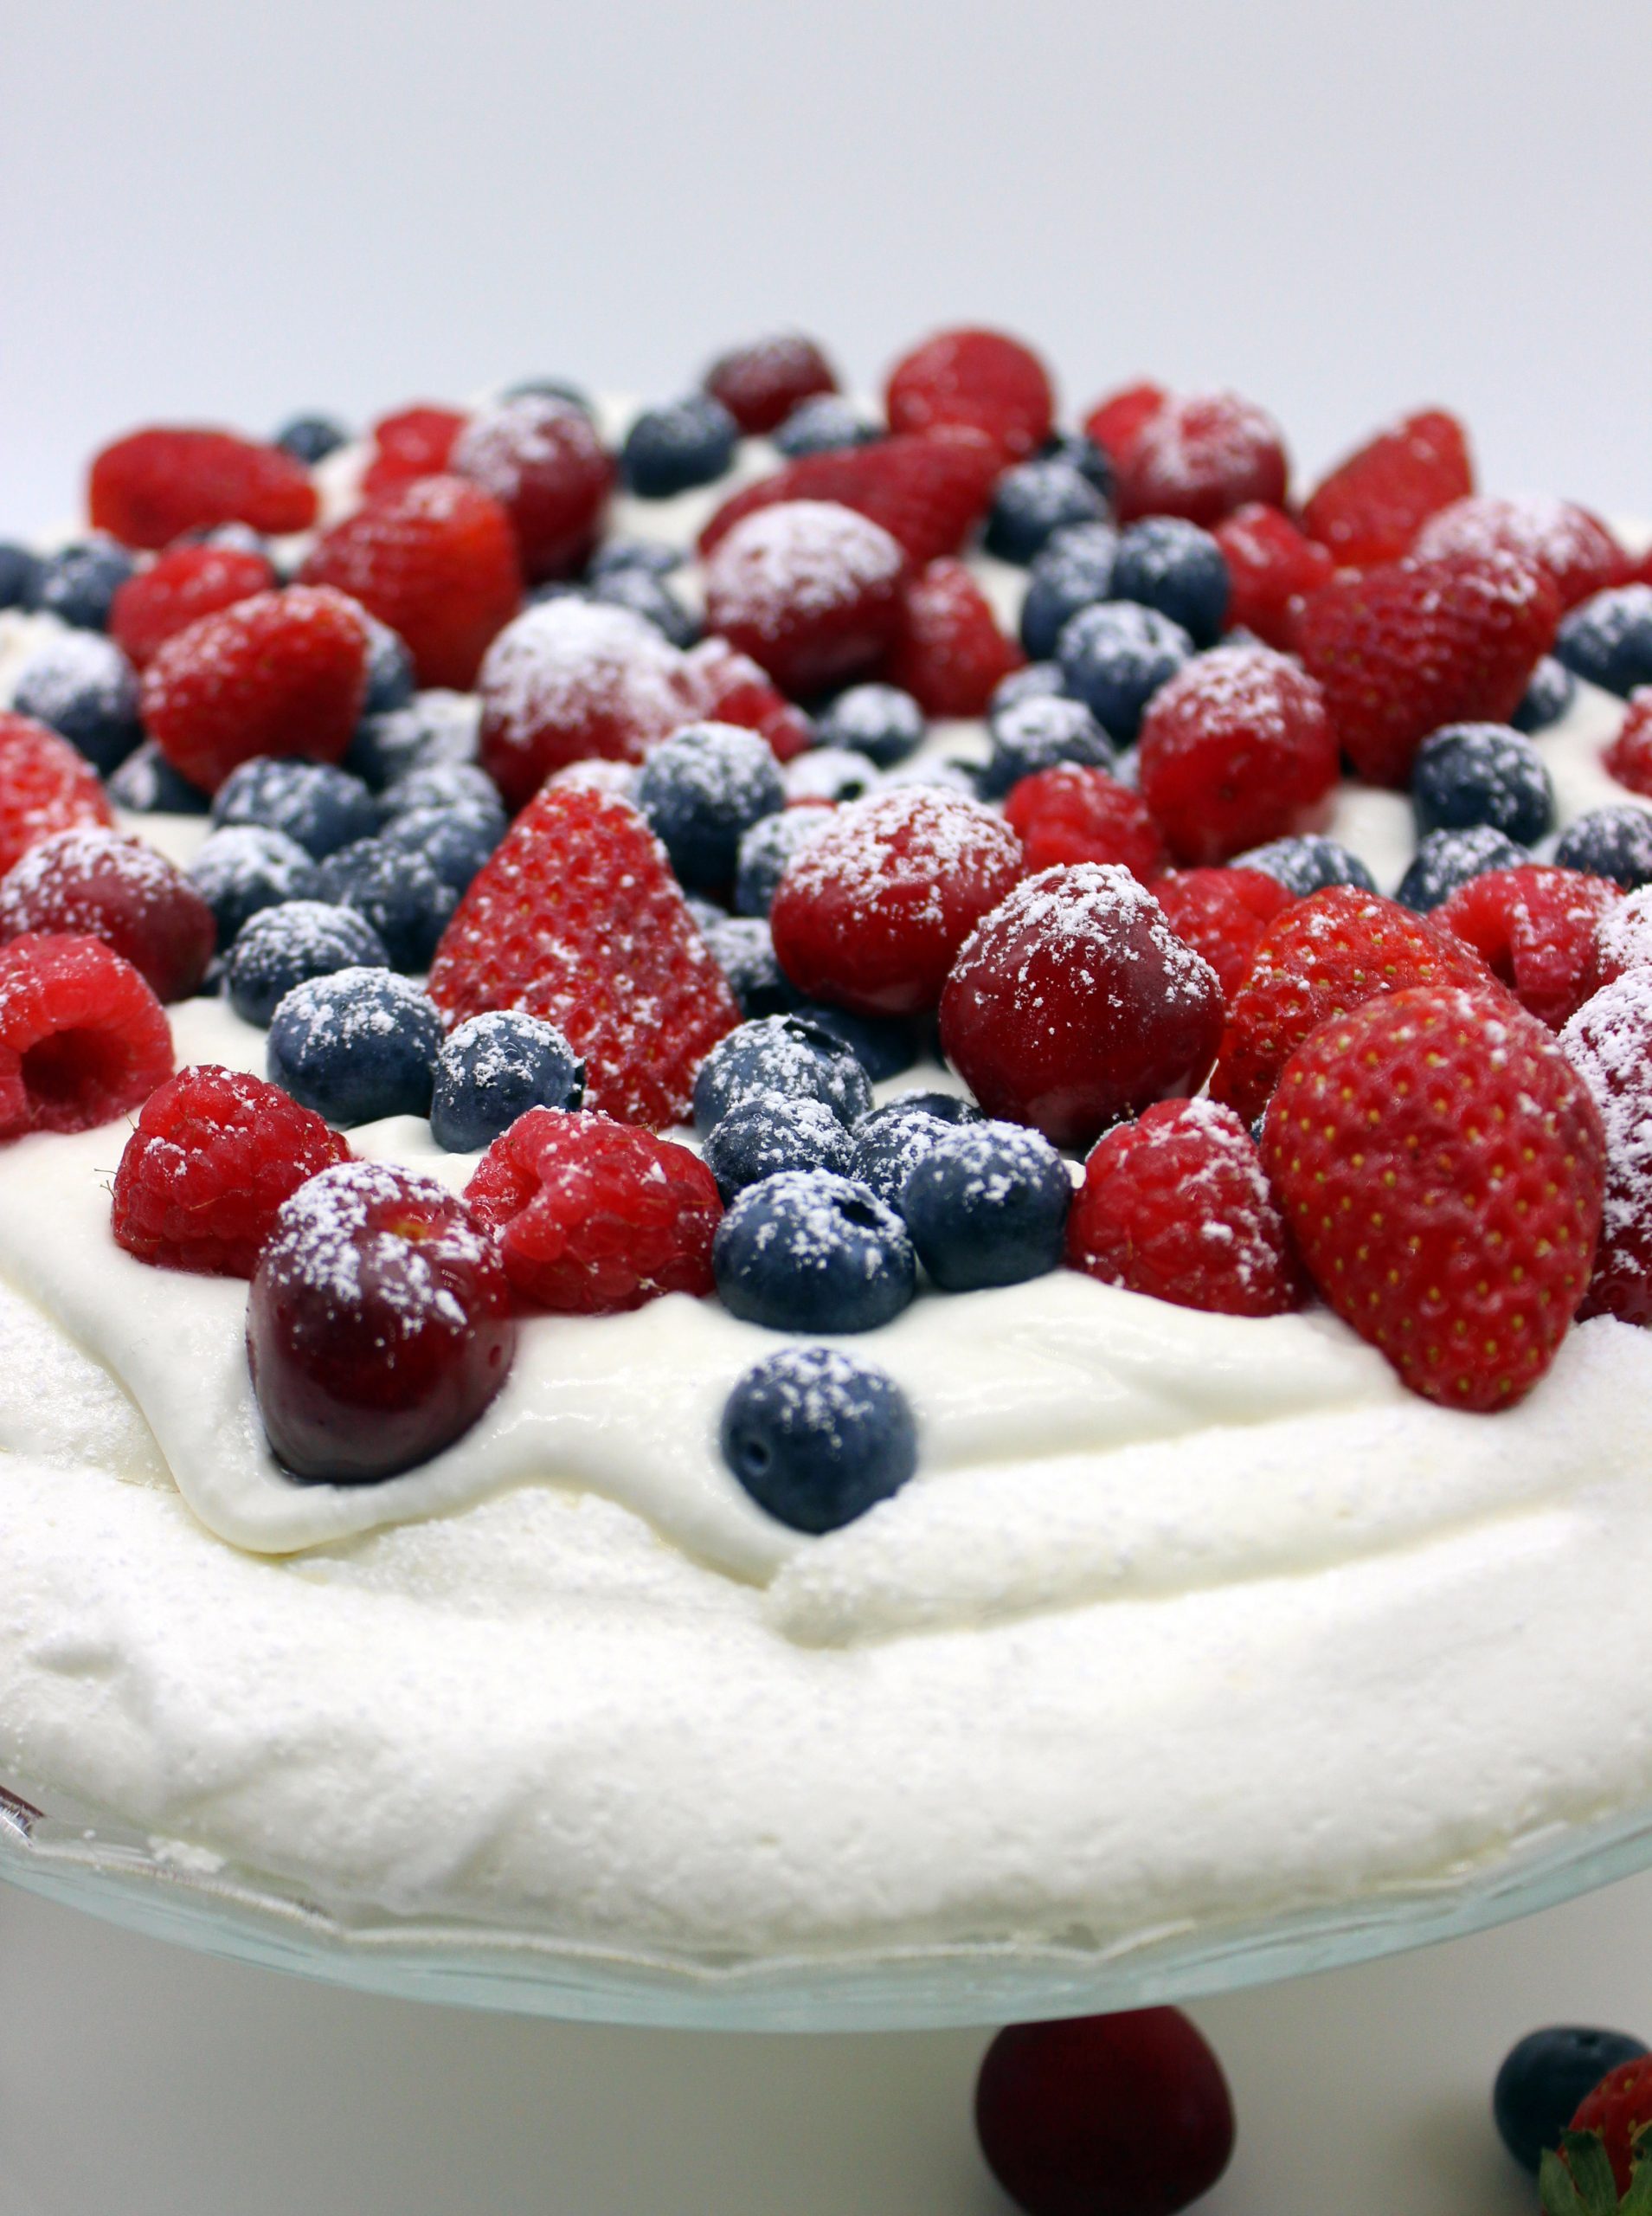
This year I feel a particular need for summer. Maybe it’s because in Italy spring has been quite cold and rainy. Or maybe it’s the worldwide pandemic that makes us all stay at home. Anyway, no matter what’s the reason, I’m longing for light clothing, bright sun, fresh air and blue sky with some big white puffy clouds. Unfortunately, no one of us can change the weather. But we can change our menu! And that means that we can create something light and fresh in our plate. Something that looks like a puffy white cloud and tastes like summer. What am I talking about? – My easy vegan Pavlova cake, of course!
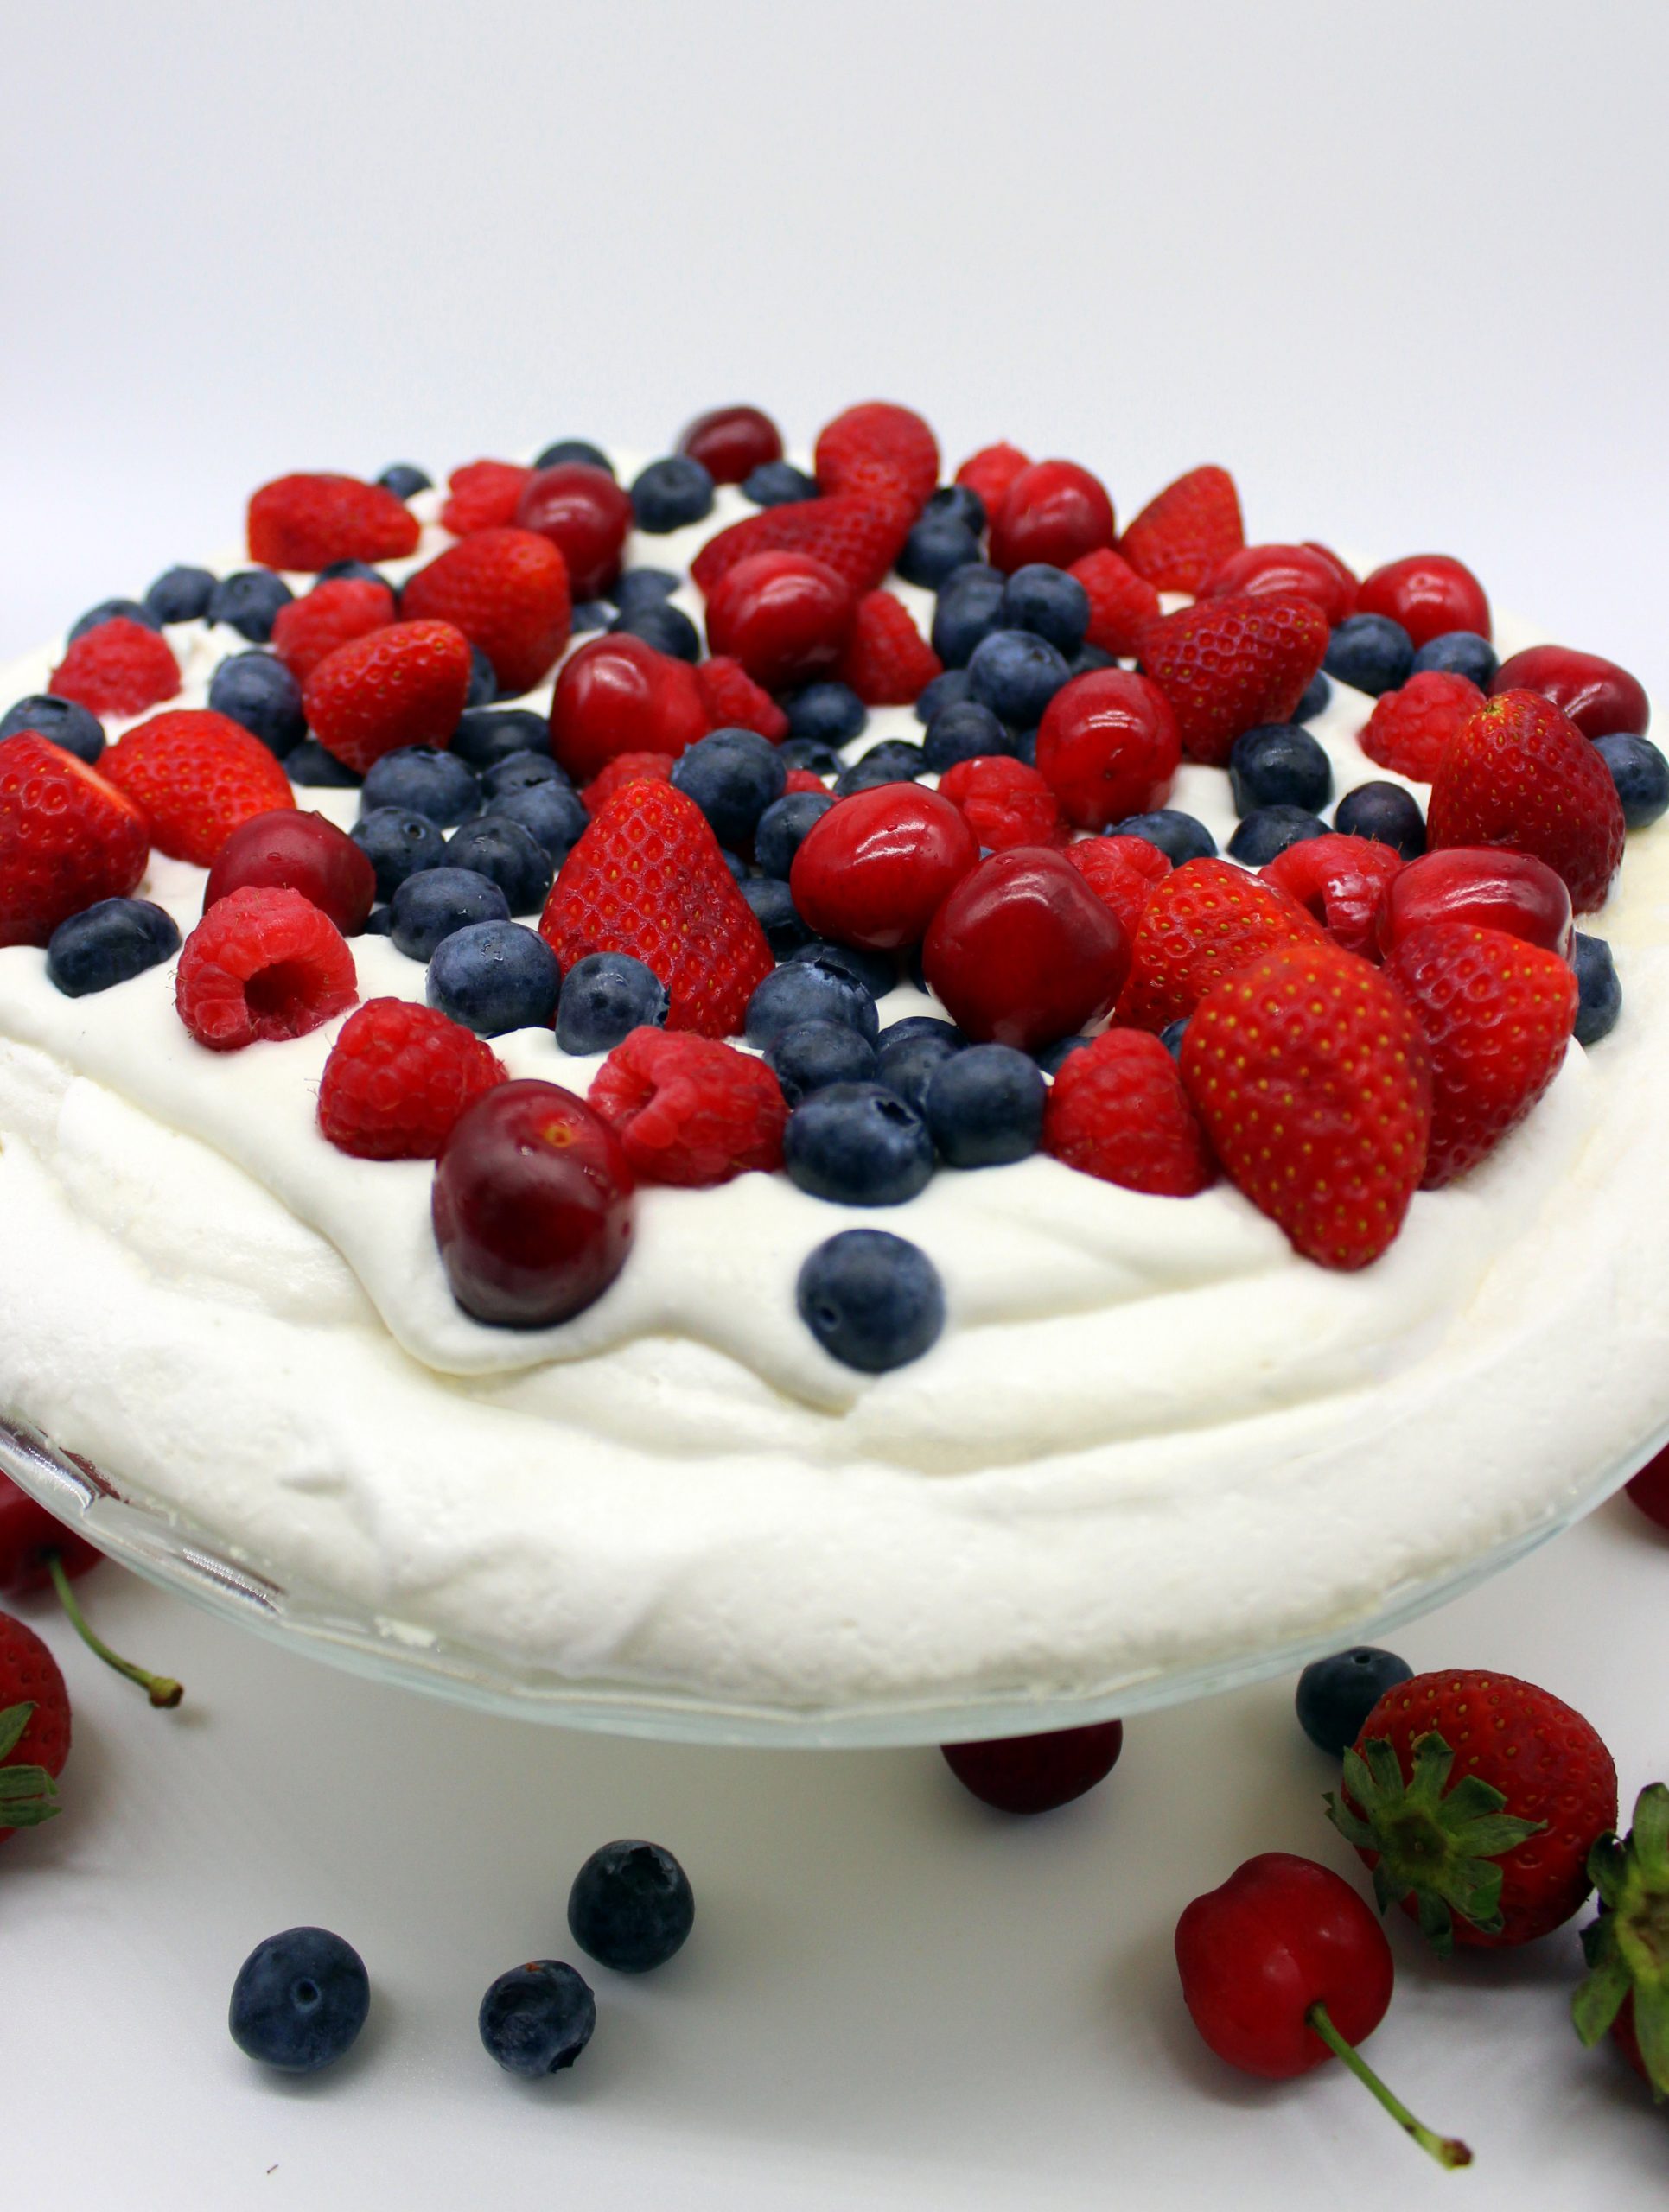
For those of you who don’t know, Pavlova is a meringue-based dessert named after the Russian ballerina Anna Pavlova. While those of you, who know what Pavlova is, might ask: how is it possible to make it vegan, if meringue is made of beaten egg whites? You also might be worried that this is one of the many vegan recipes online, for which you need to spend a fortune in a specific vegan food shop to buy some strange ingredients. Well, I have good news for you! – Most probably all the necessary ingredients you already have at home! Or, if you don’t, they can be easily found in almost any food store. And they are all cheap!
Useful tips for preparing easy vegan Pavlova cake
If you follow all the steps precisely, the outcome most probably will be perfect. But in general, when it comes to vegan meringue, there’s always a possibility that it doesn’t come out exactly as it should. One of the culprits could be your oven. Since the correct baking temperature for vegan Pavlova is crucial, keep in mind that the result is not guaranteed to be perfect the first time you make it. If you prefer to train yourself, I advise you to first make my vegan meringue cookies. With them you’ll understand if the baking temperature of your oven matches the temperature that you’ve set. And you’ll also learn how to work with aquafaba – the main ingredient of this easy vegan Pavlova cake.
Aquafaba is the liquid from cooked or canned chickpeas. I used aquafaba from canned chickpeas. Of course, it contains some salt, but you won’t feel its flavor. If you want to avoid salt completely, make your own aquafaba by boiling soaked dry chickpeas and then reducing the liquid to the consistency that resembles raw egg whites. It takes some time, but in such a way you’ll skip the added salt. On the internet you can find many advices on how to make your own aquafaba. But I repeat – you can easily use the brine from canned chickpeas to obtain an equally delicious result! Another important thing – all the utensils and the bowl, in which you’ll whip the aquafaba, must be completely clean! There cannot be any greasy residue, otherwise you won’t be able to whip it.
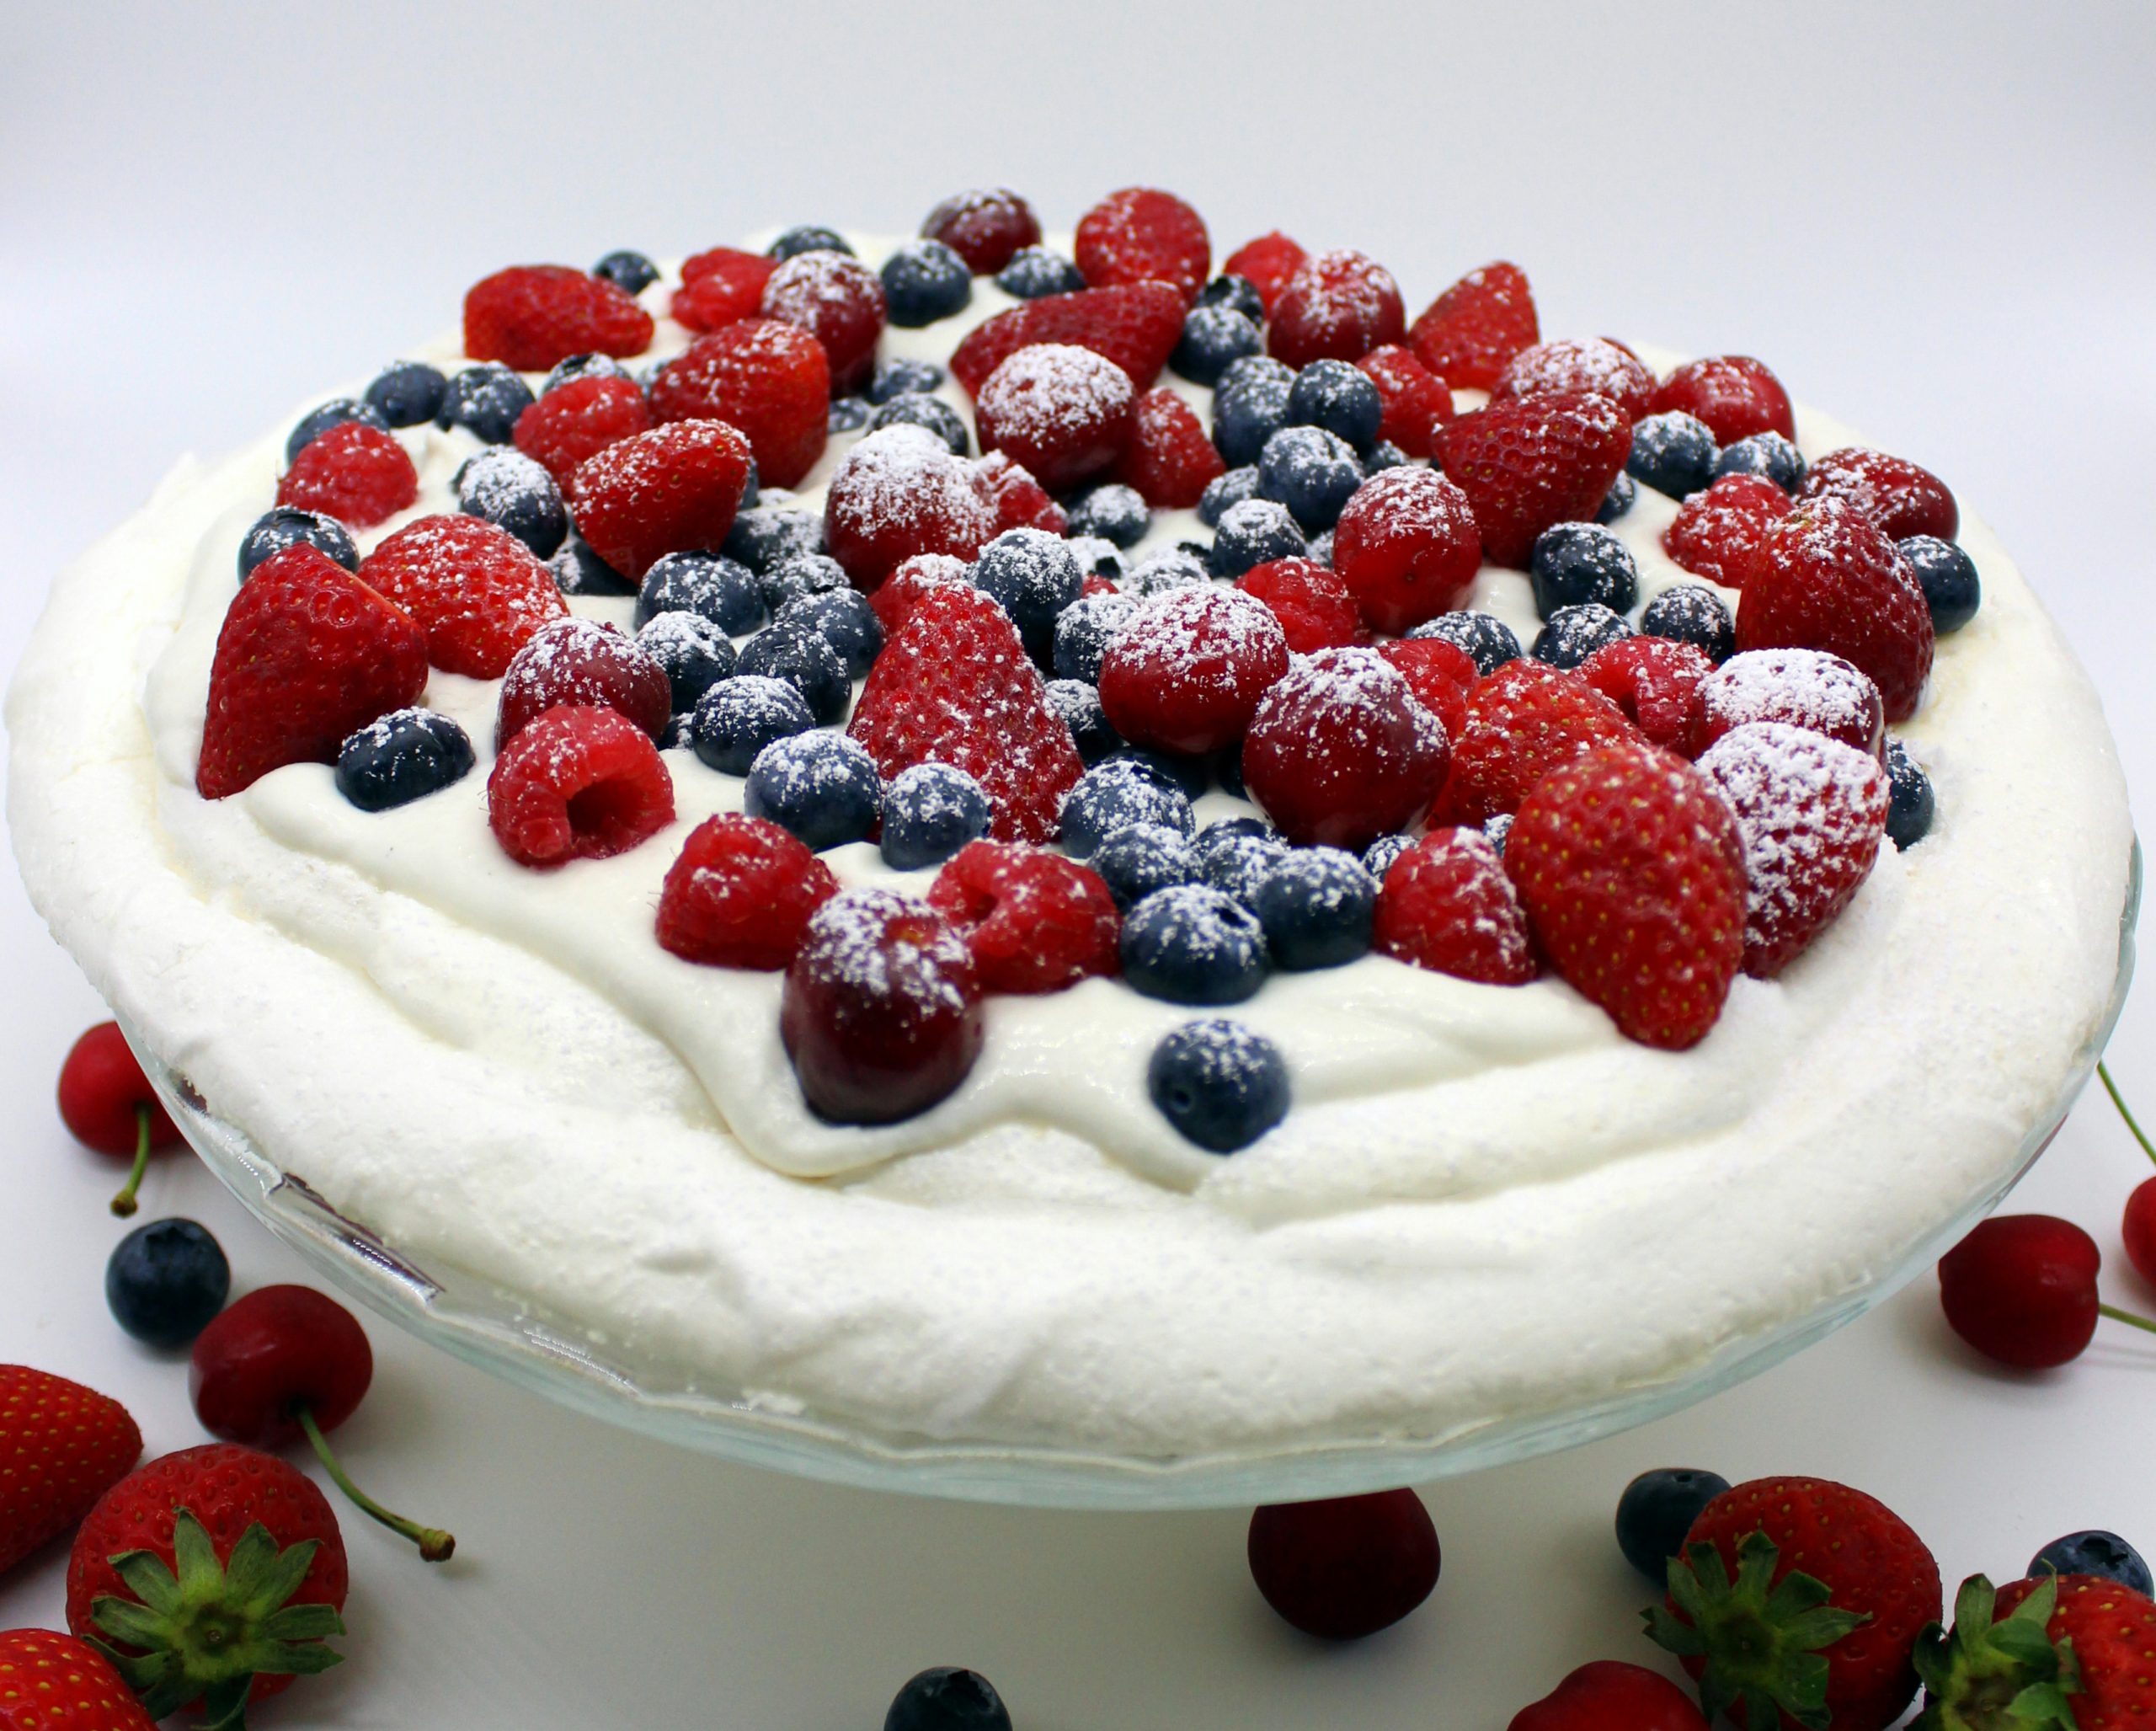
Even though it might be a bit tricky to make this easy vegan Pavlova cake the first time, I’m sure that you won’t regret trying this recipe, because it really is:
-
vegan
- refreshing
- fluffy
- creamy
- sweet
- juicy
- silky smooth
- cloud-like
- gluten-free
- egg-free
- and simply yummy!
Let me know, if you try this recipe! Leave a comment or even more: snap a picture of your masterpiece and post it on Instagram by tagging @vegan_bunnymommycooks or Facebook by tagging @bunnymommycooks. And feel free to let your animal family members join in the picture!
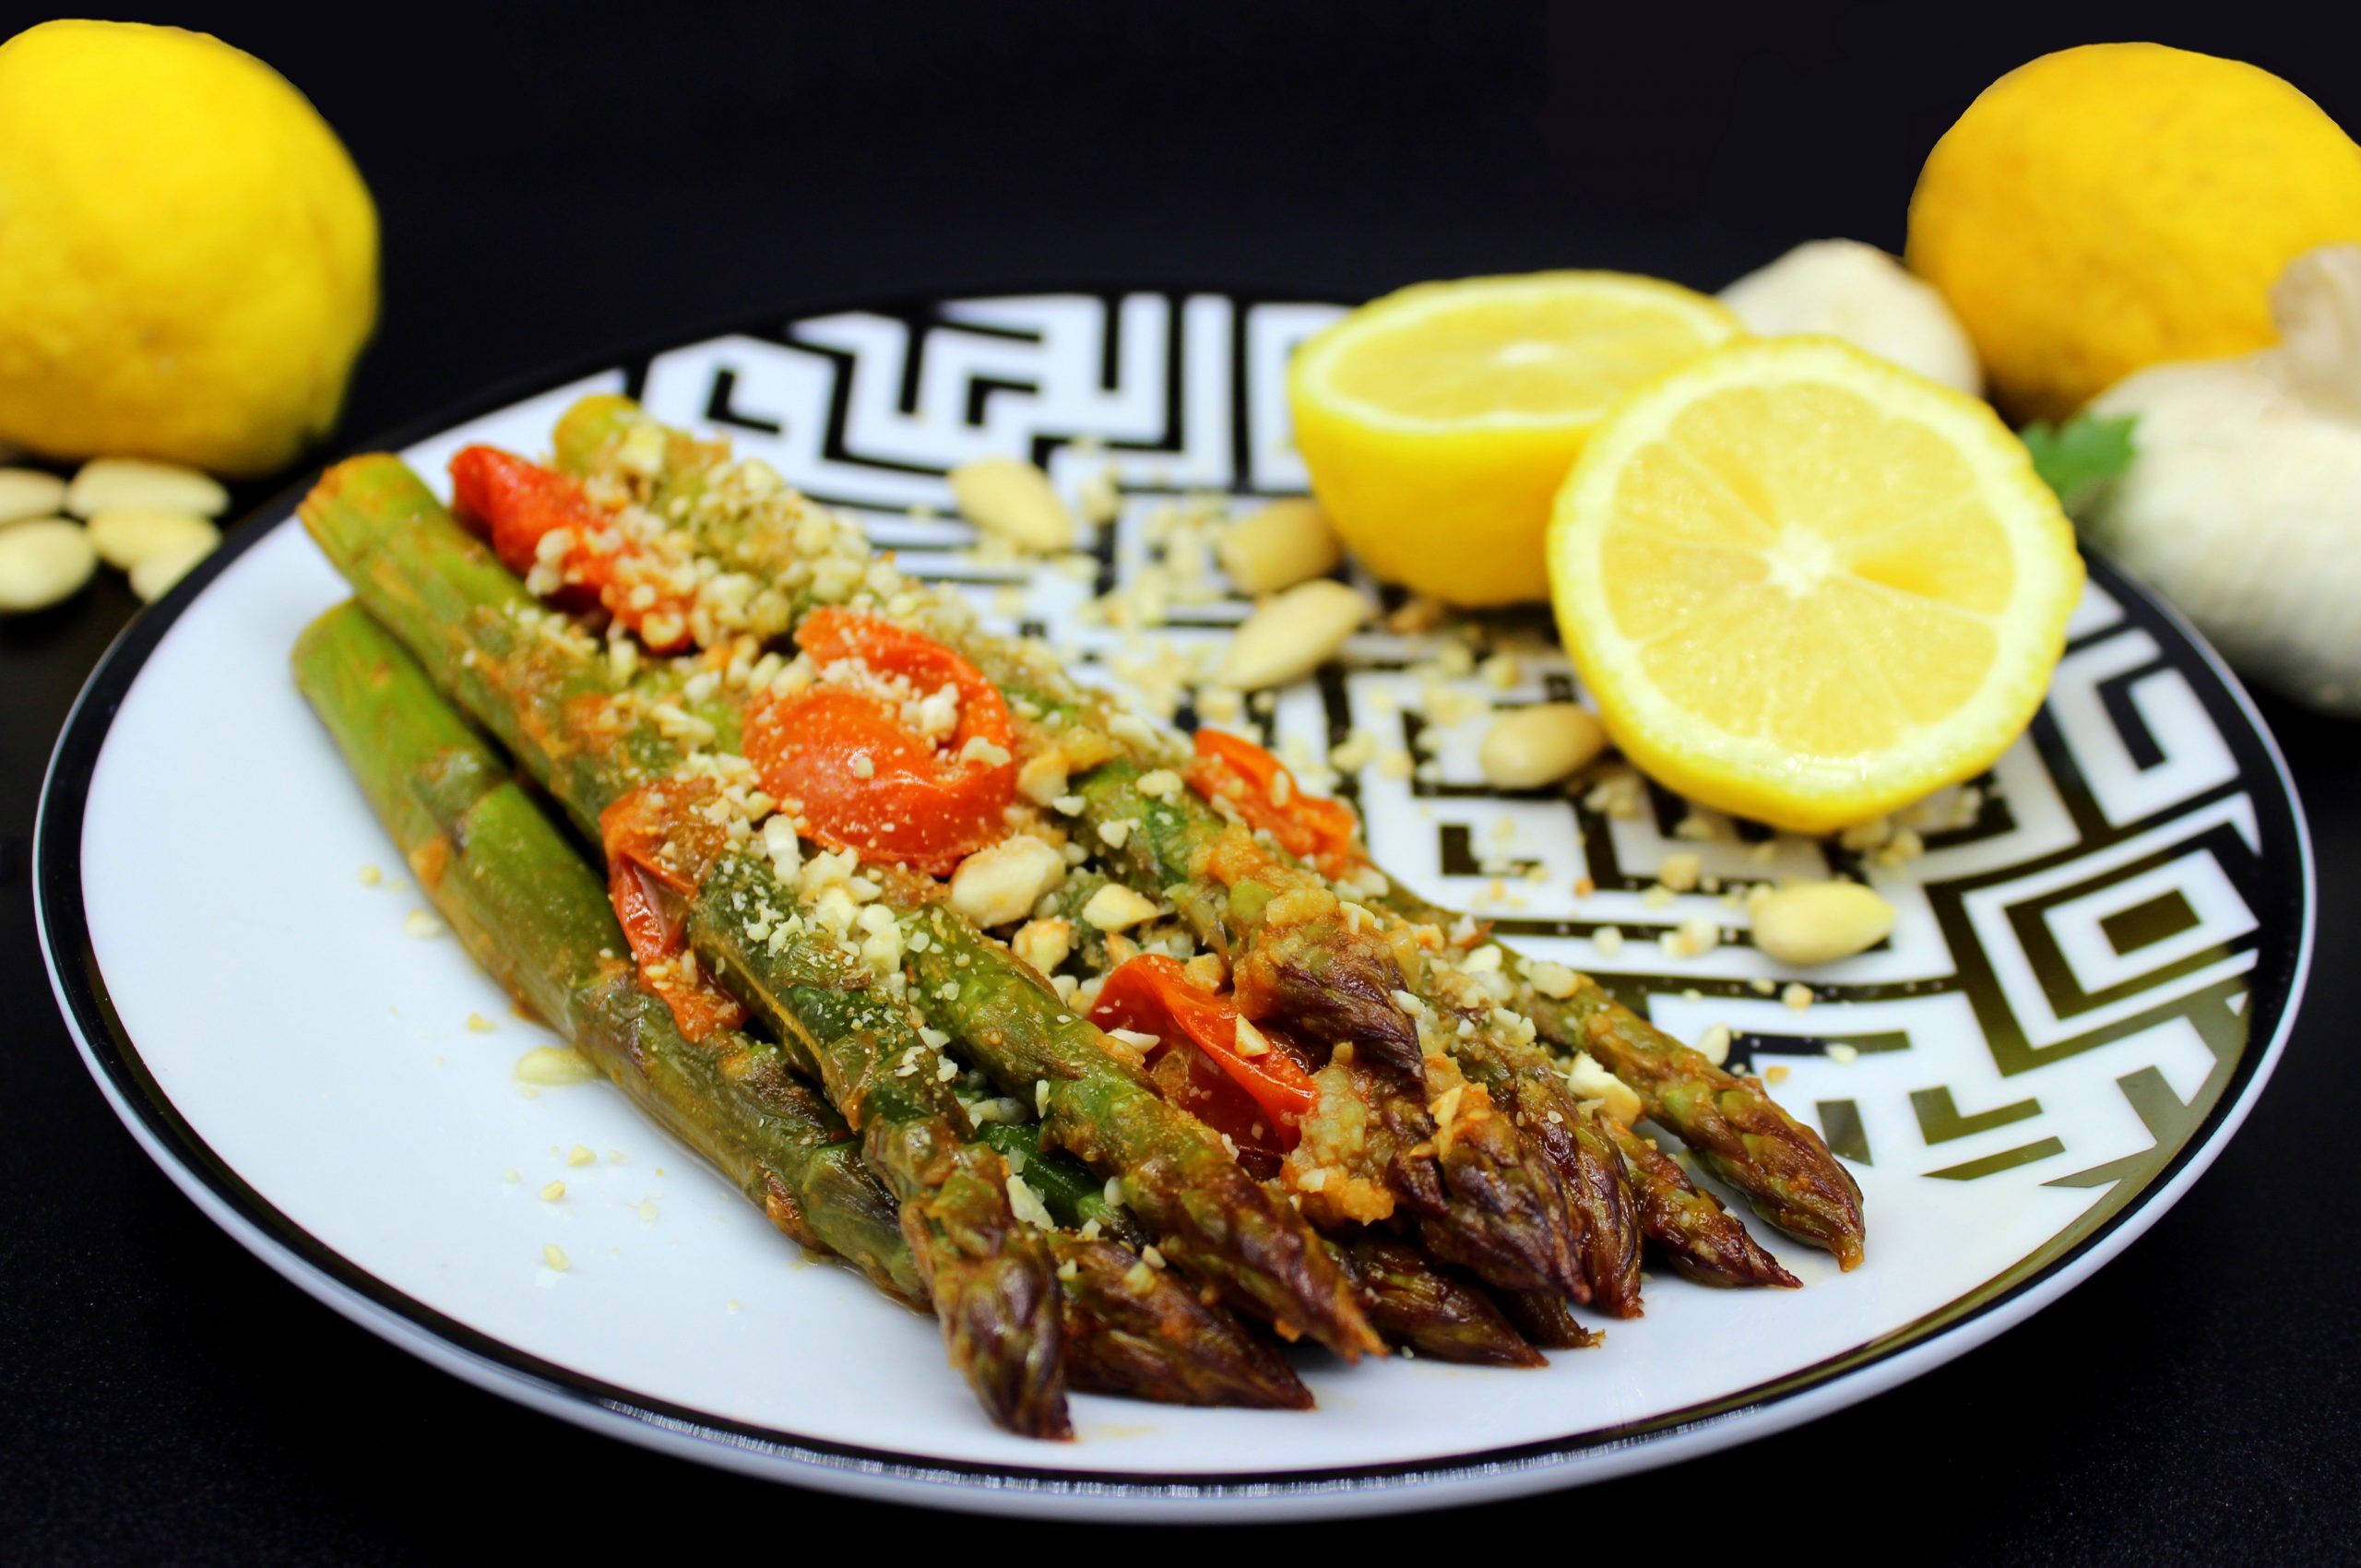
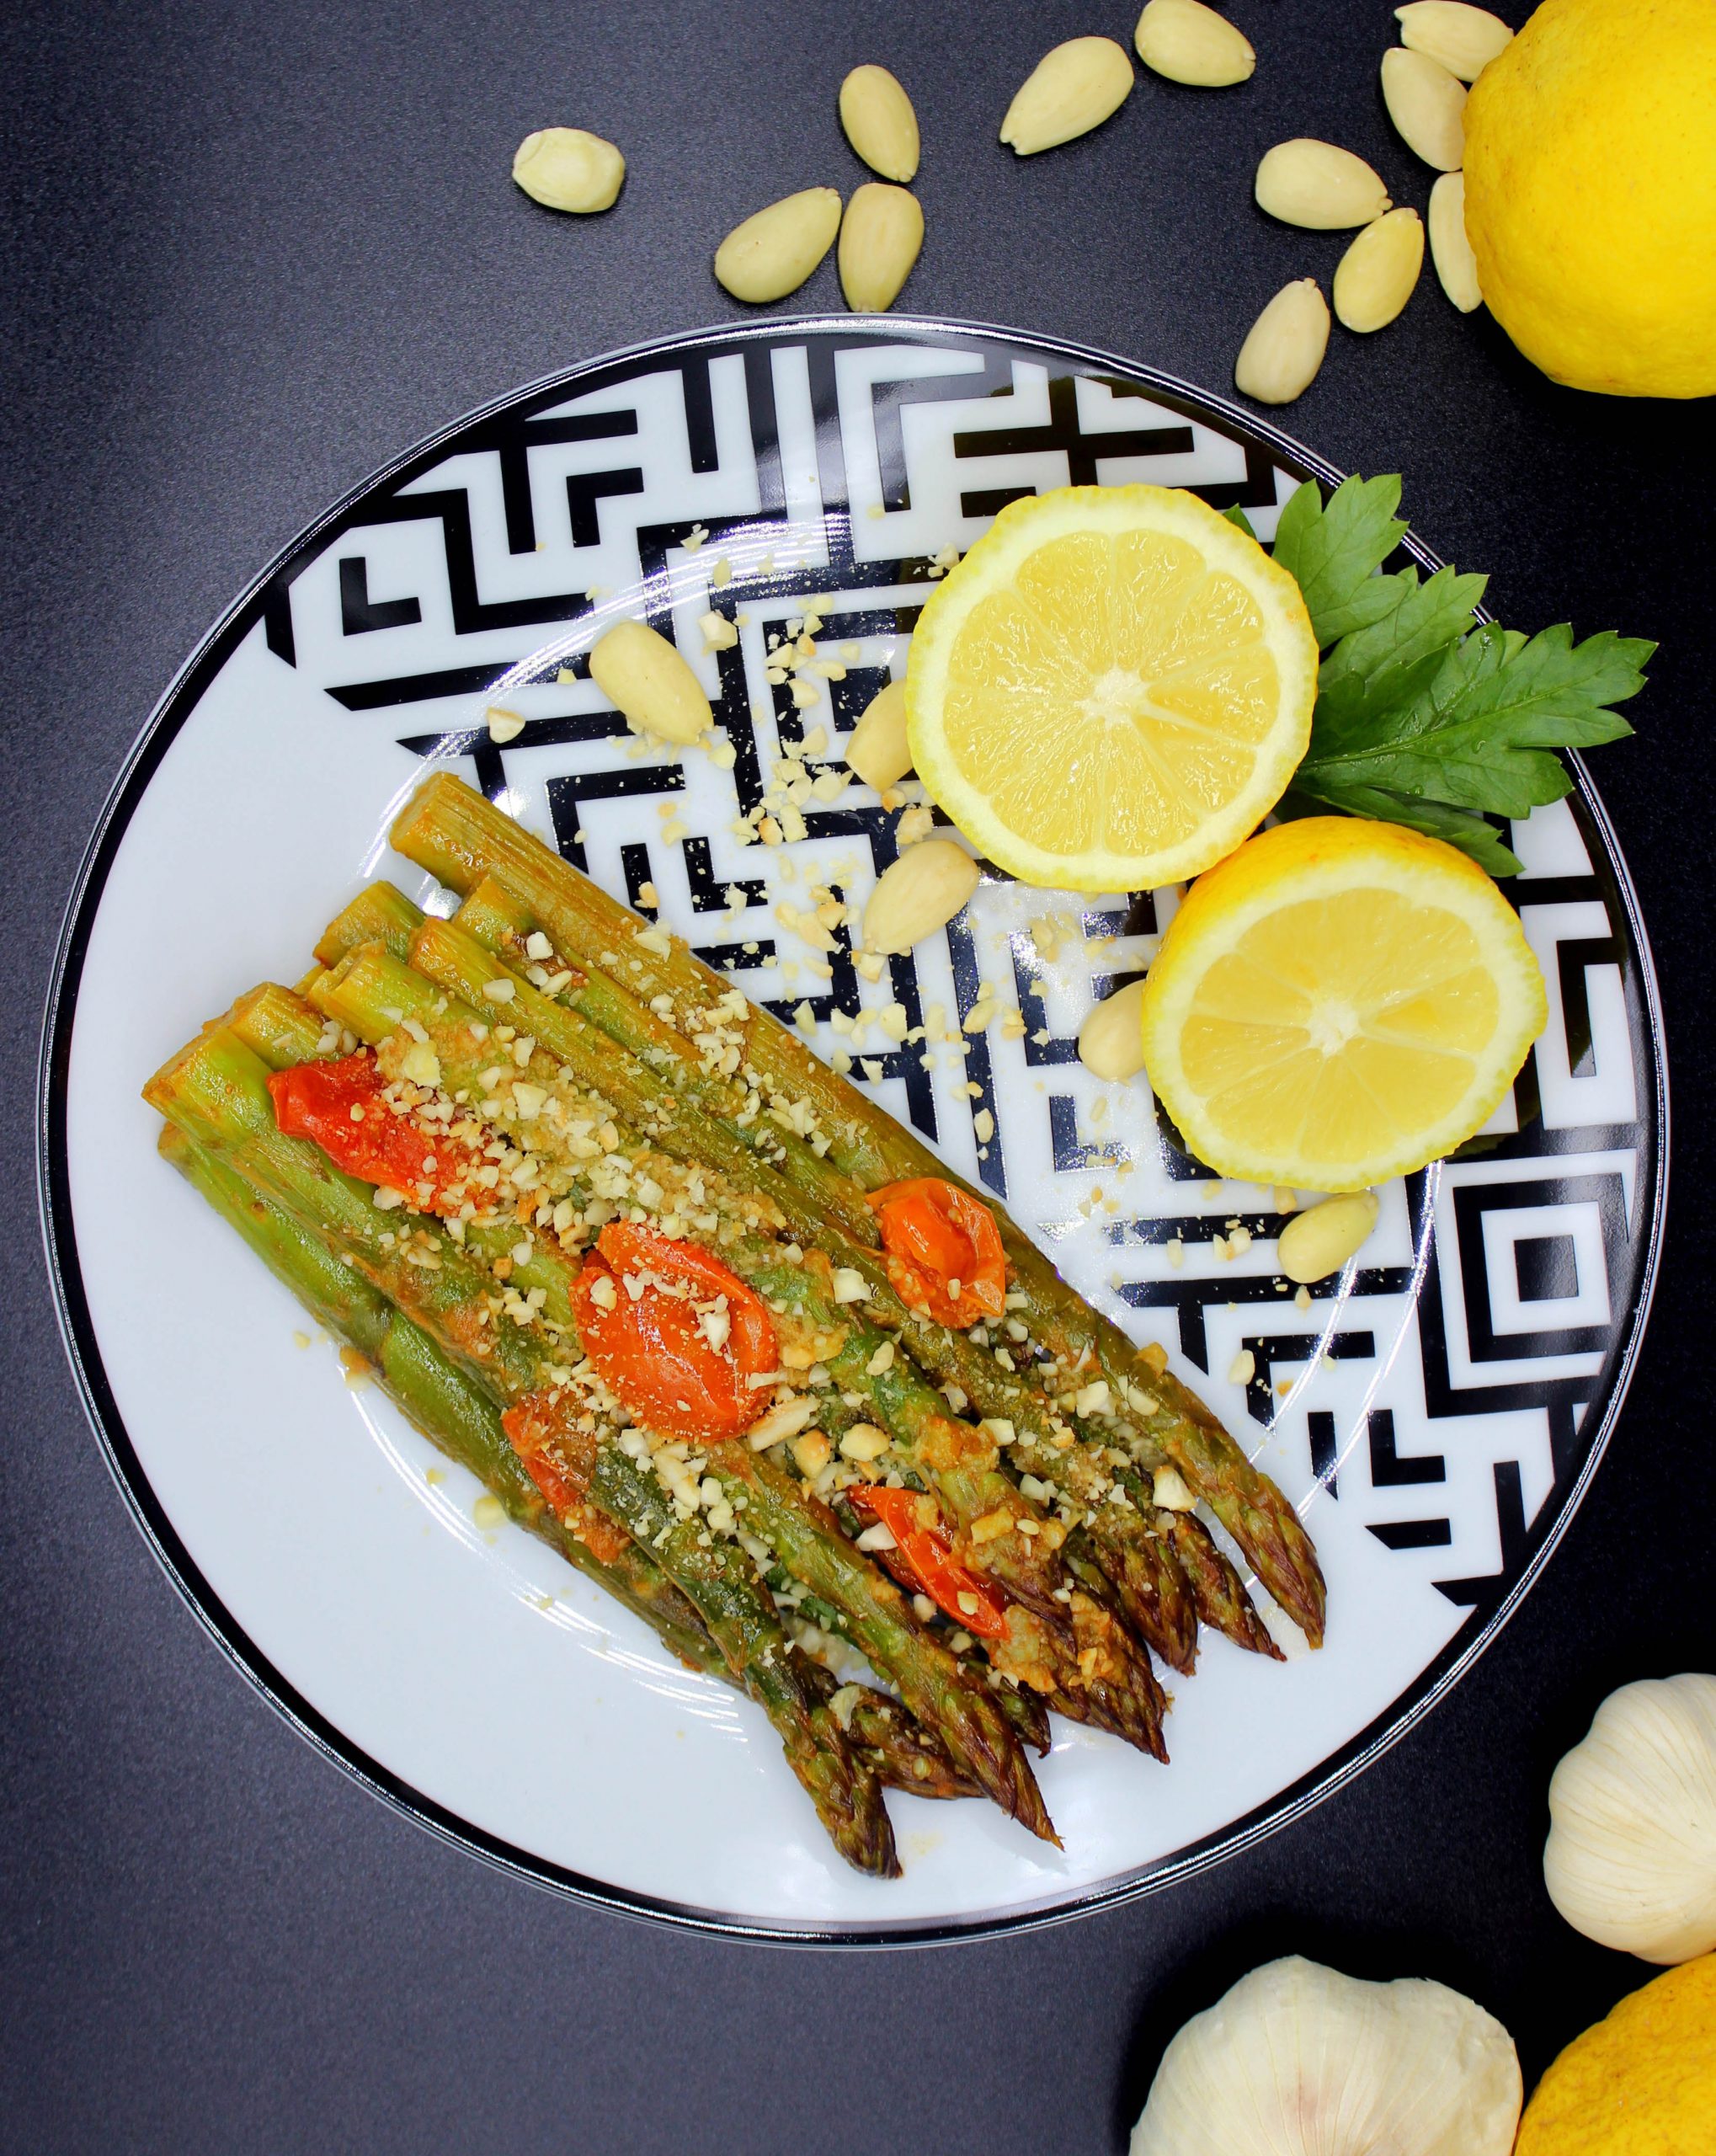
Asparagus with garlic and almonds
This recipe was posted on: 30/05/2021
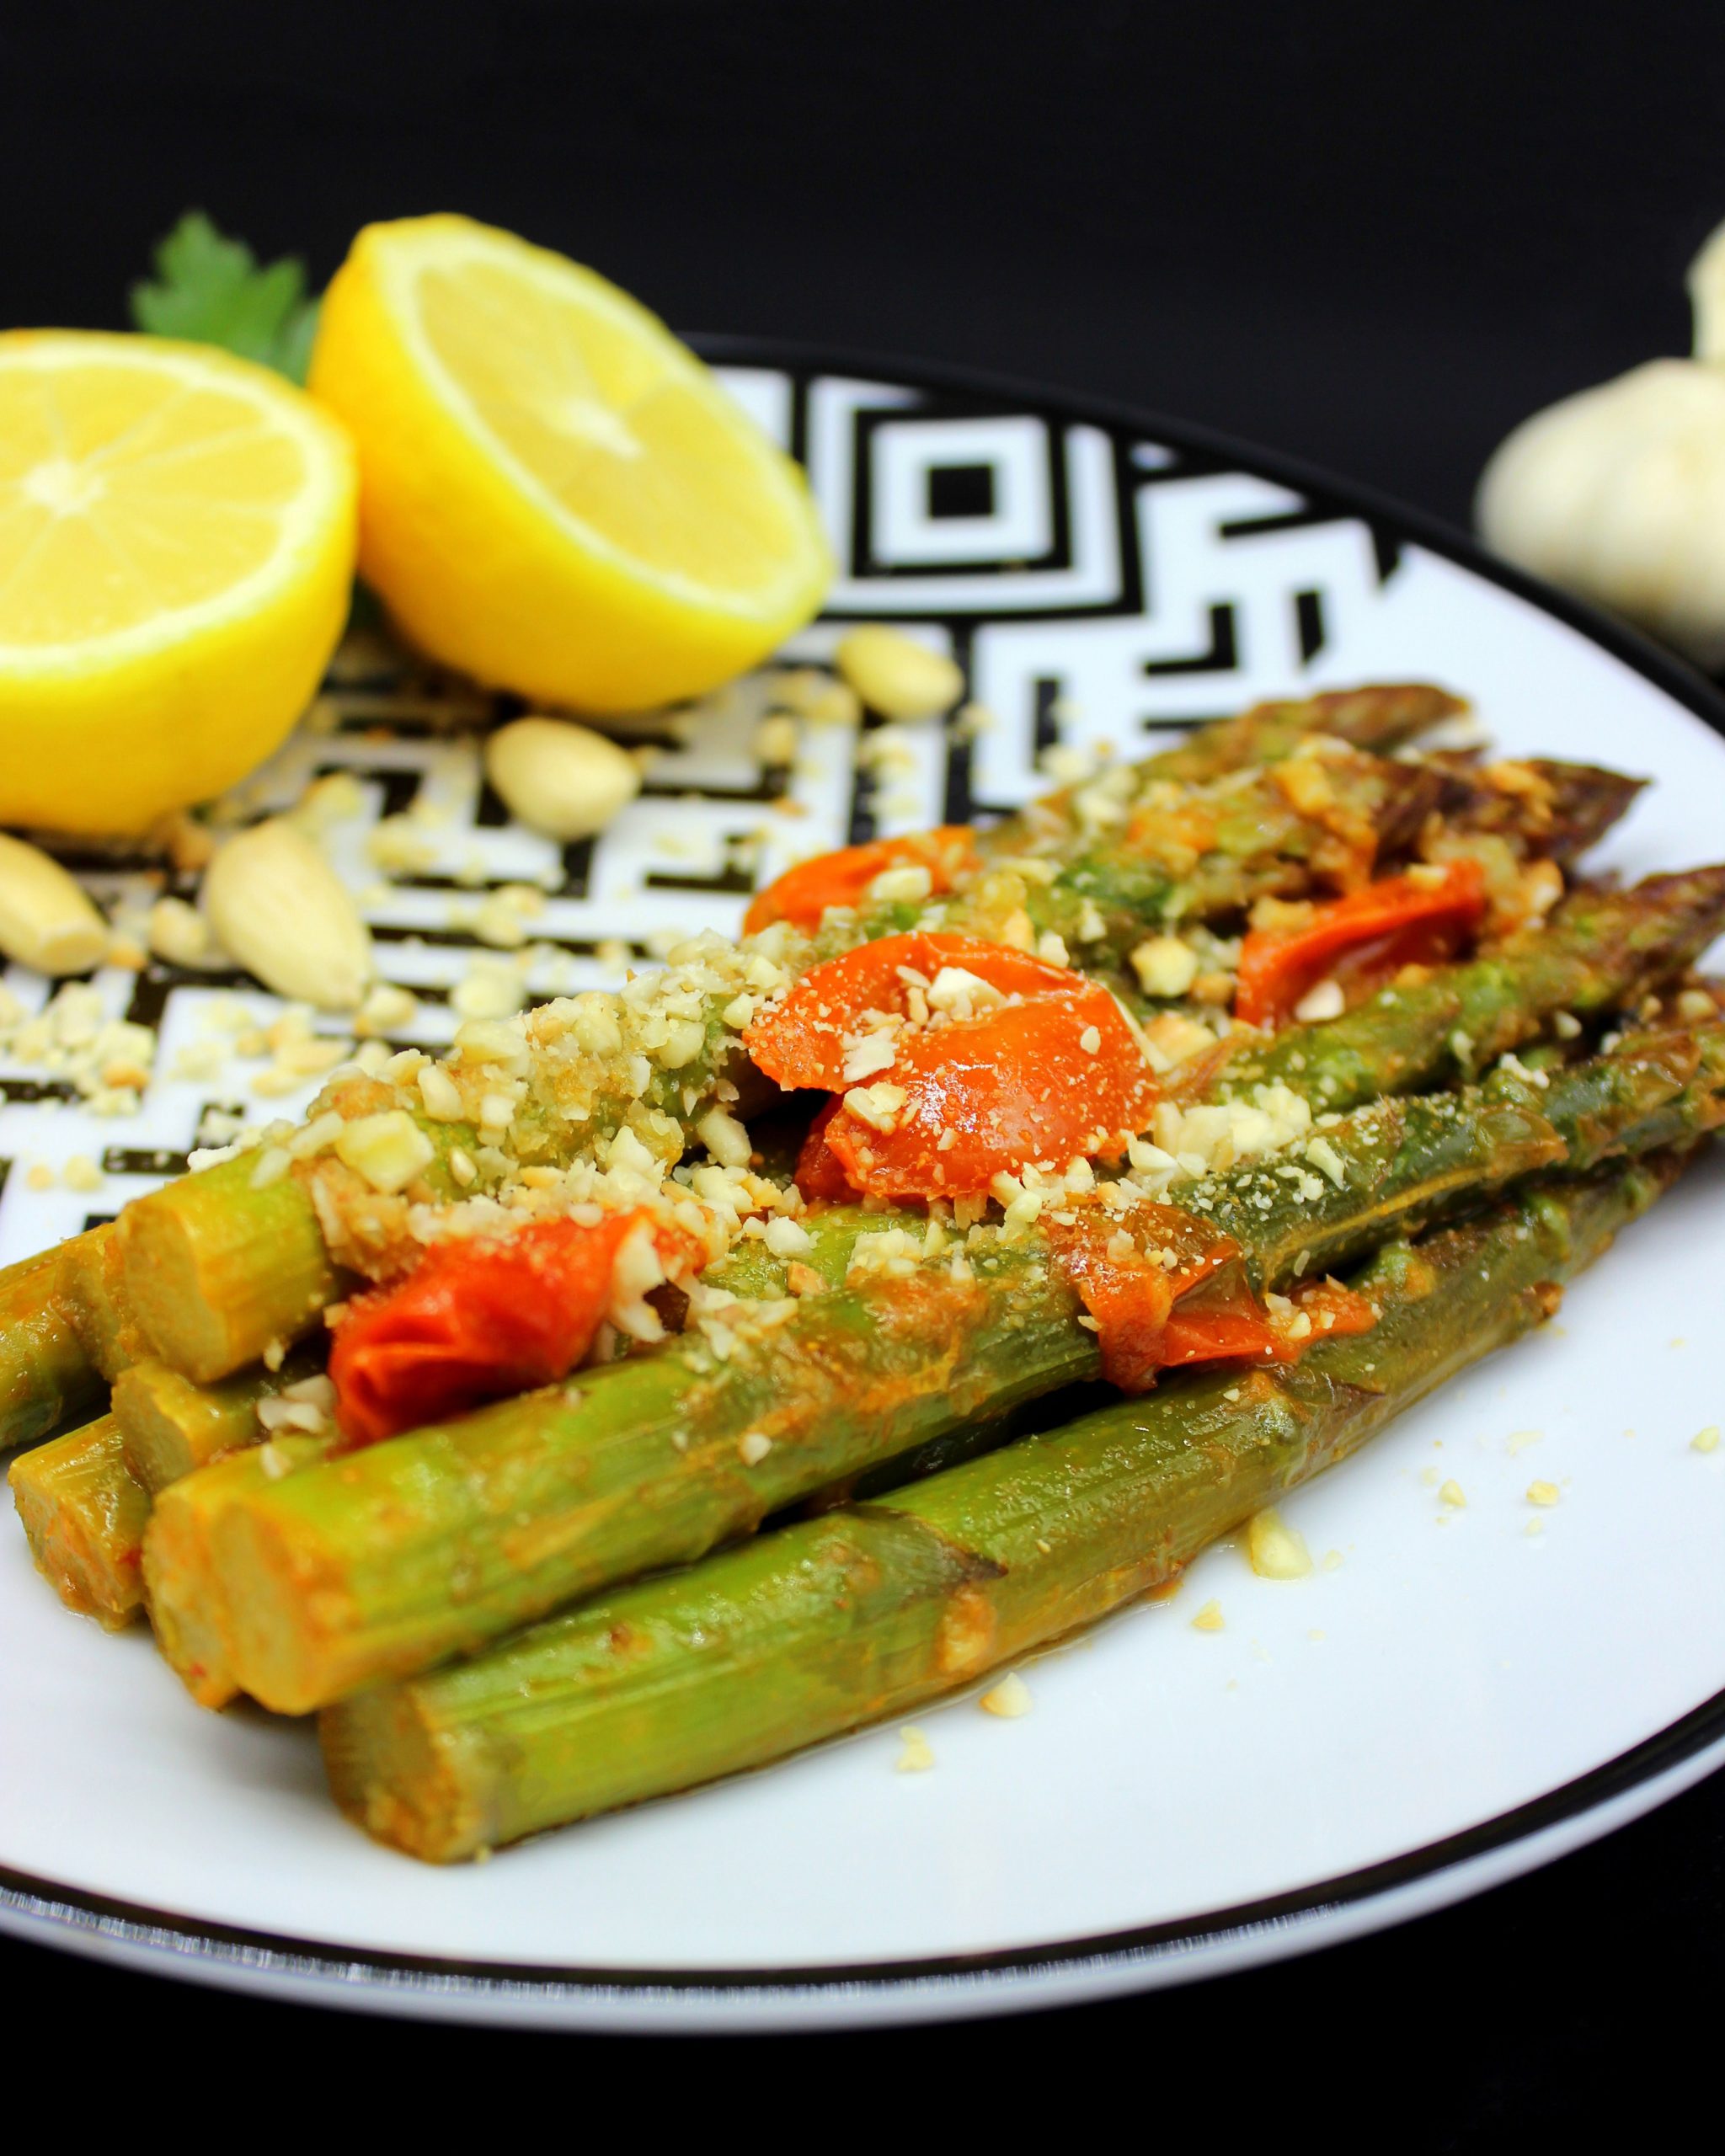
Even though the asparagus season is slowly coming to an end, you can still find in the food stores this fabulous vegetable. You can add asparagus to vegetable stews, make a risotto with asparagus or use them as I did – by making a delicious side dish. The best part of this recipe for asparagus with garlic and almonds is the fact that it’s very easy to make. But apart from that, it also has a very rich flavor. It’s so delicious that even people who don’t like asparagus might start to like them.
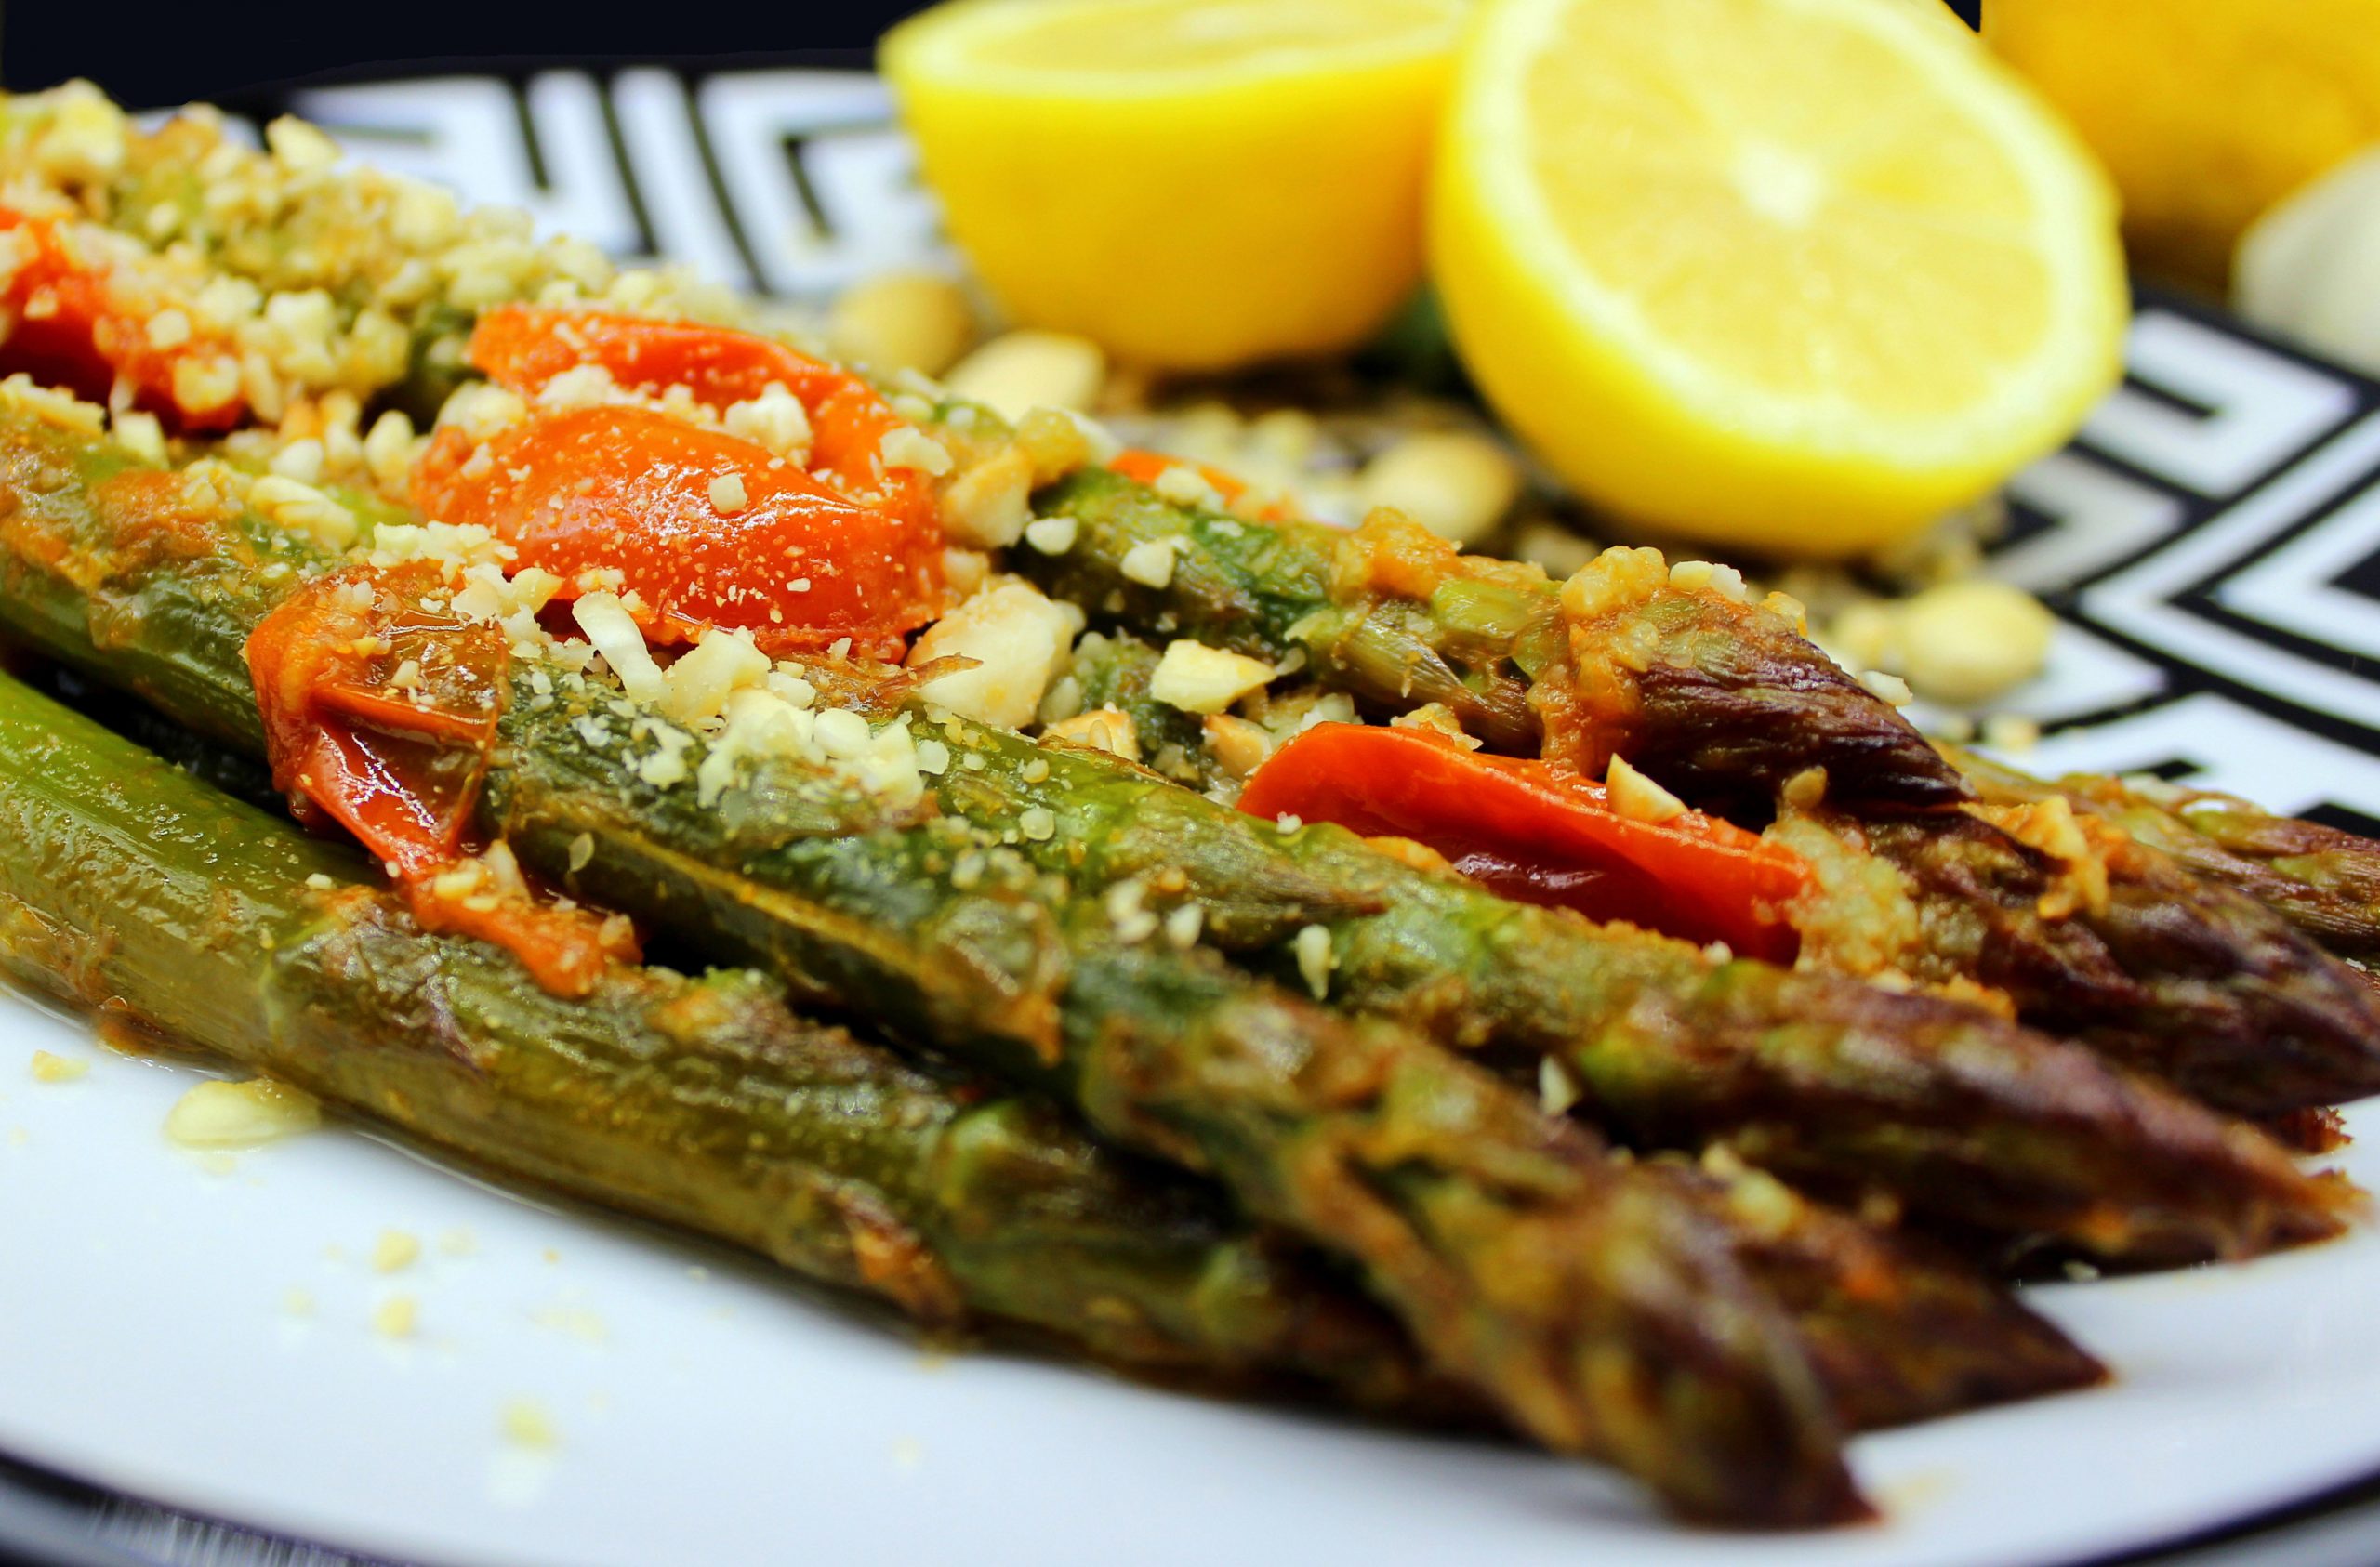
Even though the list of the ingredients is short, every single ingredient has an important task. Garlic adds not only flavor, but also a wonderful aroma to the dish. Cherry tomatoes make everything slightly creamy. Toasted almond pieces add that delicious nutty note and creates an effect of eating something soft and crispy at the same time. While the lemon juice gives a refreshing touch to an already delicious meal. These asparagus with garlic and almonds are destined to be a side dish. But since they’re so delicious, I won’t be surprised if you use them as a healthy main dish!
How to prepare asparagus with garlic and almonds
The preparation process of this side dish could not be easier! You simply need to cook in a small amount of oil crushed garlic together with cherry tomatoes, then add cleaned asparagus, lemon juice and a bit of salt. Cook for a few minutes by occasionally mixing everything. Once you see that the frying pan starts to get dry, add a bit of water. Once the water has evaporated, add it again and continue to do so until the asparagus are soft. Serve by sprinkling over toasted almond pieces and by adding some extra lemon juice. Enjoy them alone or together with some juicy celeriac cutlets, delicious eggplant and sundried tomato burgers or some simple vegan (no)meatballs.
The variety of dishes that you can prepare from vegetables only is huge. And the fact that even by excluding from your daily menu all products of animal origin you can still have a healthy body and mind is simply wonderful. There’s nothing better than eating vegetables when they are in season. In such a way you’re giving your body all the good nutrients that the specific vegetable contains. Since the asparagus season is quite short, run to your local food store now to still find some of them and prepare yourself these asparagus with garlic and almonds, which are:
-
vegan
- healthy
- easy to make
- flavorful
- creamy and crispy at the same time
- refreshing
- juicy
- full of valuable nutrients
- and simply yummy!
Let me know, if you try this recipe! Leave a comment or even more: snap a picture of your masterpiece and post it on Instagram by tagging @vegan_bunnymommycooks or Facebook by tagging @bunnymommycooks. And feel free to let your animal family members join in the picture!
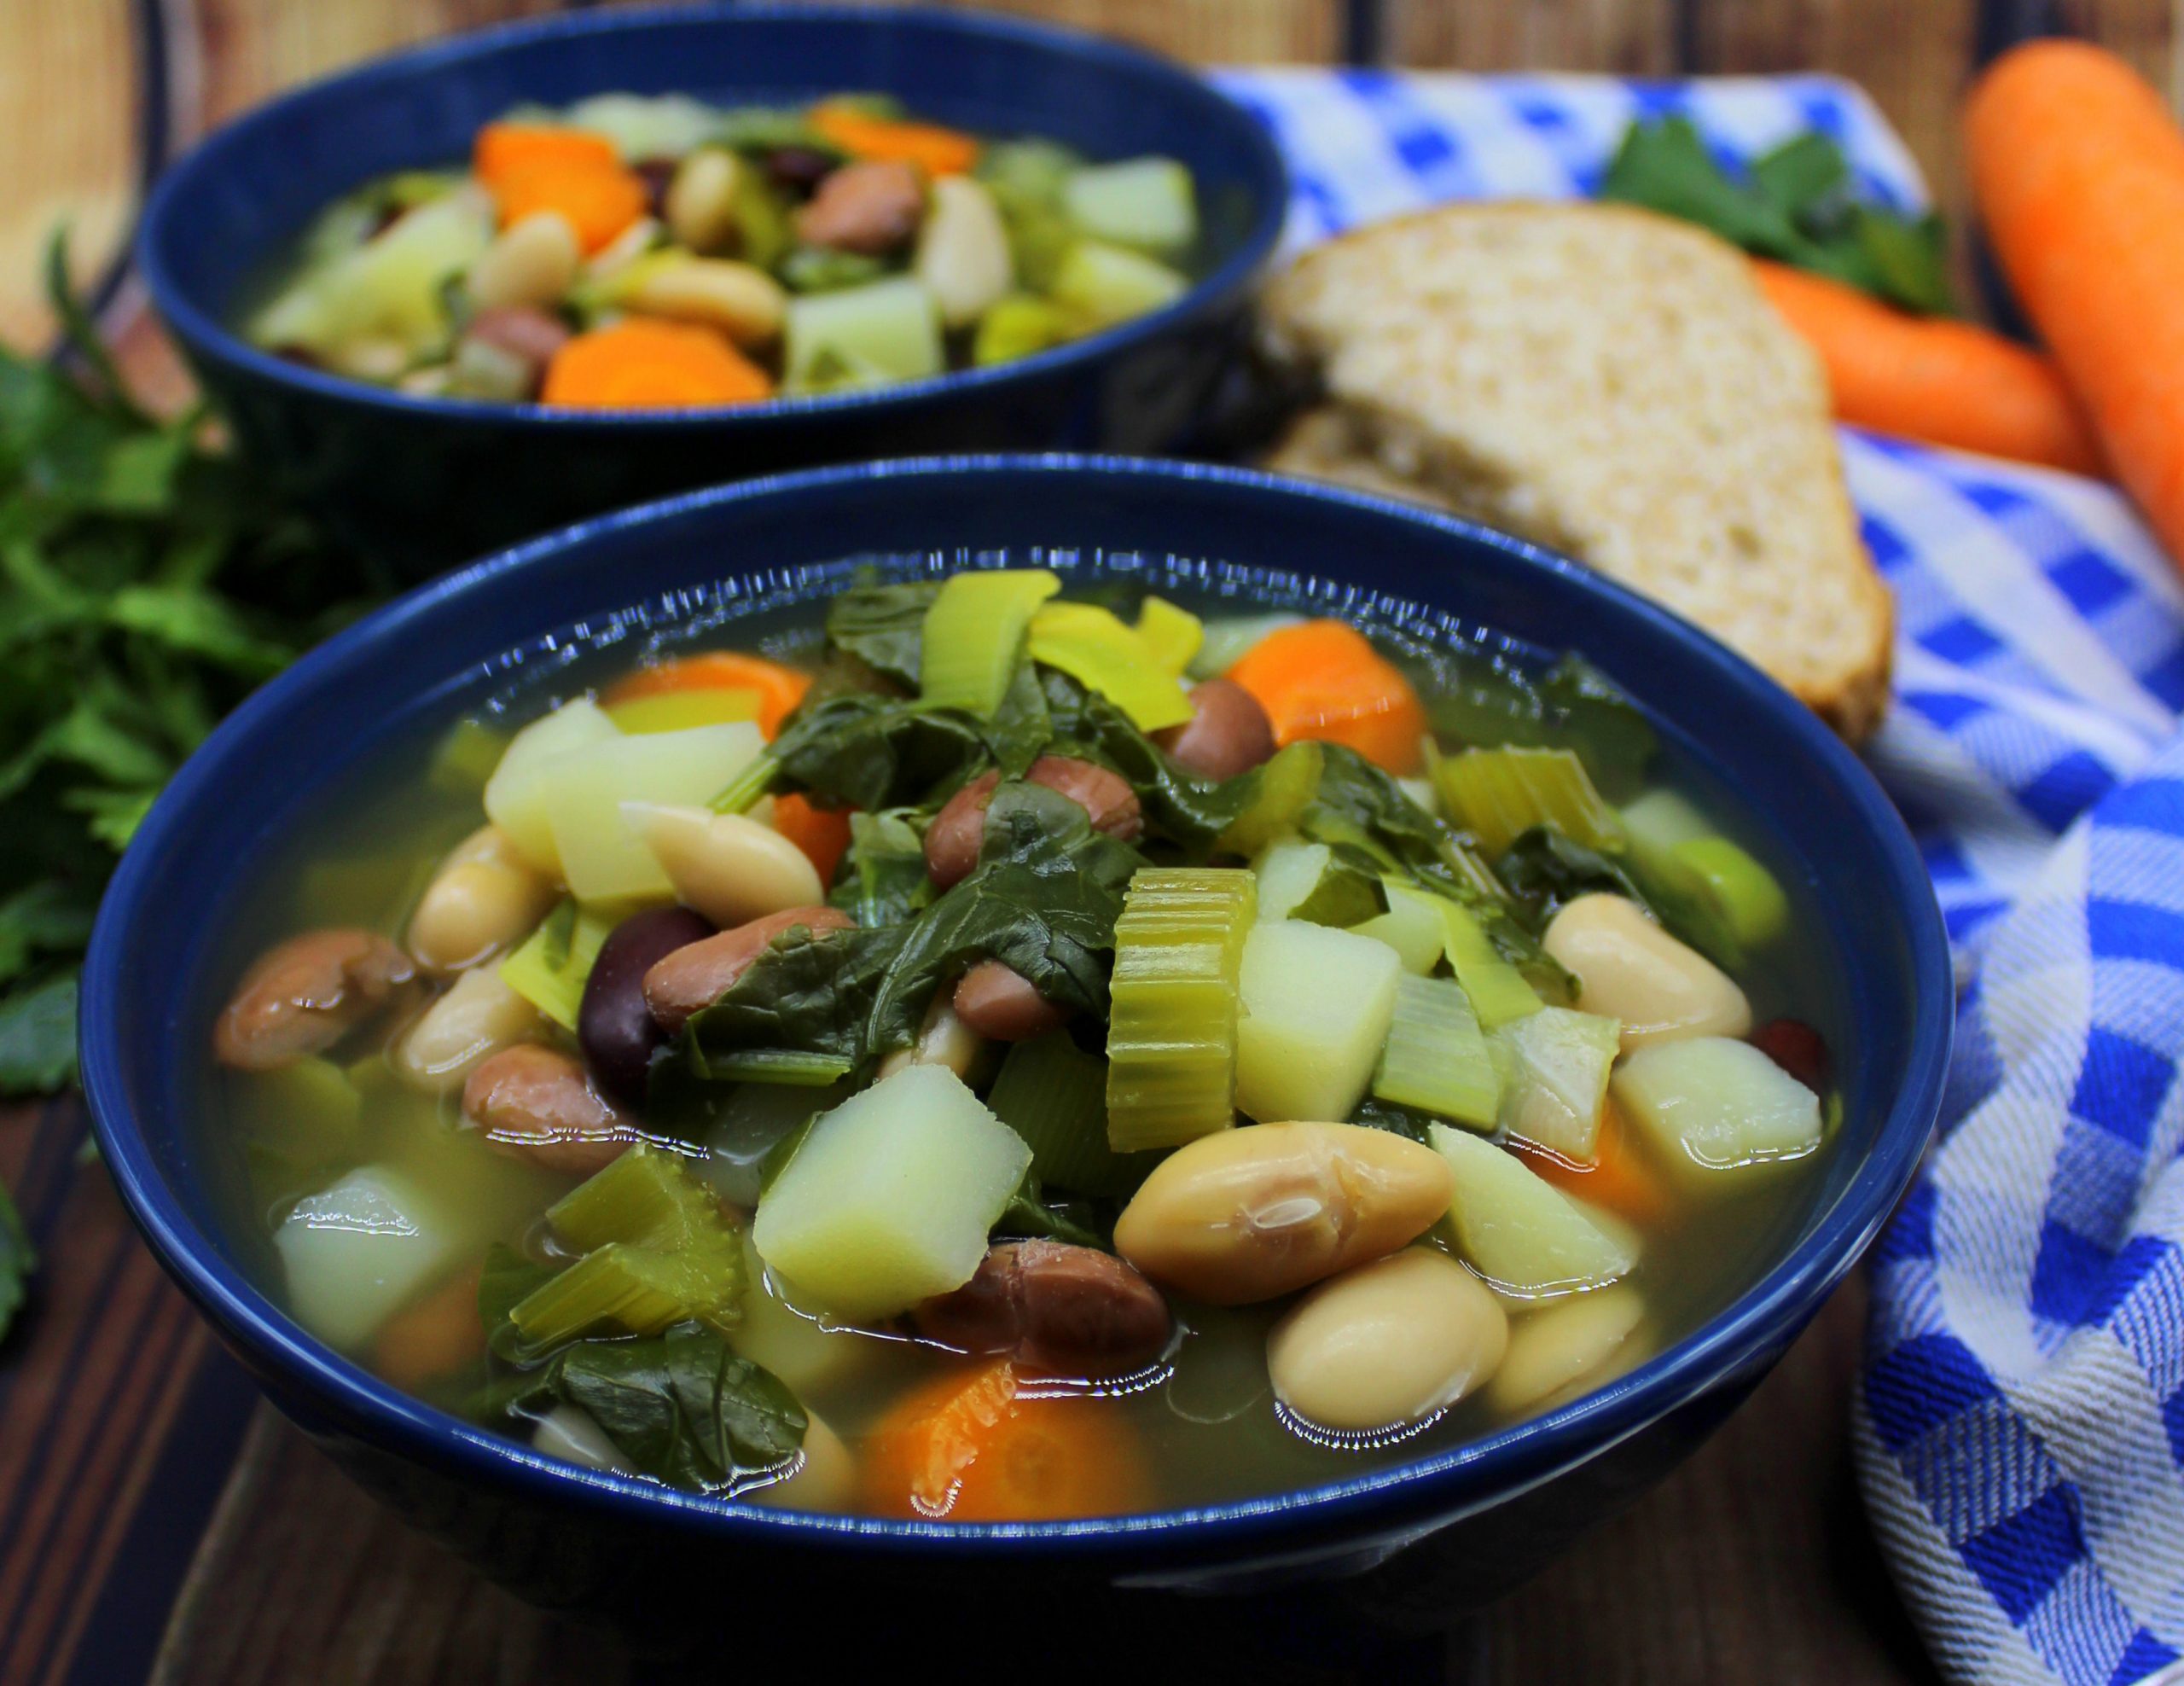
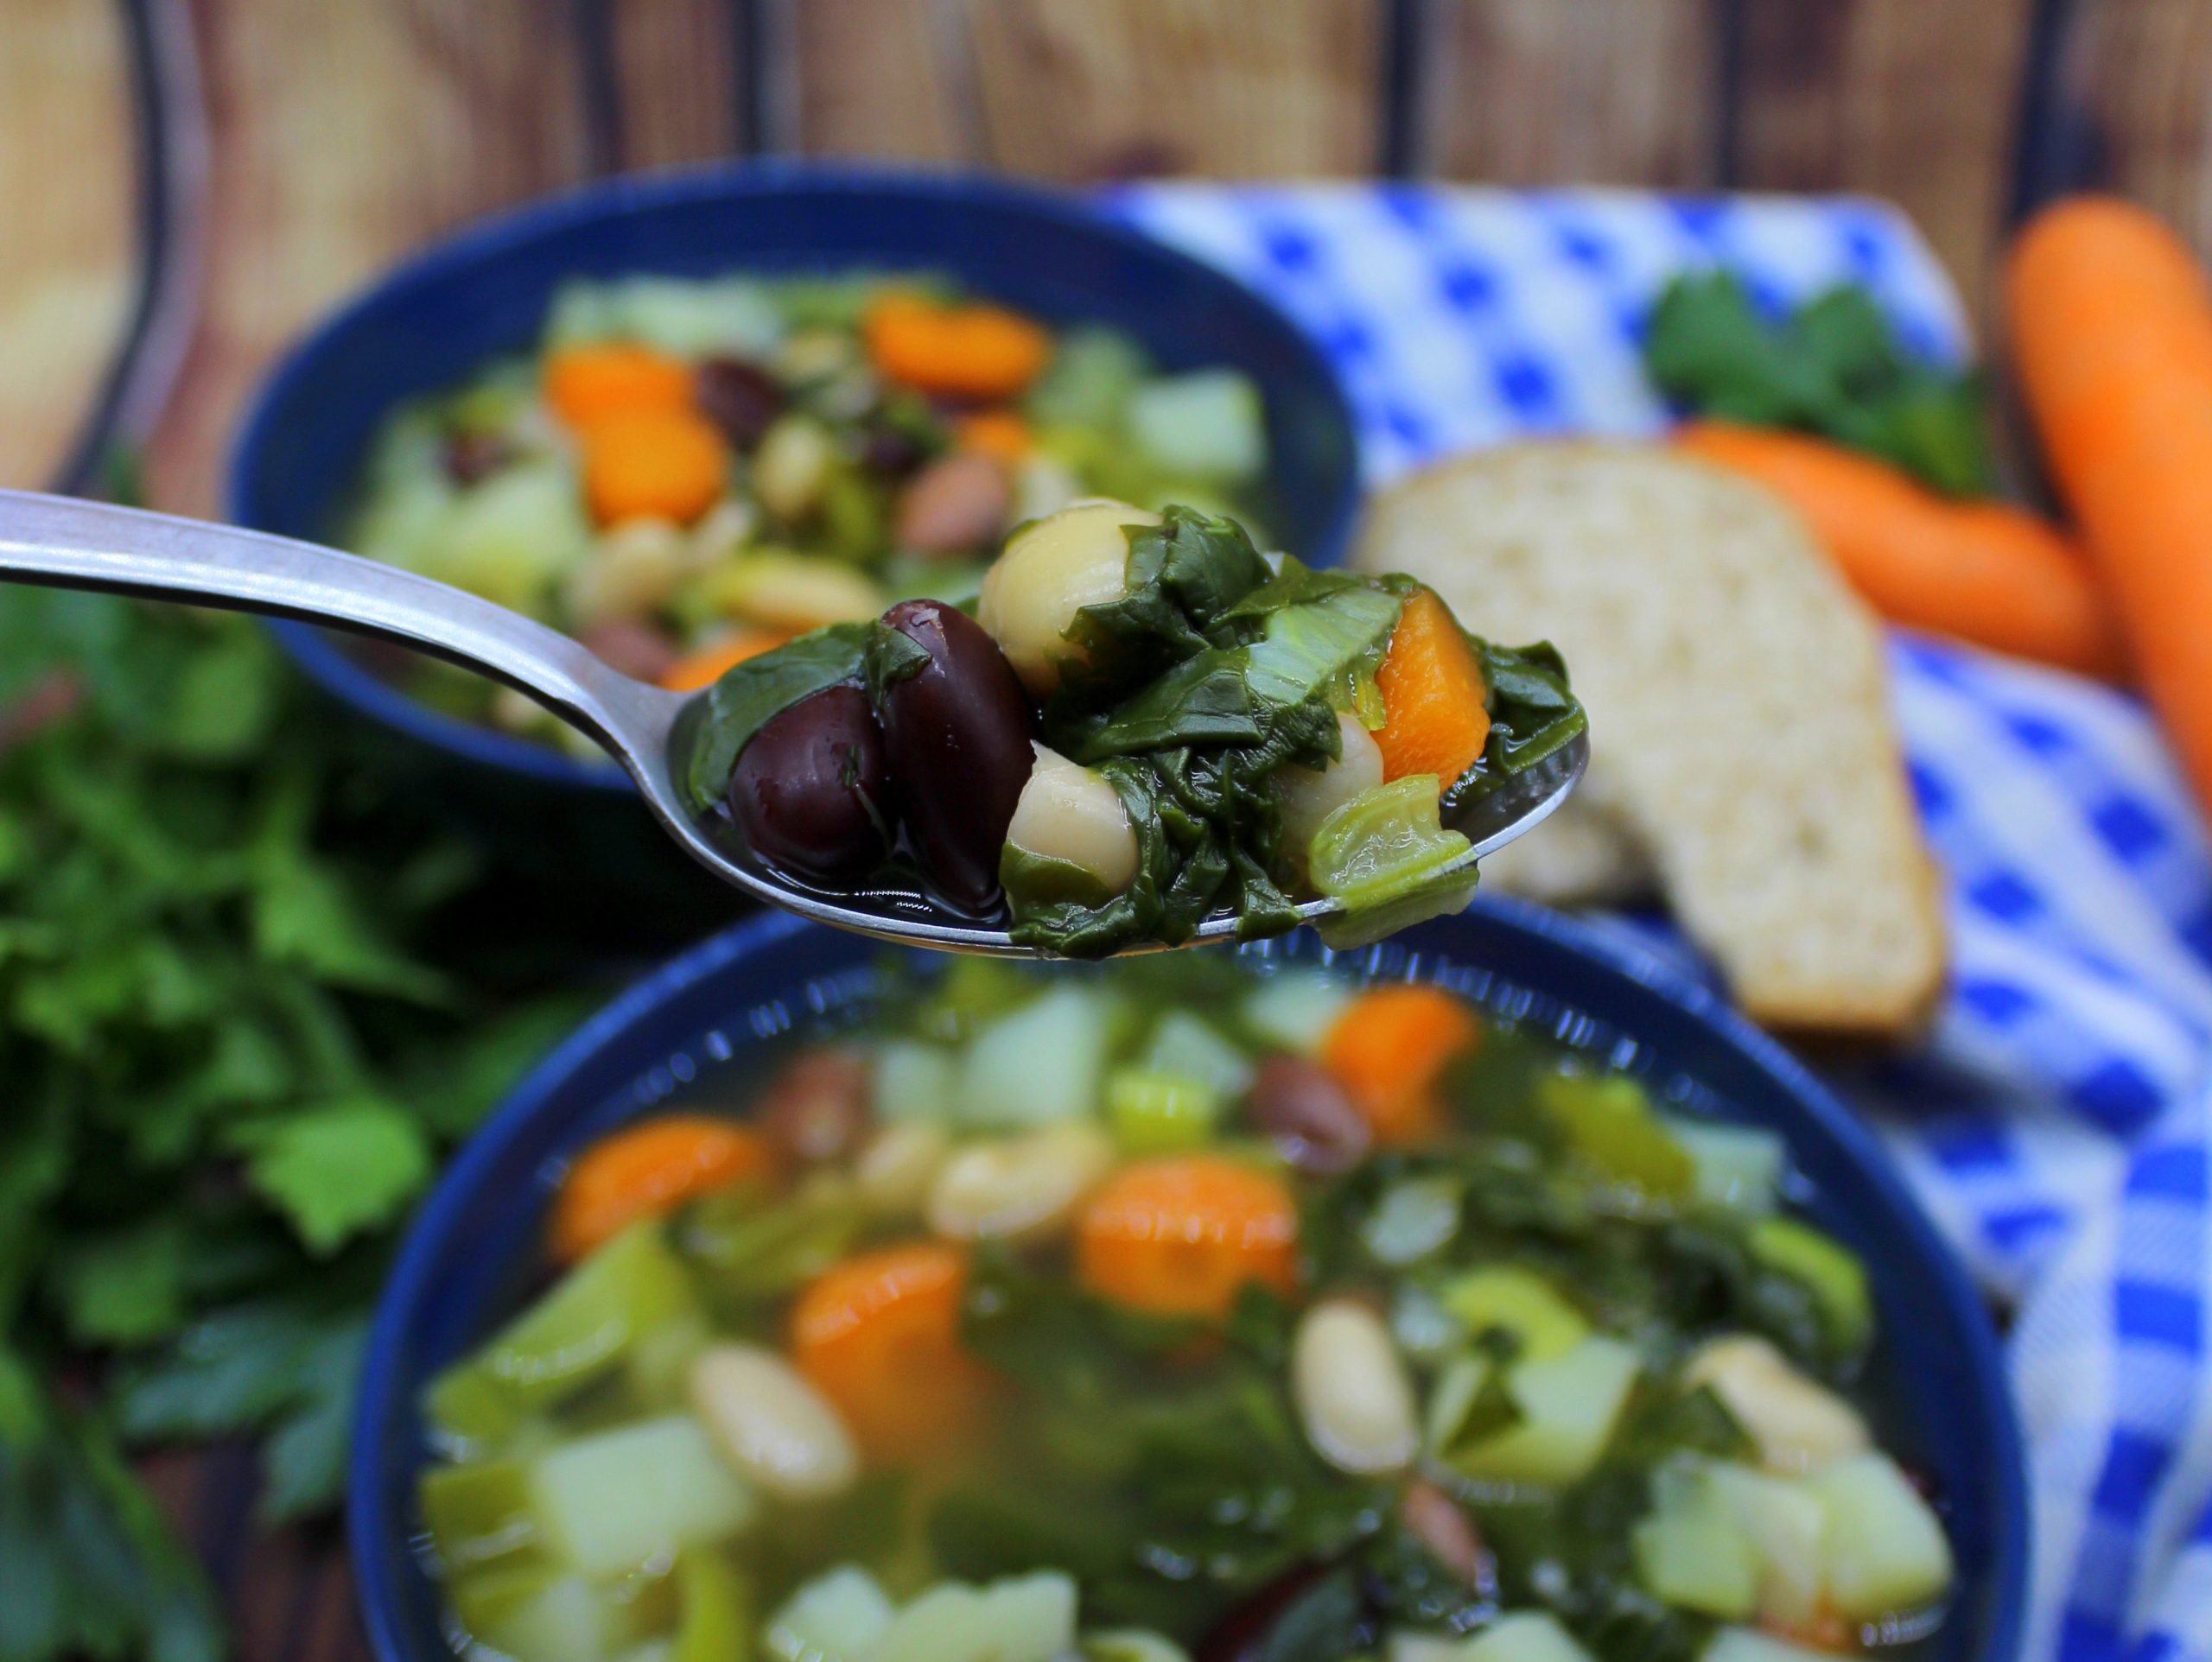
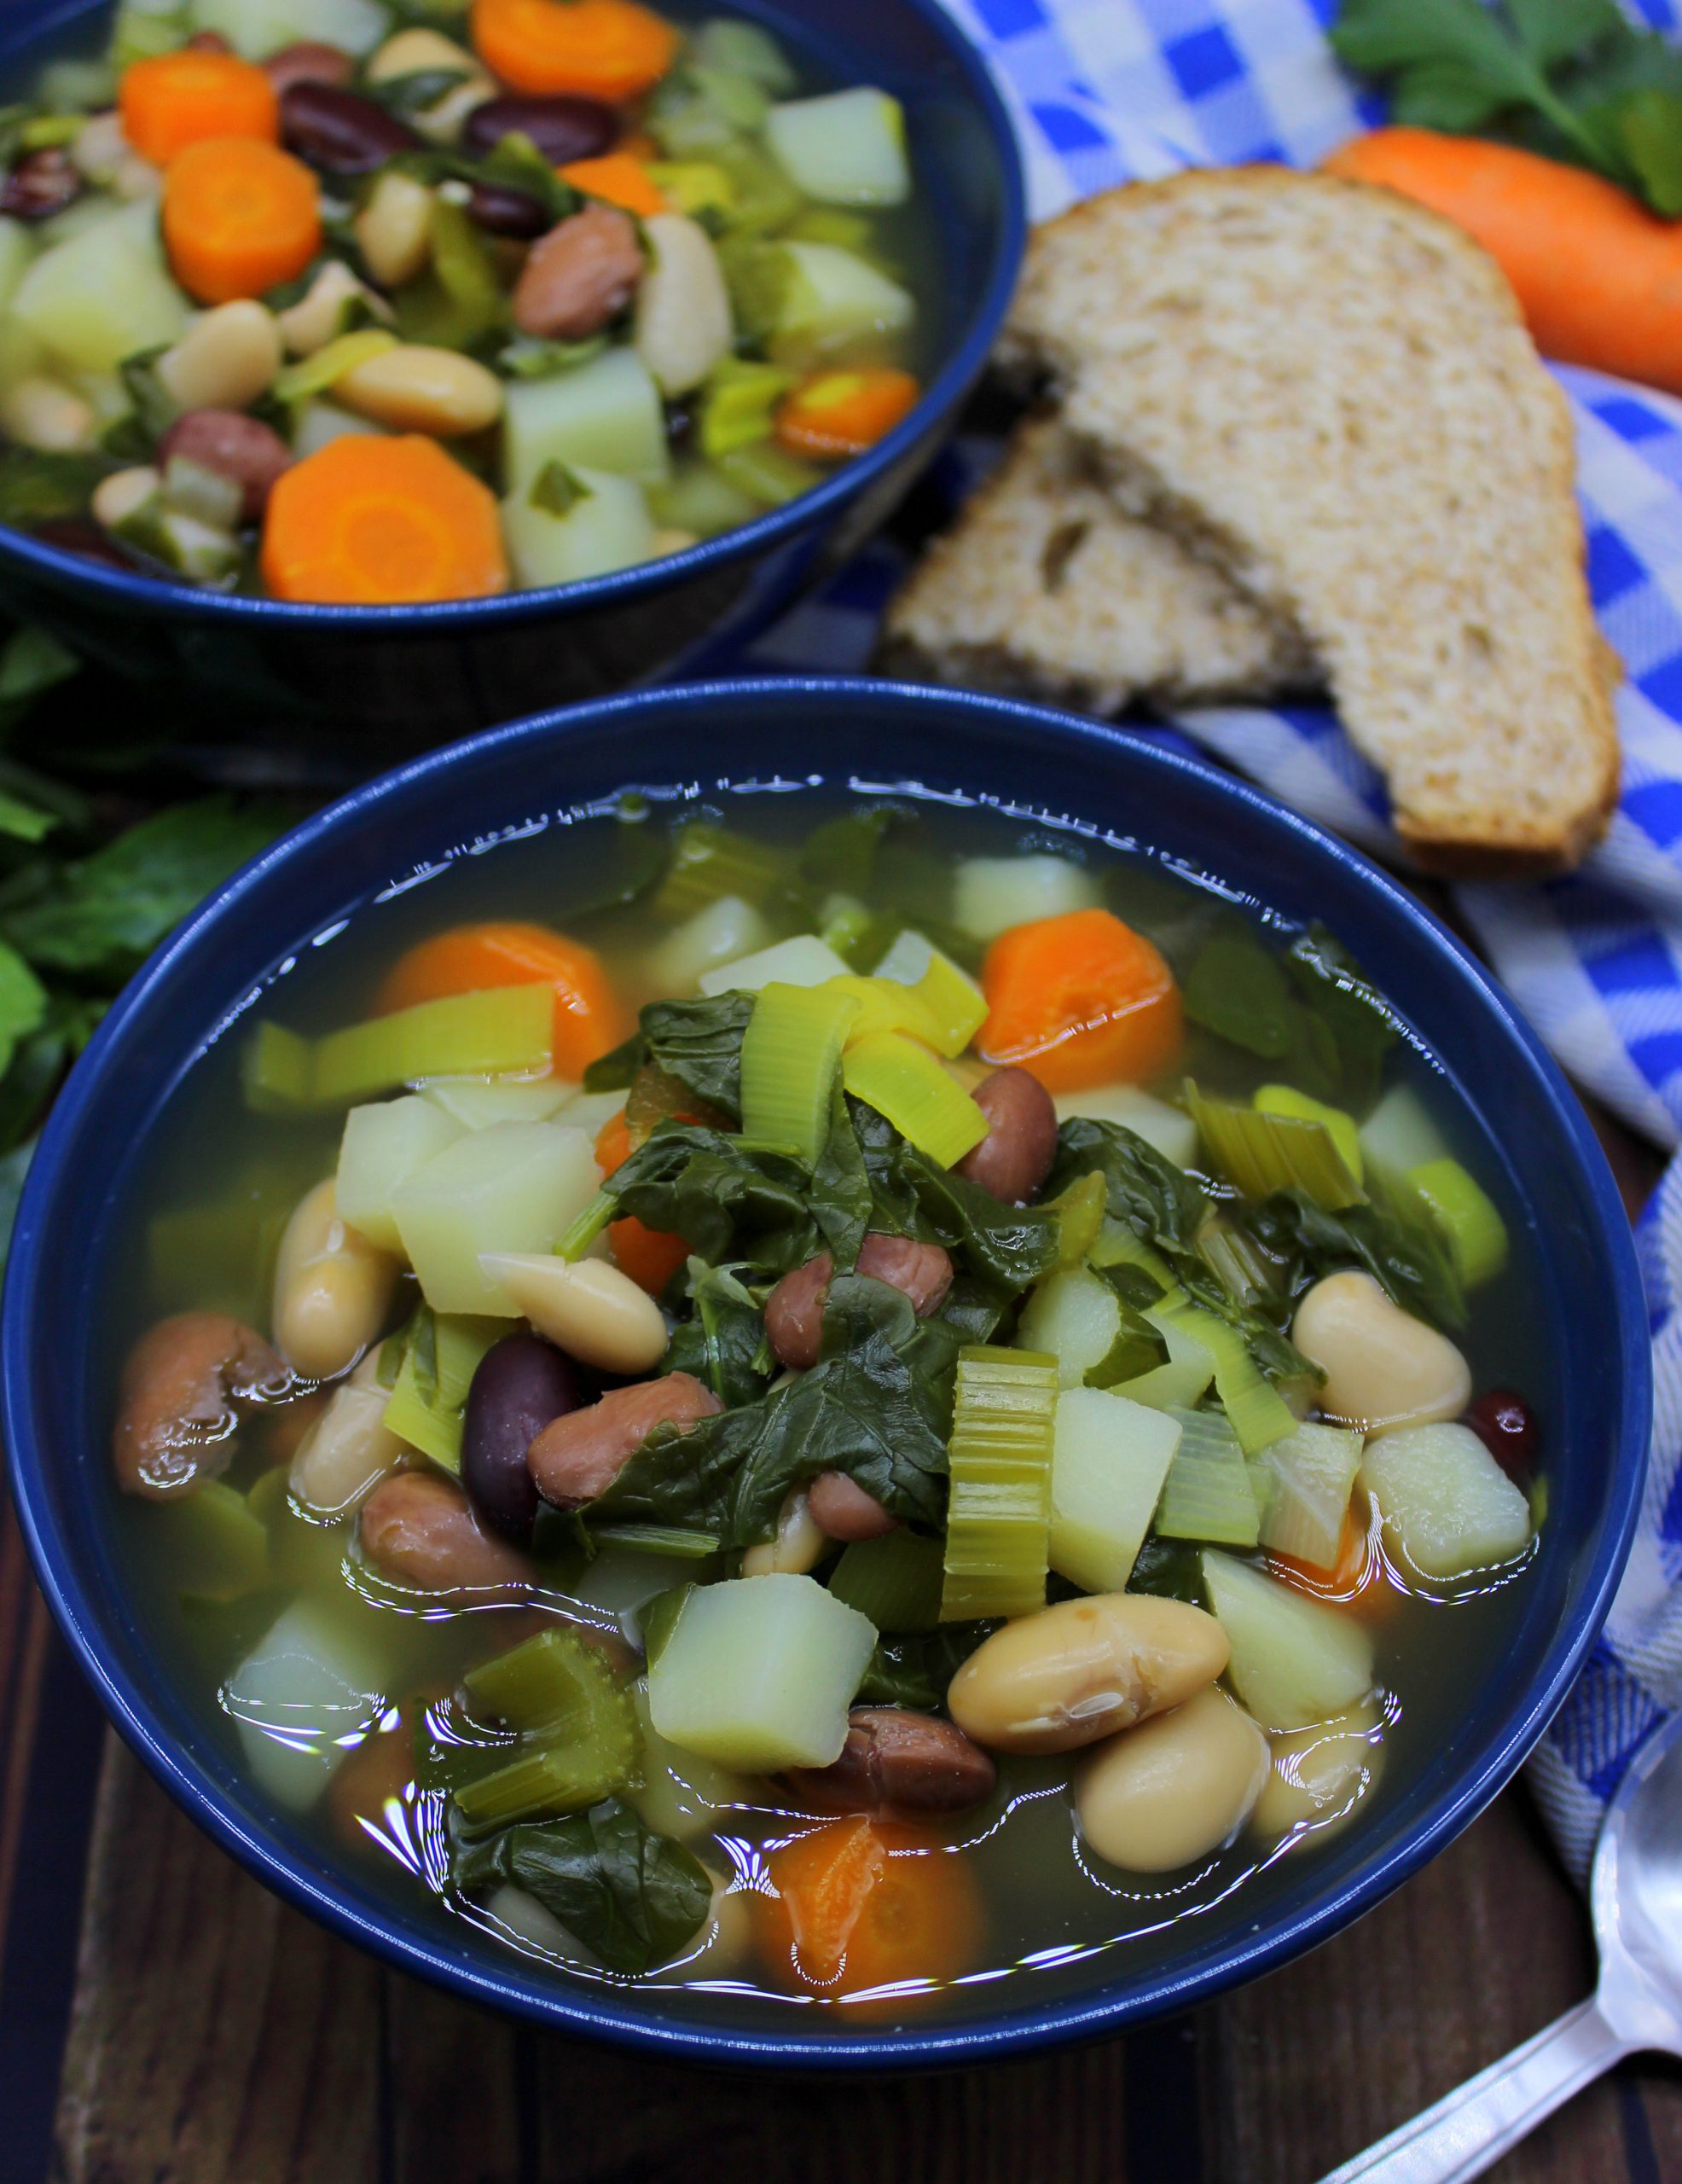
Low-fat four bean soup
This recipe was posted on: 09/05/2021
This year spring is a bit colder than in the past years. And so, for that reason it’s completely normal to crave for something that warms you up from the inside. When I think of warming dishes, my first thought always goes to soups. You can make soups in many different ways. But, since summer is approaching, maybe it’s better to choose something light and low-fat. My low-fat four bean soup is the perfect dish to warm you up without making you worry about the calories.
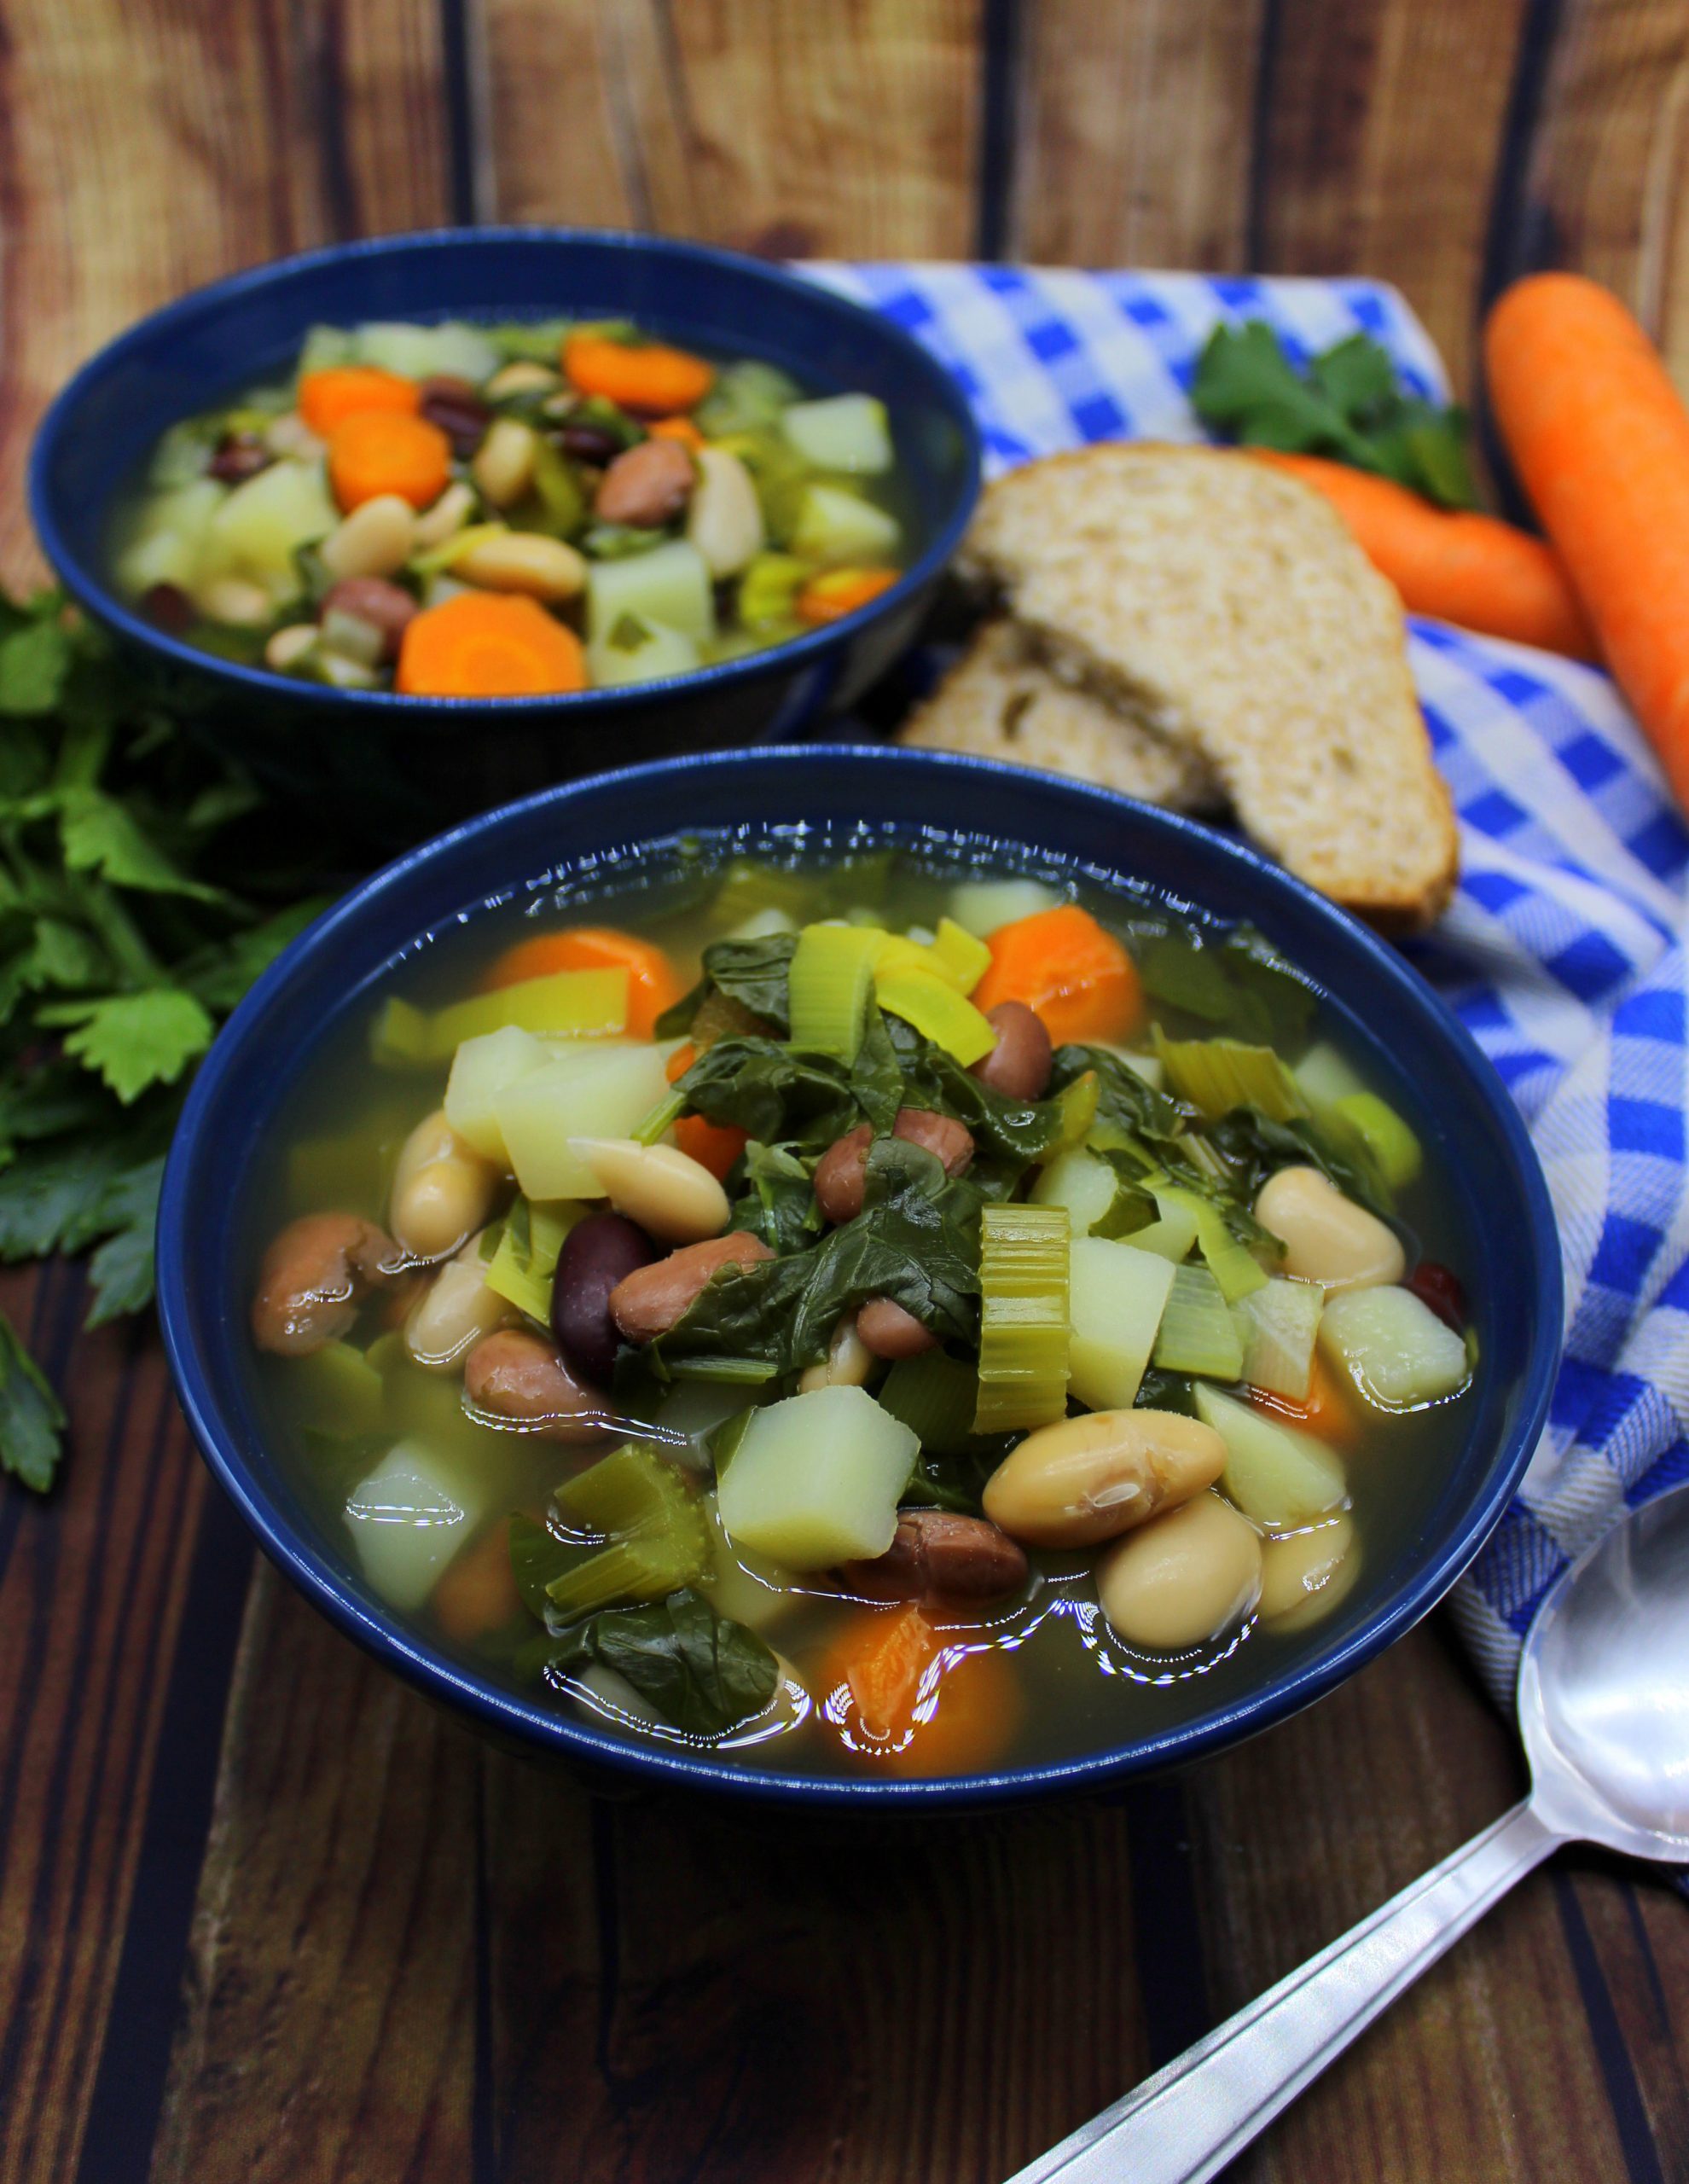
In my opinion, the best thing you can do to be in a good shape is simply to eat healthy. And this low-fat four bean soup definitely can be considered healthy since it contains a lot of plant protein from beans and also a good amount of different vegetables. It’s already very easy to prepare this vegan bean soup. But to make everything even easier you can change some of the ingredients. For example, if you’re not a big fan of some specific vegetable that I used, simply skip it or substitute it with another one that you like. Or if some of the beans that I used are not available in your country, use instead the ones that you can easily buy at your local food store.
How to prepare low-fat four bean soup
The preparation process of this low-fat four bean soup is as easy as counting until three! Just warm up the vegetable stock, clean and cut carrots and celery and put them to boil. Meanwhile clean and cut potatoes, spinach and leek, and add them in the pot. At the end add all the beans and boil everything for some extra minutes. And that’s it! Your vegan bean soup is ready! Simple, light and full of valuable nutrients. Obviously, be aware of the fact that you must use already cooked or canned beans for this recipe. So, in case you decide not to use canned beans, but instead boil them on your own, make sure to do that before you start preparing this soup, since it will take some hours. But if you want to make things quick and easy, just use canned beans.
If you like soups just as much as I do, I invite you to try also my creamy pumpkin soup with roasted chickpeas and broccoli. This soup is so delicious that I’m sure you will like it, even if you’re not a big fan of pumpkins. For additional pleasure, enjoy this soup together with my crostini with cavolo nero and bell pepper hummus. But if you prefer soups with visible pieces of ingredients, my vegan potato leek soup will be perfect for you! It has few simple ingredients, rich flavor and, most importantly, it’s very quick and easy to make!
No matter if you’re searching for dishes that don’t contain a lot of calories or dishes that are simply delicious, this four bean soup won’t disappoint you, because it is:
-
vegan
- healthy
- easy to make
- low-fat
- flavorful
- warming
- filling
- nutritious
- and simply yummy!
Let me know, if you try this recipe! Leave a comment or even more: snap a picture of your masterpiece and post it on Instagram by tagging @vegan_bunnymommycooks or Facebook by tagging @bunnymommycooks. And feel free to let your animal family members join in the picture!
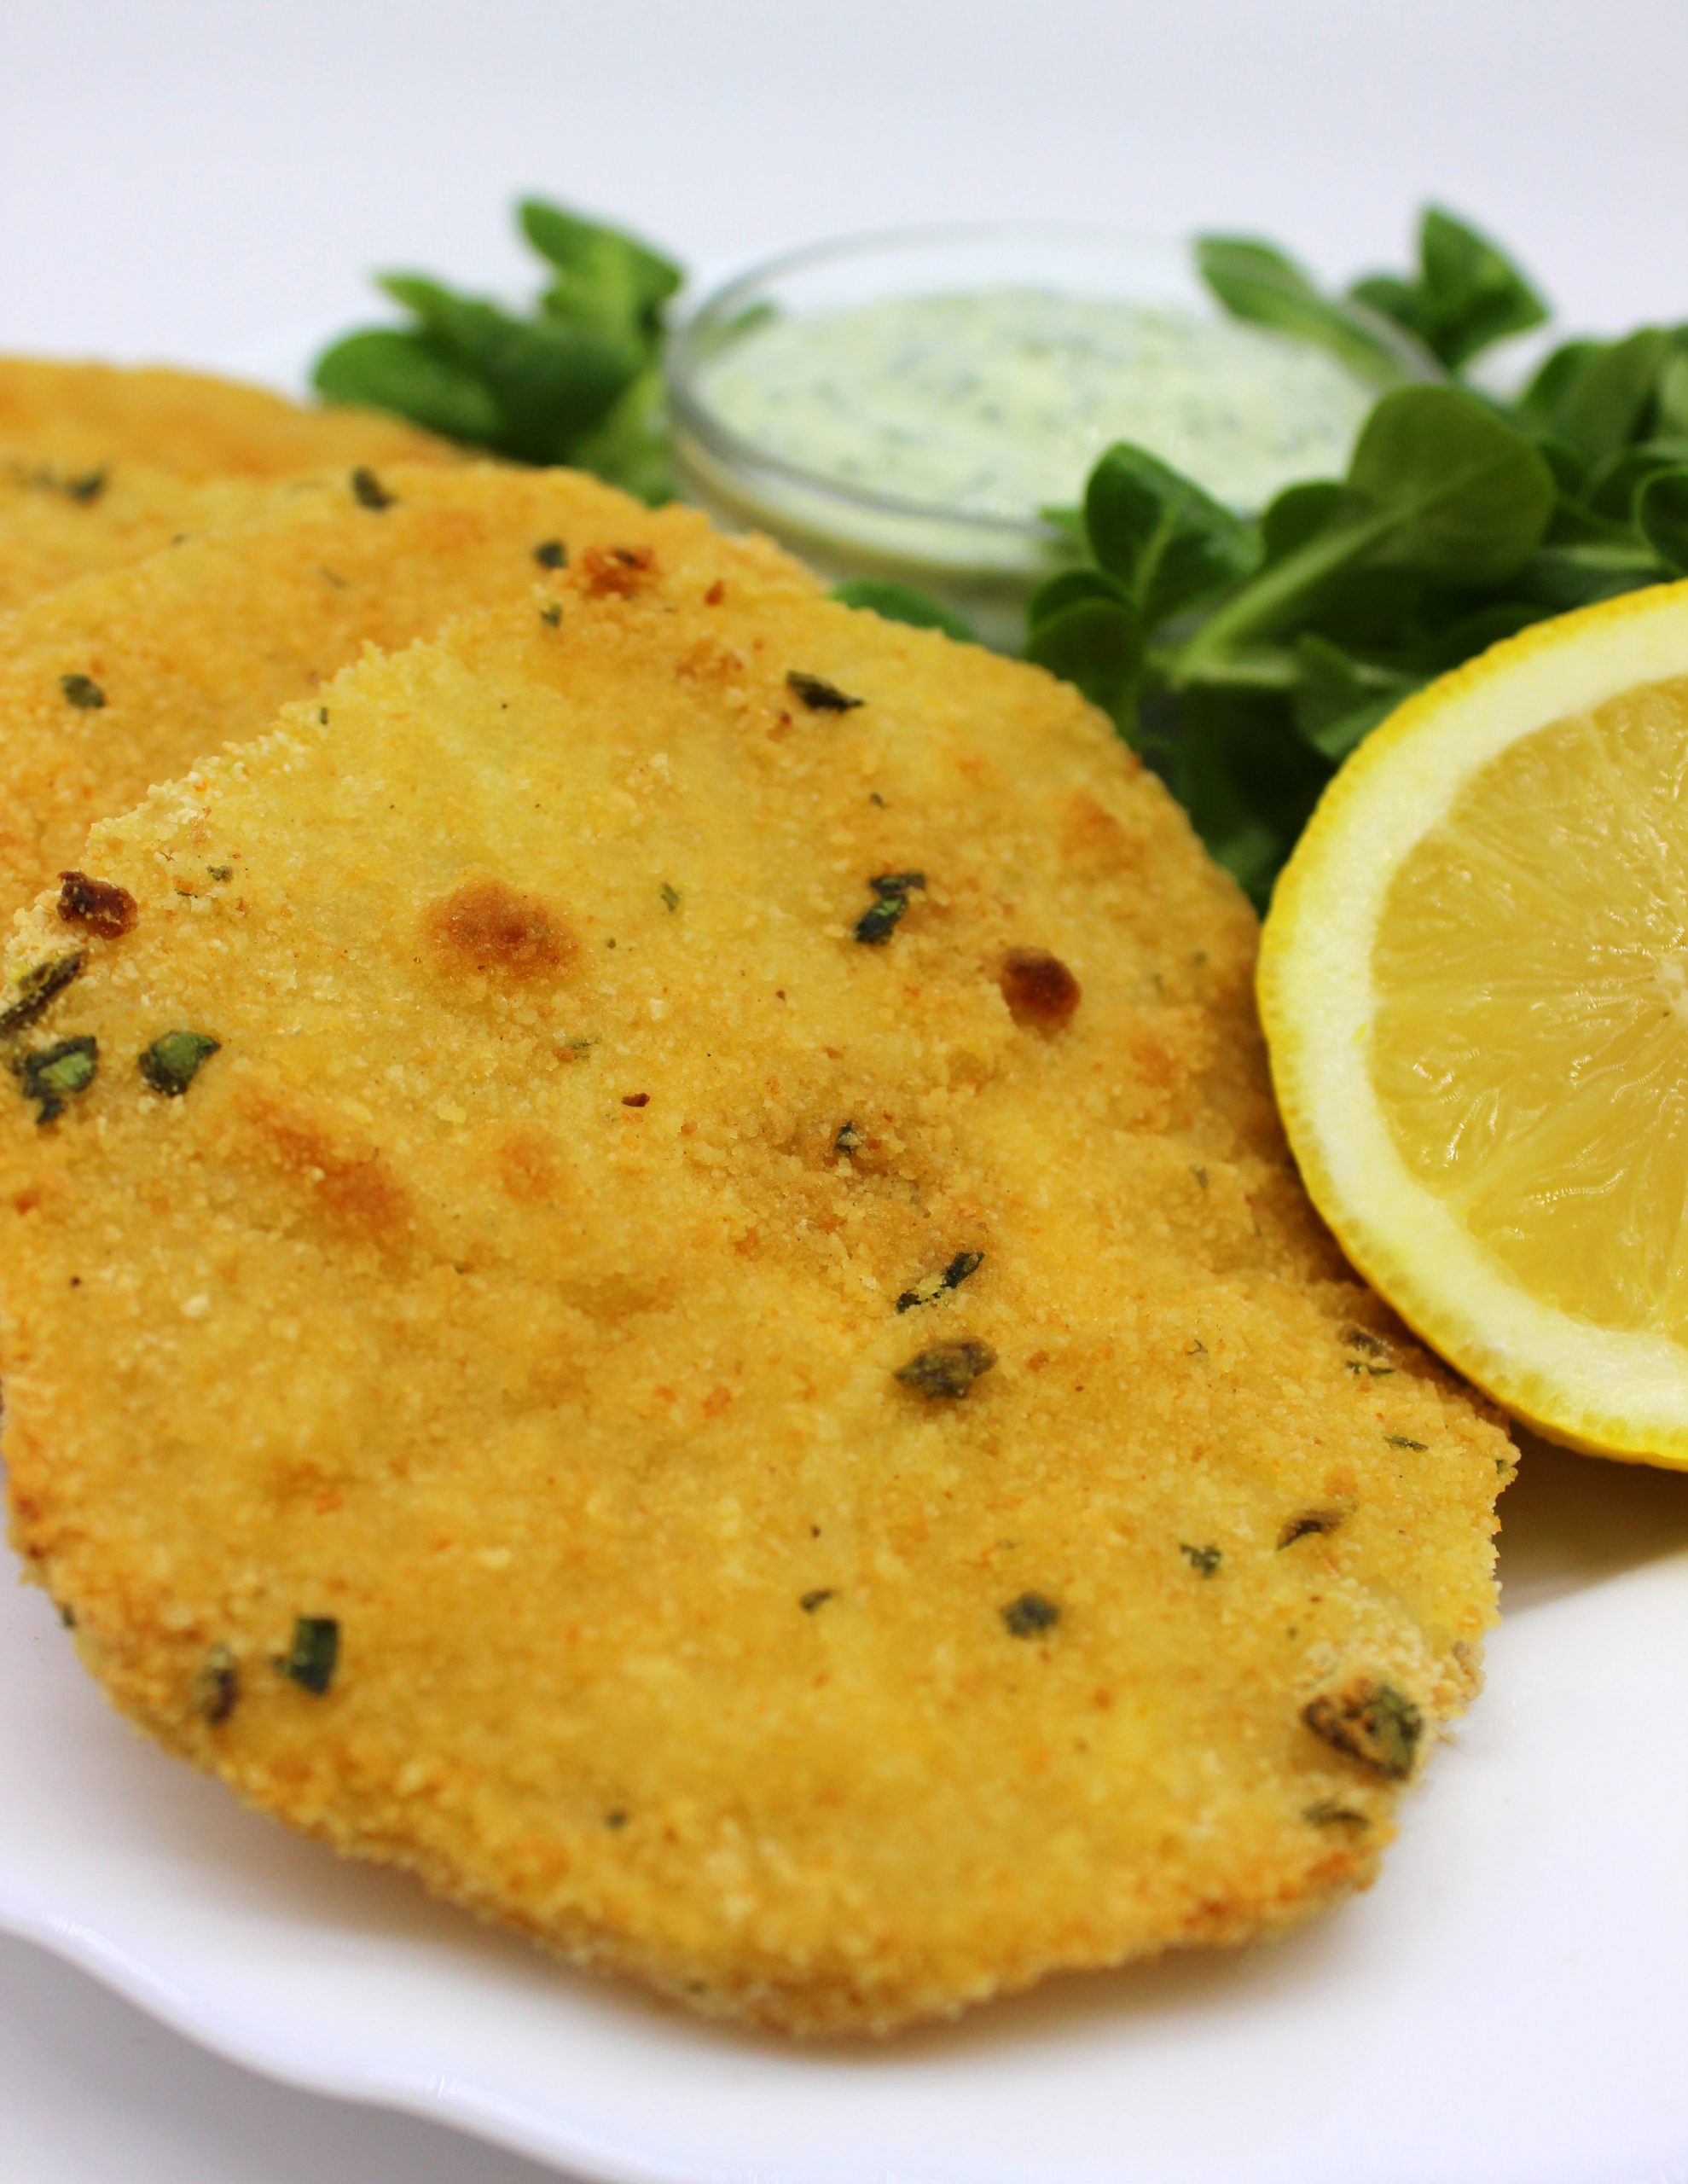
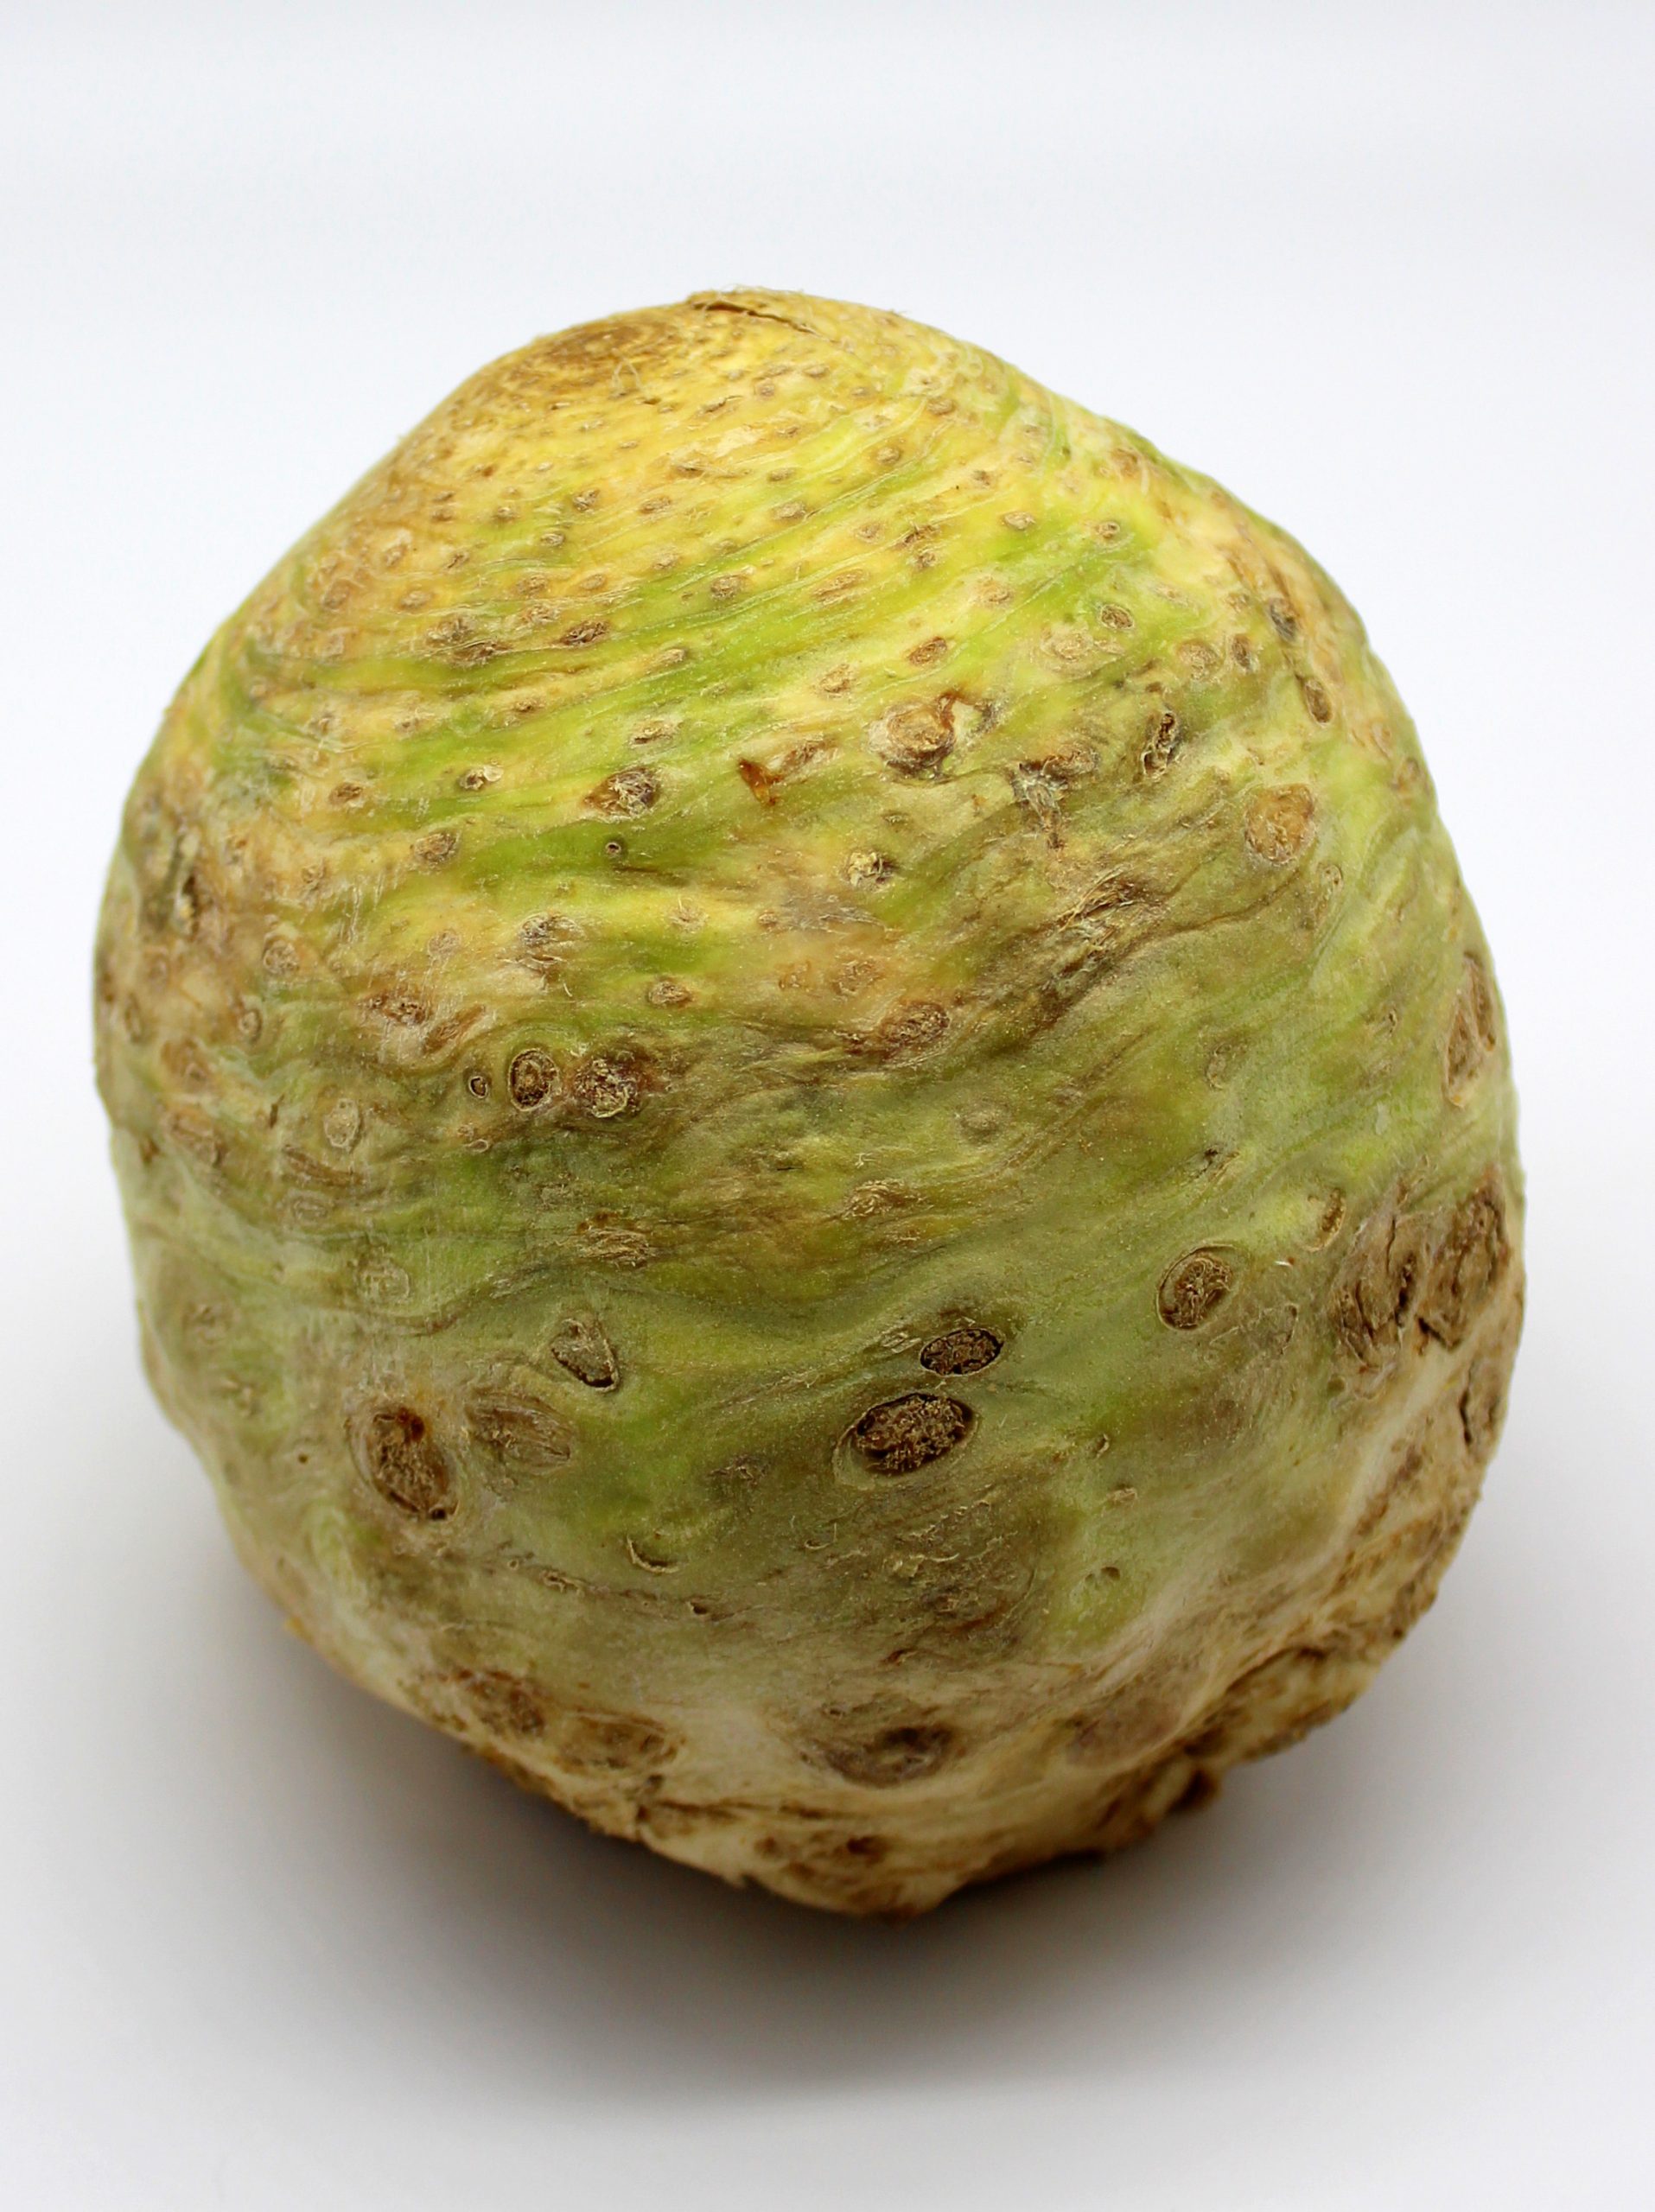
Healthy vegan celeriac cutlets
This recipe was posted on: 24/03/2021
Even if you consider yourself good in cooking, probably there are some food products that are unfamiliar to you. Compared to other root vegetables, in my opinion, celeriac is not between the most popular ones. But I think it’s a bit unfair, since you can use it many different ways. And one of them is by preparing these healthy vegan celeriac cutlets!
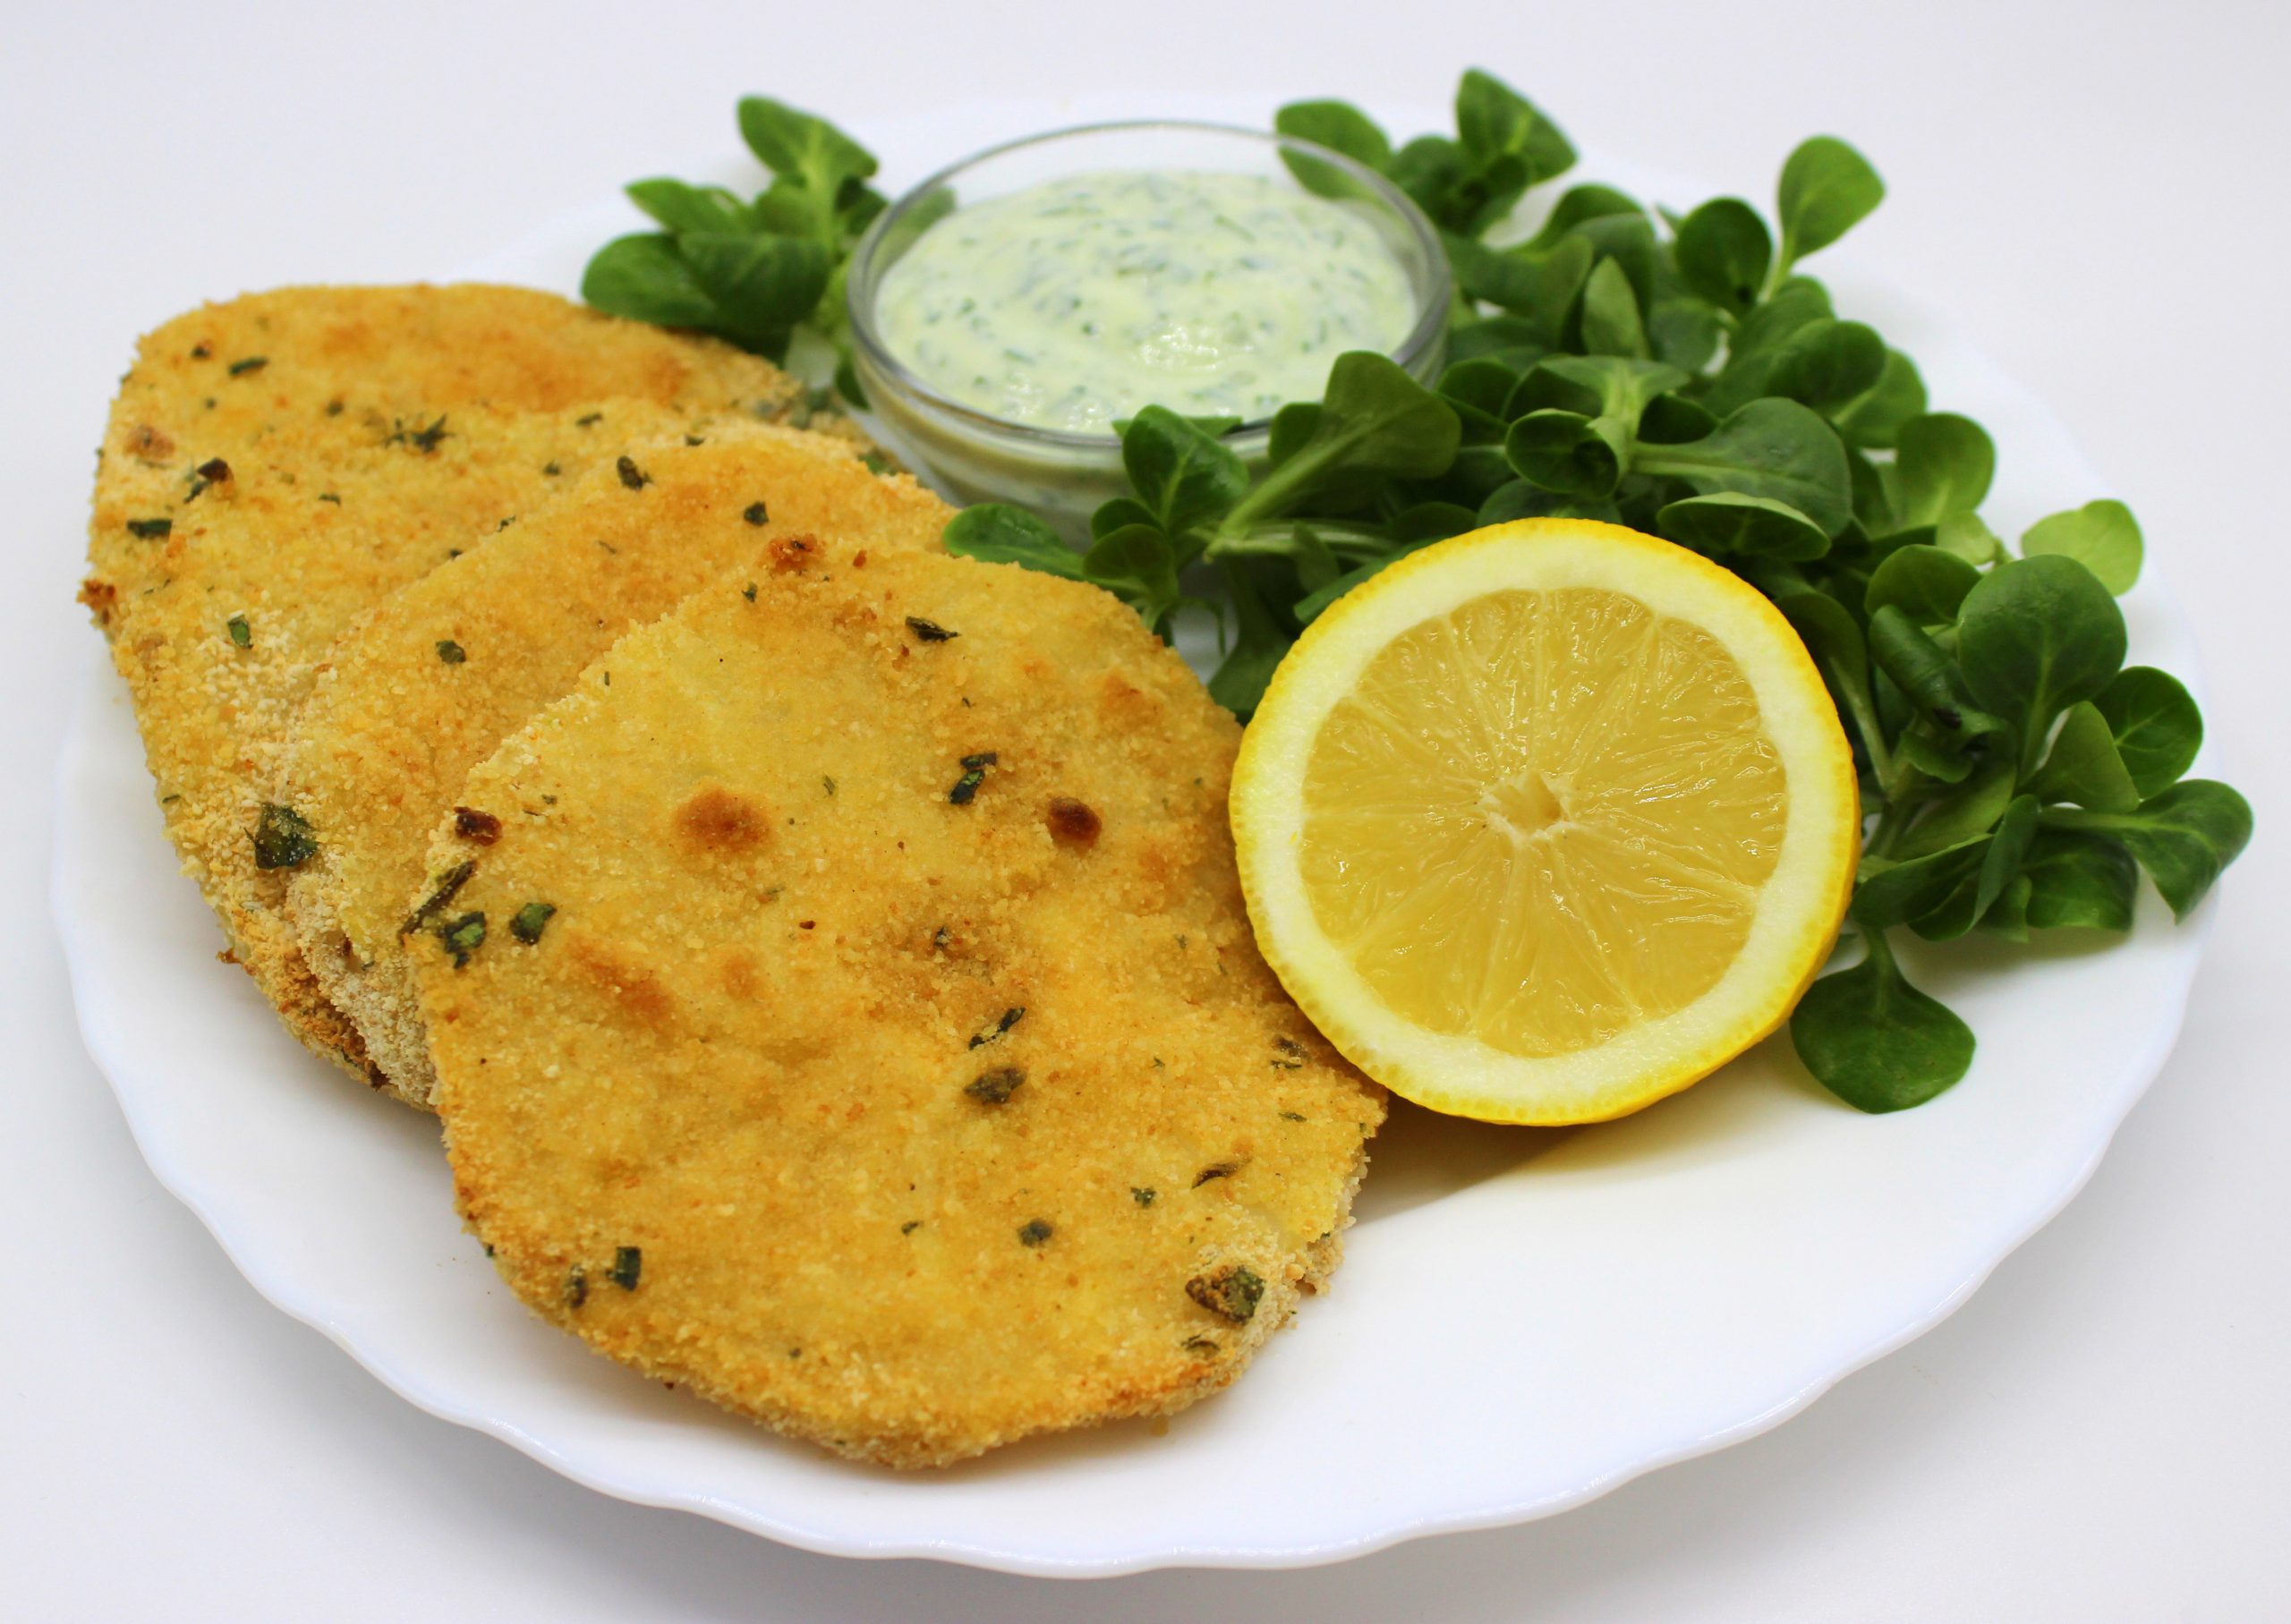
Before we dive into the recipe details, let me first tell you something important: even though I use the word “cutlets”, the outcome flavor is not similar to meat. Not at all! So, please, don’t expect it to be meaty. The reason people call this food “celeriac cutlets” is simply because visually they are similar to meat cutlets. And that’s it! My healthy vegan celeriac cutlets are meat-free and very delicious!
How to prepare healthy vegan celeriac cutlets
You can adjust these healthy vegan celeriac cutlets to your own liking. For example, if you want to enjoy the healthier version, bake them in the oven. Otherwise, if you prefer fried food, feel free to fry them in oil. What regards the necessary ingredients, you can always substitute the wheat flour with chickpea flour. And if you also decide to use breadcrumbs that don’t contain gluten, your celeriac cutlets will be not only vegan, but also gluten free. Also the choice of spices is up to you. Use the ones you like the most. Baked celeriac doesn’t have a particularly strong flavor, so feel free to express yourself when choosing the spices! But now let’s concentrate on the preparation process itself. So, to prepare these healthy vegan celeriac cutlets you’ll need celeriac, flour, water, breadcrumbs, garlic, parsley, spices and some olive oil.
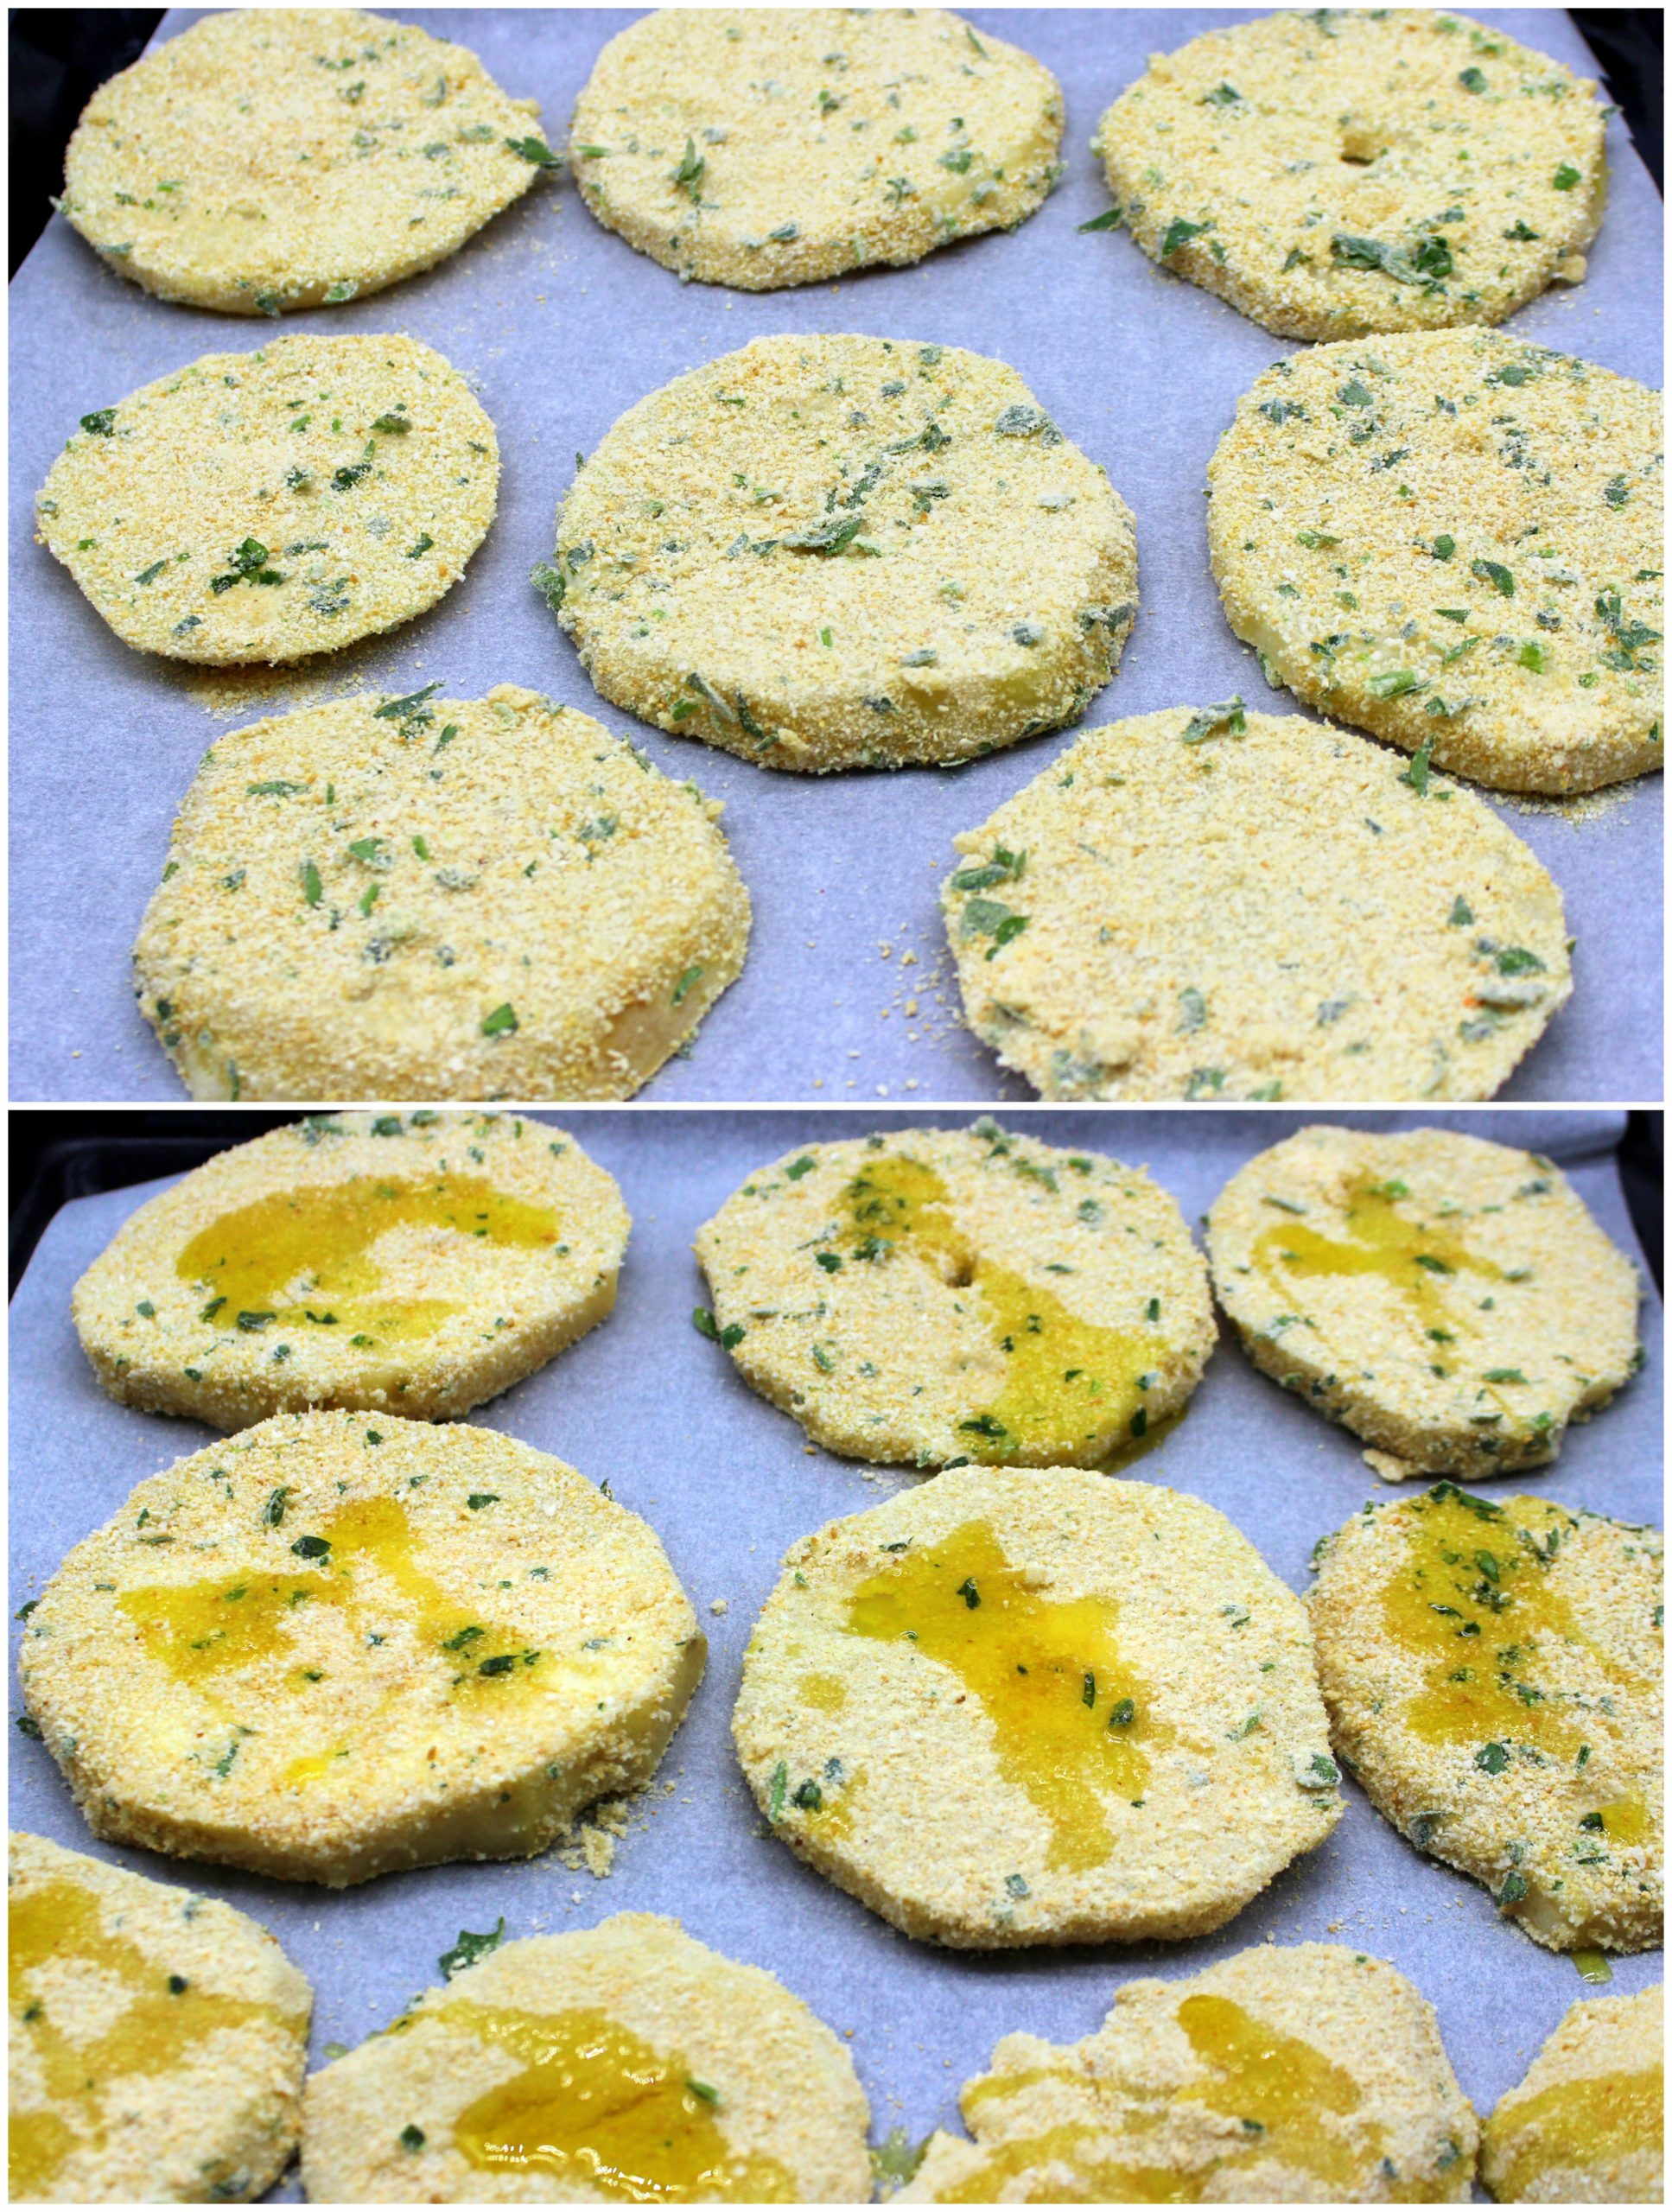
First you need to peel and clean the celeriac and then cut it in slices. Since celeriac is quite hard, for cutting use a sharp knife, but be very careful! Once you’ve sliced your celeriac, put the slices in boiling hot water and boil them for a few minutes. Meanwhile in one bowl mix flour and water and in another bowl mix breadcrumbs with crushed garlic, chopped parsley and spices. When the celeriac slices have cooled down a bit, take a slice with one hand, dip it in the flour – water mixture, then place it in the breadcrumbs and press. With the other hand put breadcrumbs on the top of the slice and press them in. Then transfer the prepared slice on a baking tray. Continue with all the remaining slices. Pour over the slices a bit of olive oil and bake them in the oven (200°C/390°F) for 20 minutes.
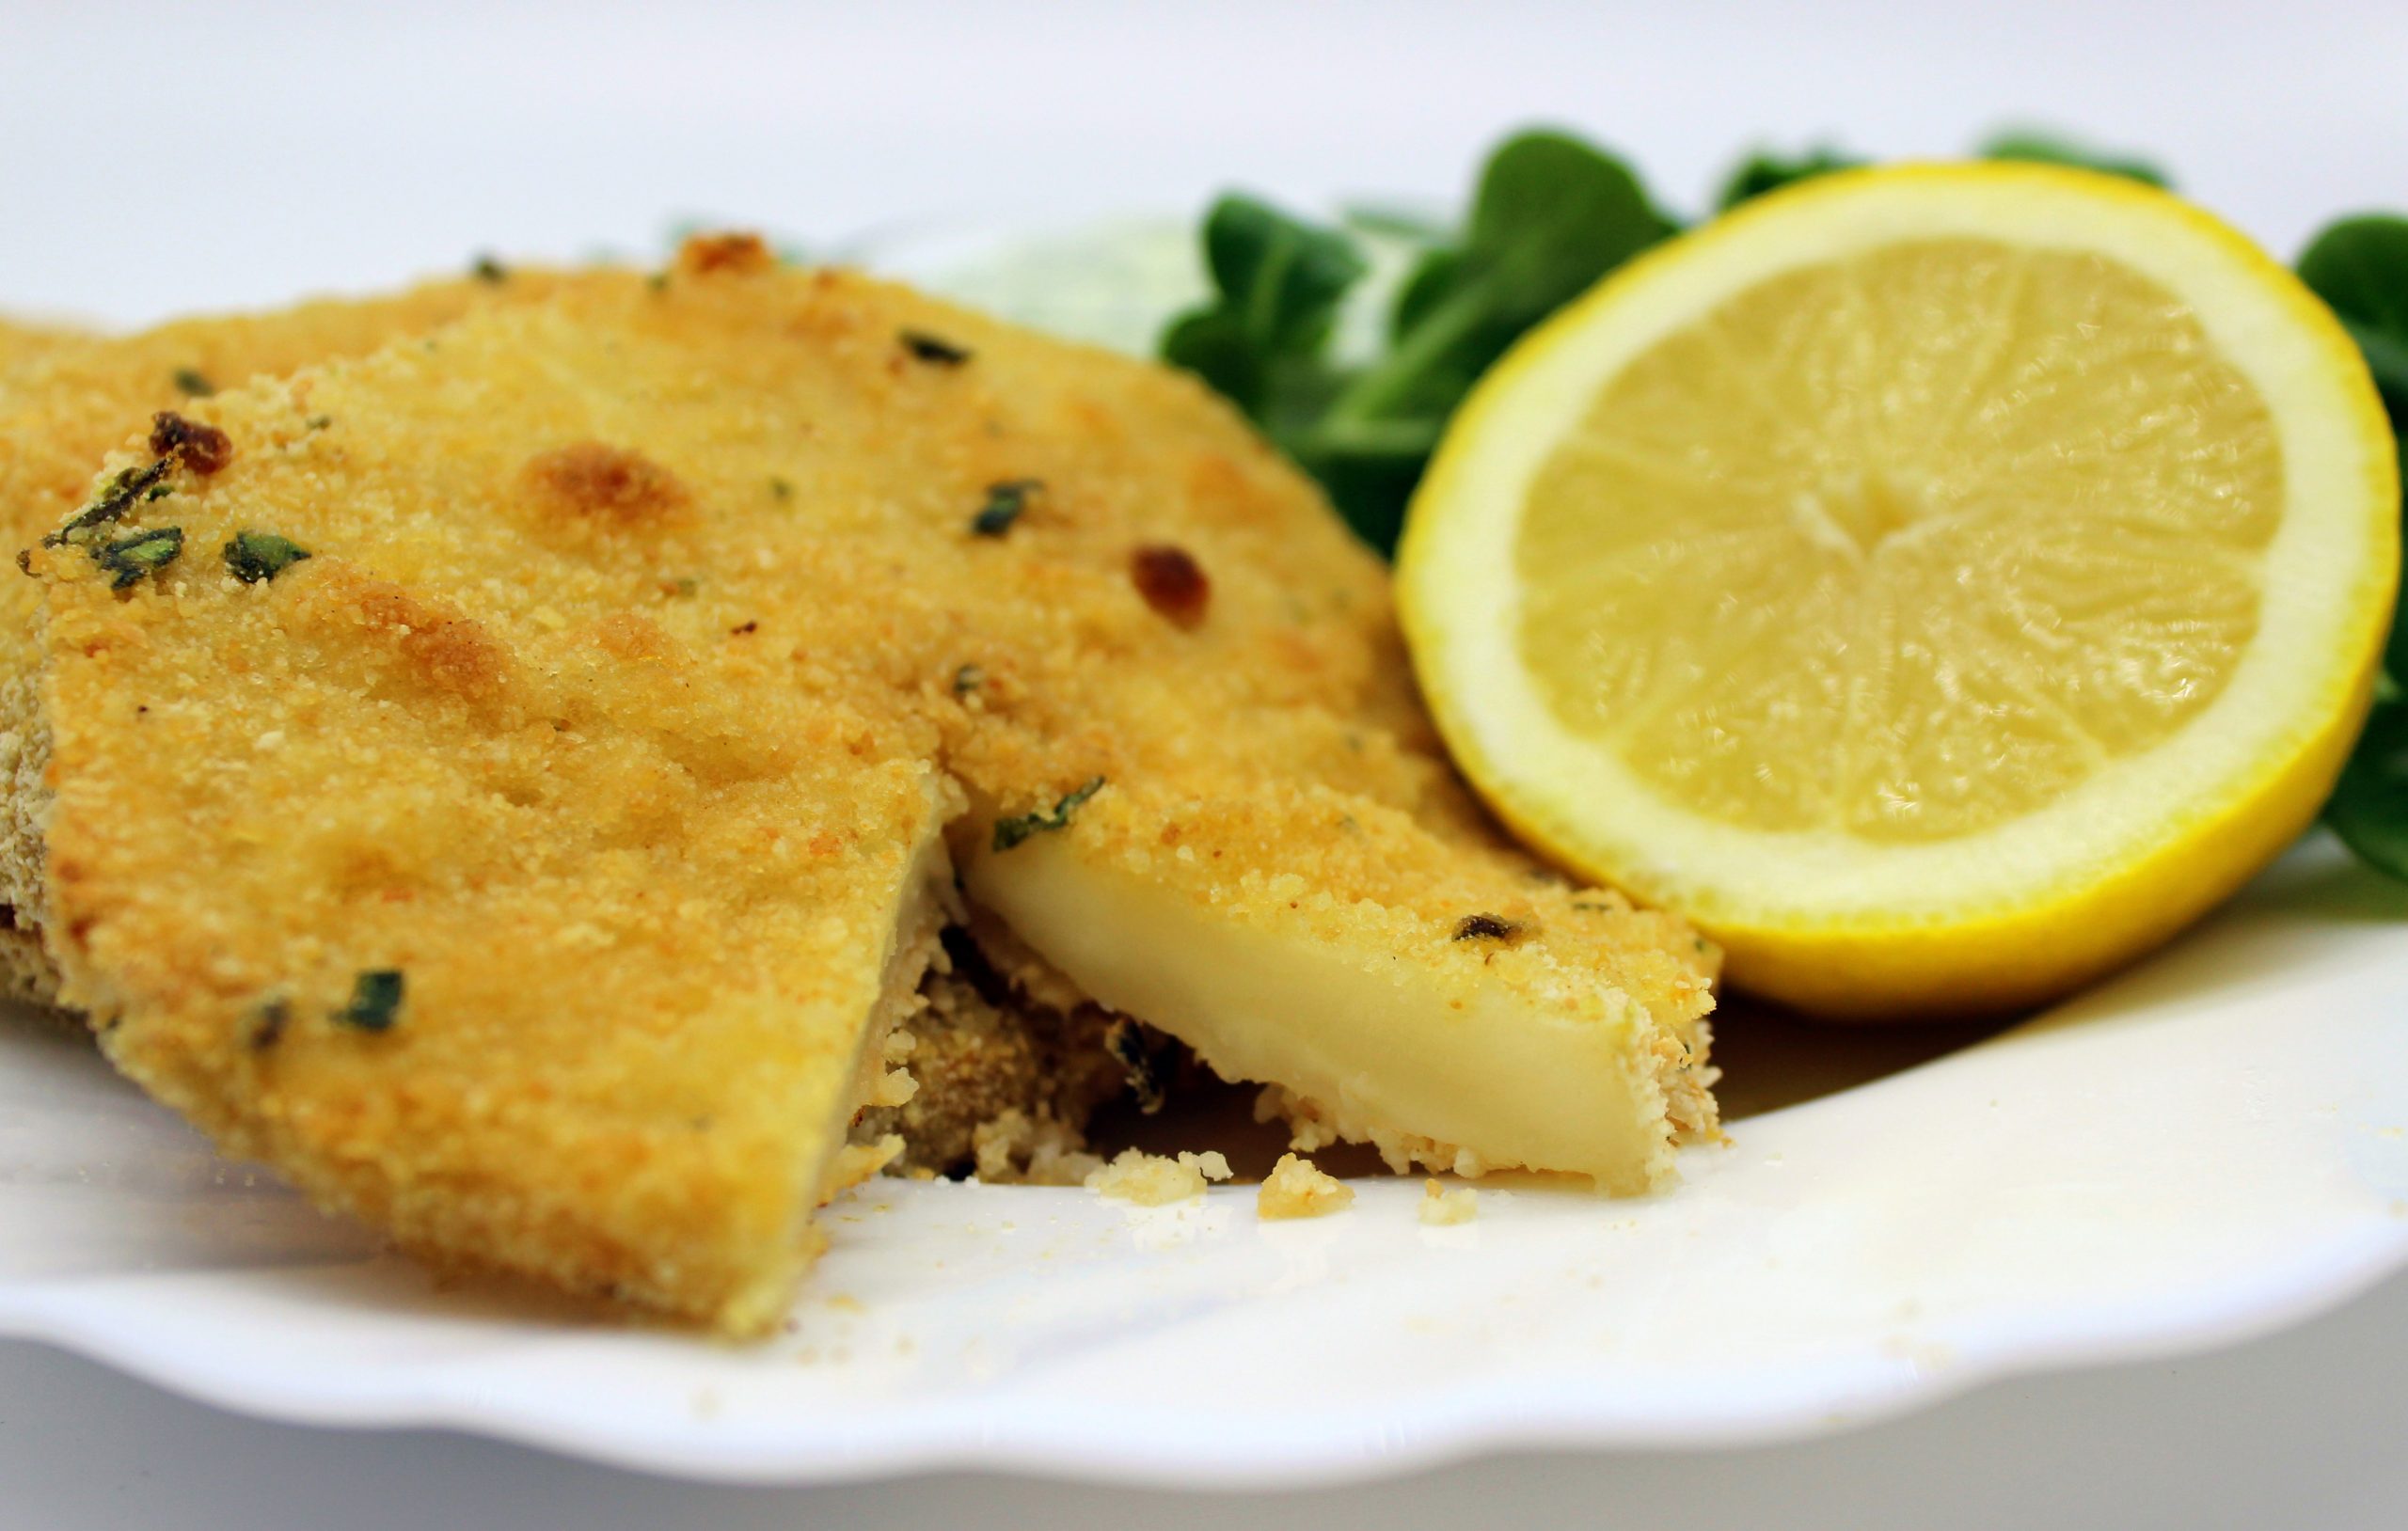
How to serve healthy vegan celeriac cutlets
You can enjoy celeriac cutlets both warm and cold. And you can use them as a main dish, side dish or even as some sort of vegan burger between two slices of bread. The options are limitless! If you decide to serve them as a main dish, I advise you to accompany them with some vegan sauce. For example, the refreshing flavor of my vegan Tzatziki sauce fits perfectly with these crispy celeriac cutlets. If instead you want to make things even more simple, just squeeze some drops of fresh lemon juice over the cutlets. The flavor combination will surprise you – trust me! But if you want to use these celeriac cutlets as a side dish, serve them together with my crispy garlic Hasselback potatoes.

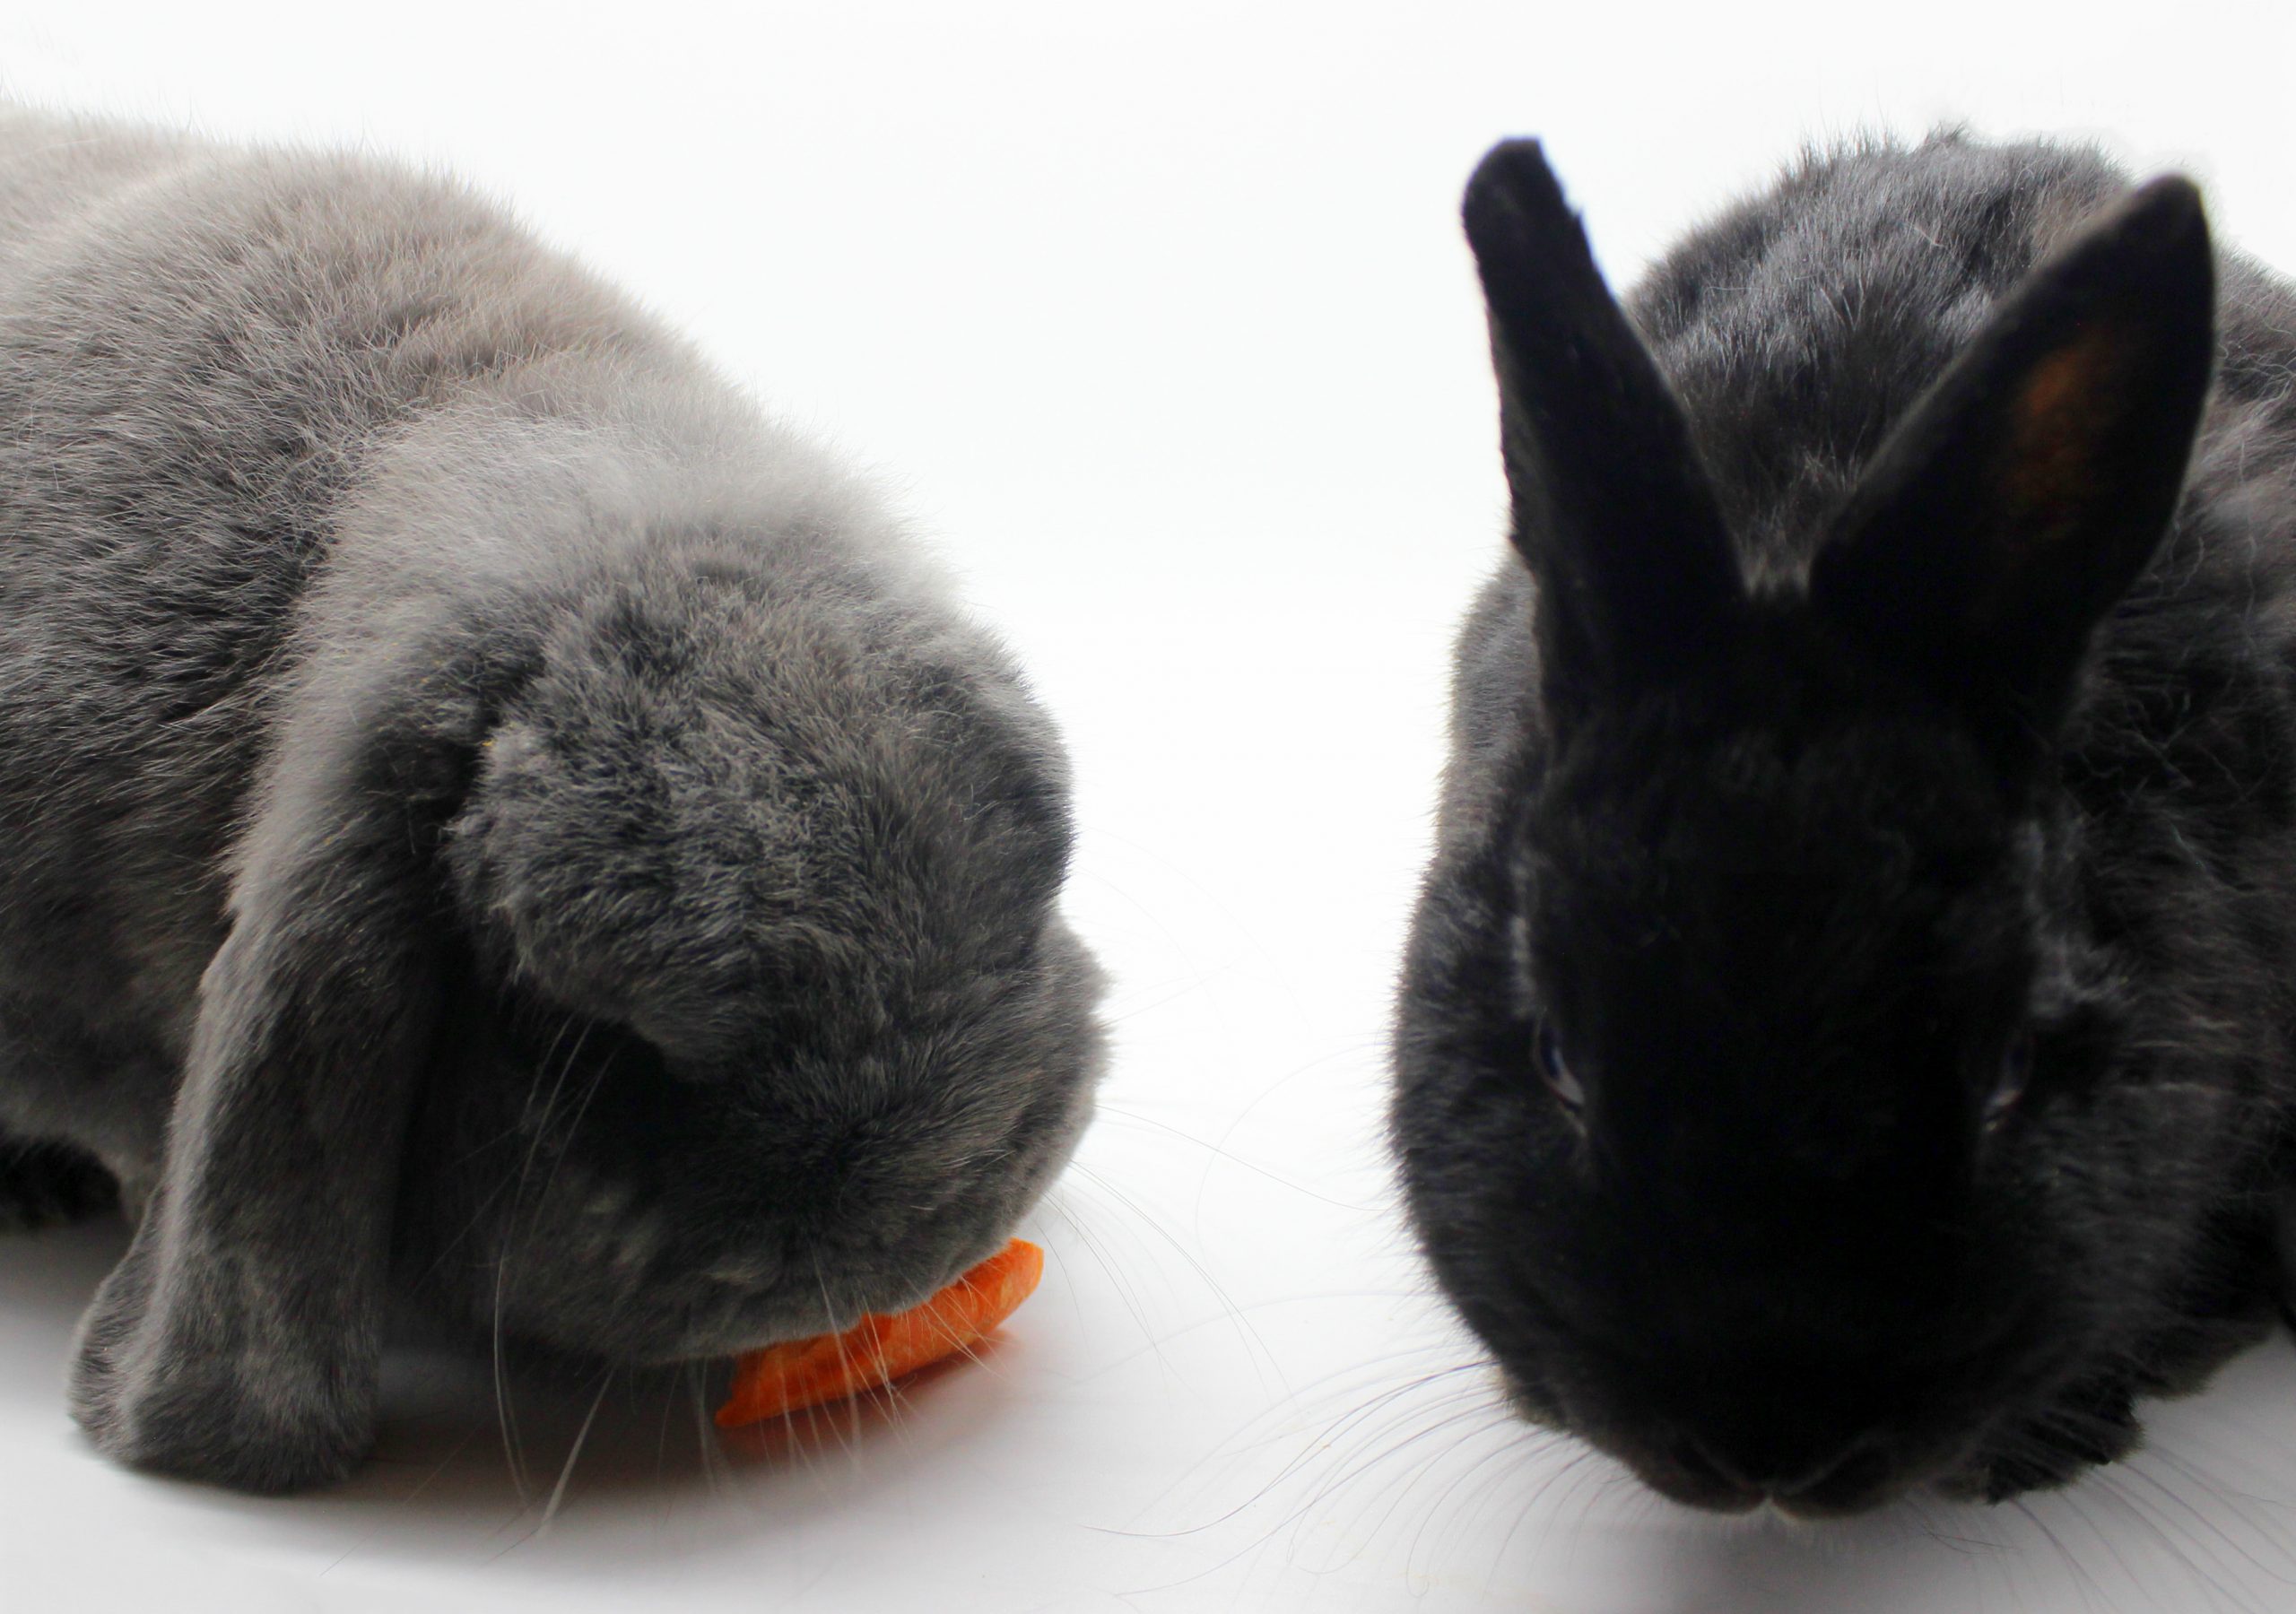
When I was working on this recipe, Vanilla was still with us. Even though now she hops happily together with Specky in the bunny paradise, I think it’s only correct to remember how wonderful she was! That time when I was preparing these healthy vegan celeriac cutlets, she got very confused that I’m making from celeriac something that looks like meat, but isn’t meat… Even though I must admit that in my opinion she gave me these confused looks just to get some tasty rewards, ha ha! Anyway, true or not, during the process Vanilla got to enjoy the delicious vegetable itself that grows out from celeriac – the celery!

In case you have never tried to cook anything with celeriac before, I hope that this recipe inspired you to do it! I must admit that the first time I was a bit skeptical, since I’m not a huge fan of celery flavor. But I assure you that the final result does not have a strong taste of celery. So, simply try this recipe to find out that these celeriac cutlets are:
-
vegan
- healthy
- easy to make
- crispy on the outside
- juicy inside
- flavorful
- versatile in usage
- low-fat
- dairy-free
- egg-free
- and simply yummy!
Let me know, if you try this recipe! Leave a comment or even more: snap a picture of your masterpiece and post it on Instagram by tagging @vegan_bunnymommycooks or Facebook by tagging @bunnymommycooks. And feel free to let your animal family members join in the picture!
Vegan chocolate and peanut cupcakes
This recipe was posted on: 02/02/2021
Probably, if I mention cupcakes, your first thought is “chocolate cupcakes”. Of course, they are very delicious, but with time simple chocolate cupcakes can become boring as a sweet treat. But that doesn’t mean that you need to invent something extraordinary. Sometimes it’s enough to add some extra ingredients to the dough and to decorate the cupcakes with a delicious cream in order to obtain a spectacular result! And my vegan chocolate and peanut cupcakes are exactly that – simple, yet spectacular!

Obviously, nuts and chocolate are a well-known combination. I’d say that all the nuts taste great together with chocolate. But at the same time each type of nuts has its own specific flavor. Peanuts, for example, have a barely noticeable salty aftertaste. You might think that salt and chocolate don’t go together, but actually they do! The amount of salinity of the peanuts is so small that it creates just the right equilibrium between all the flavors. To my vegan chocolate and peanut cupcakes I added also a bit of coffee, which makes the chocolate flavor be even more powerful. So, at the end the result of this recipe is a pleasant explosion of different flavors in your mouth.

How to prepare vegan chocolate and peanut cupcakes
The preparation process of these vegan chocolate and peanut cupcakes is not that different from any other type of cupcakes. You start by sifting flour, baking powder and cacao powder in a big bowl. Then add sugar and mix everything together. After that in a glass mix instant coffee powder with hot water and then add it to the dry ingredients together with plant-based milk and oil. Mix everything well until you get a homogenous dough. Then mix in the toasted peanut pieces. Fill your cupcake forms with the prepared dough and bake your cupcakes in 170°C/340°F for about 20 – 25 minutes. Or until a toothpick inserted in the middle of a cupcake comes out clean.

While the cupcakes are cooling, prepare the cream by whipping together the white solid part of full fat coconut milk, cold peanut butter and caster sugar. It’s important that all the ingredients are cold so that they create a thick cream that holds well together. Decorate your cupcakes with the cream, sprinkle over some toasted peanut pieces and some dark chocolate, et voilà! Your vegan chocolate and peanut cupcakes are ready!

Delicious vegan cupcakes and vegan sweets
If you like the combination of chocolate and nuts, you’ll also appreciate my vegan cranberry and walnut muffins. Or, if you desire cupcakes that don’t have any connection with chocolate, you should try my ginger and mango oatmeal mini muffins. But if you’re a chocoholic like me, you must at least once try my vegan Bounty bars and my Dalgona coffee cups. All these sweets are so good that you won’t want to share them with anyone, so that you can eat them all by yourself! Just like Specky did, when I gave to him and Vanilla a carrot, but Specky decided not to share it. Despite the fact that Specky stole Vanilla’s food, he’ll always remain in our hearts as the best bunny boy ever!
Once again with this recipe I have proved that to create something vegan and really delicious, you don’t need to spend hours and hours in kitchen by using strange ingredients that you have never seen before! These chocolate and peanut cupcakes are perfect for a lazy Sunday afternoon because they are:
-
vegan
- easy to make
- flavorful
- creamy
- chocolaty
- dairy free
- nutty
- nourishing
- and simply yummy!
Let me know, if you try this recipe! Leave a comment or even more: snap a picture of your masterpiece and post it on Instagram by tagging @vegan_bunnymommycooks or Facebook by tagging @bunnymommycooks. And feel free to let your animal family members join in the picture!
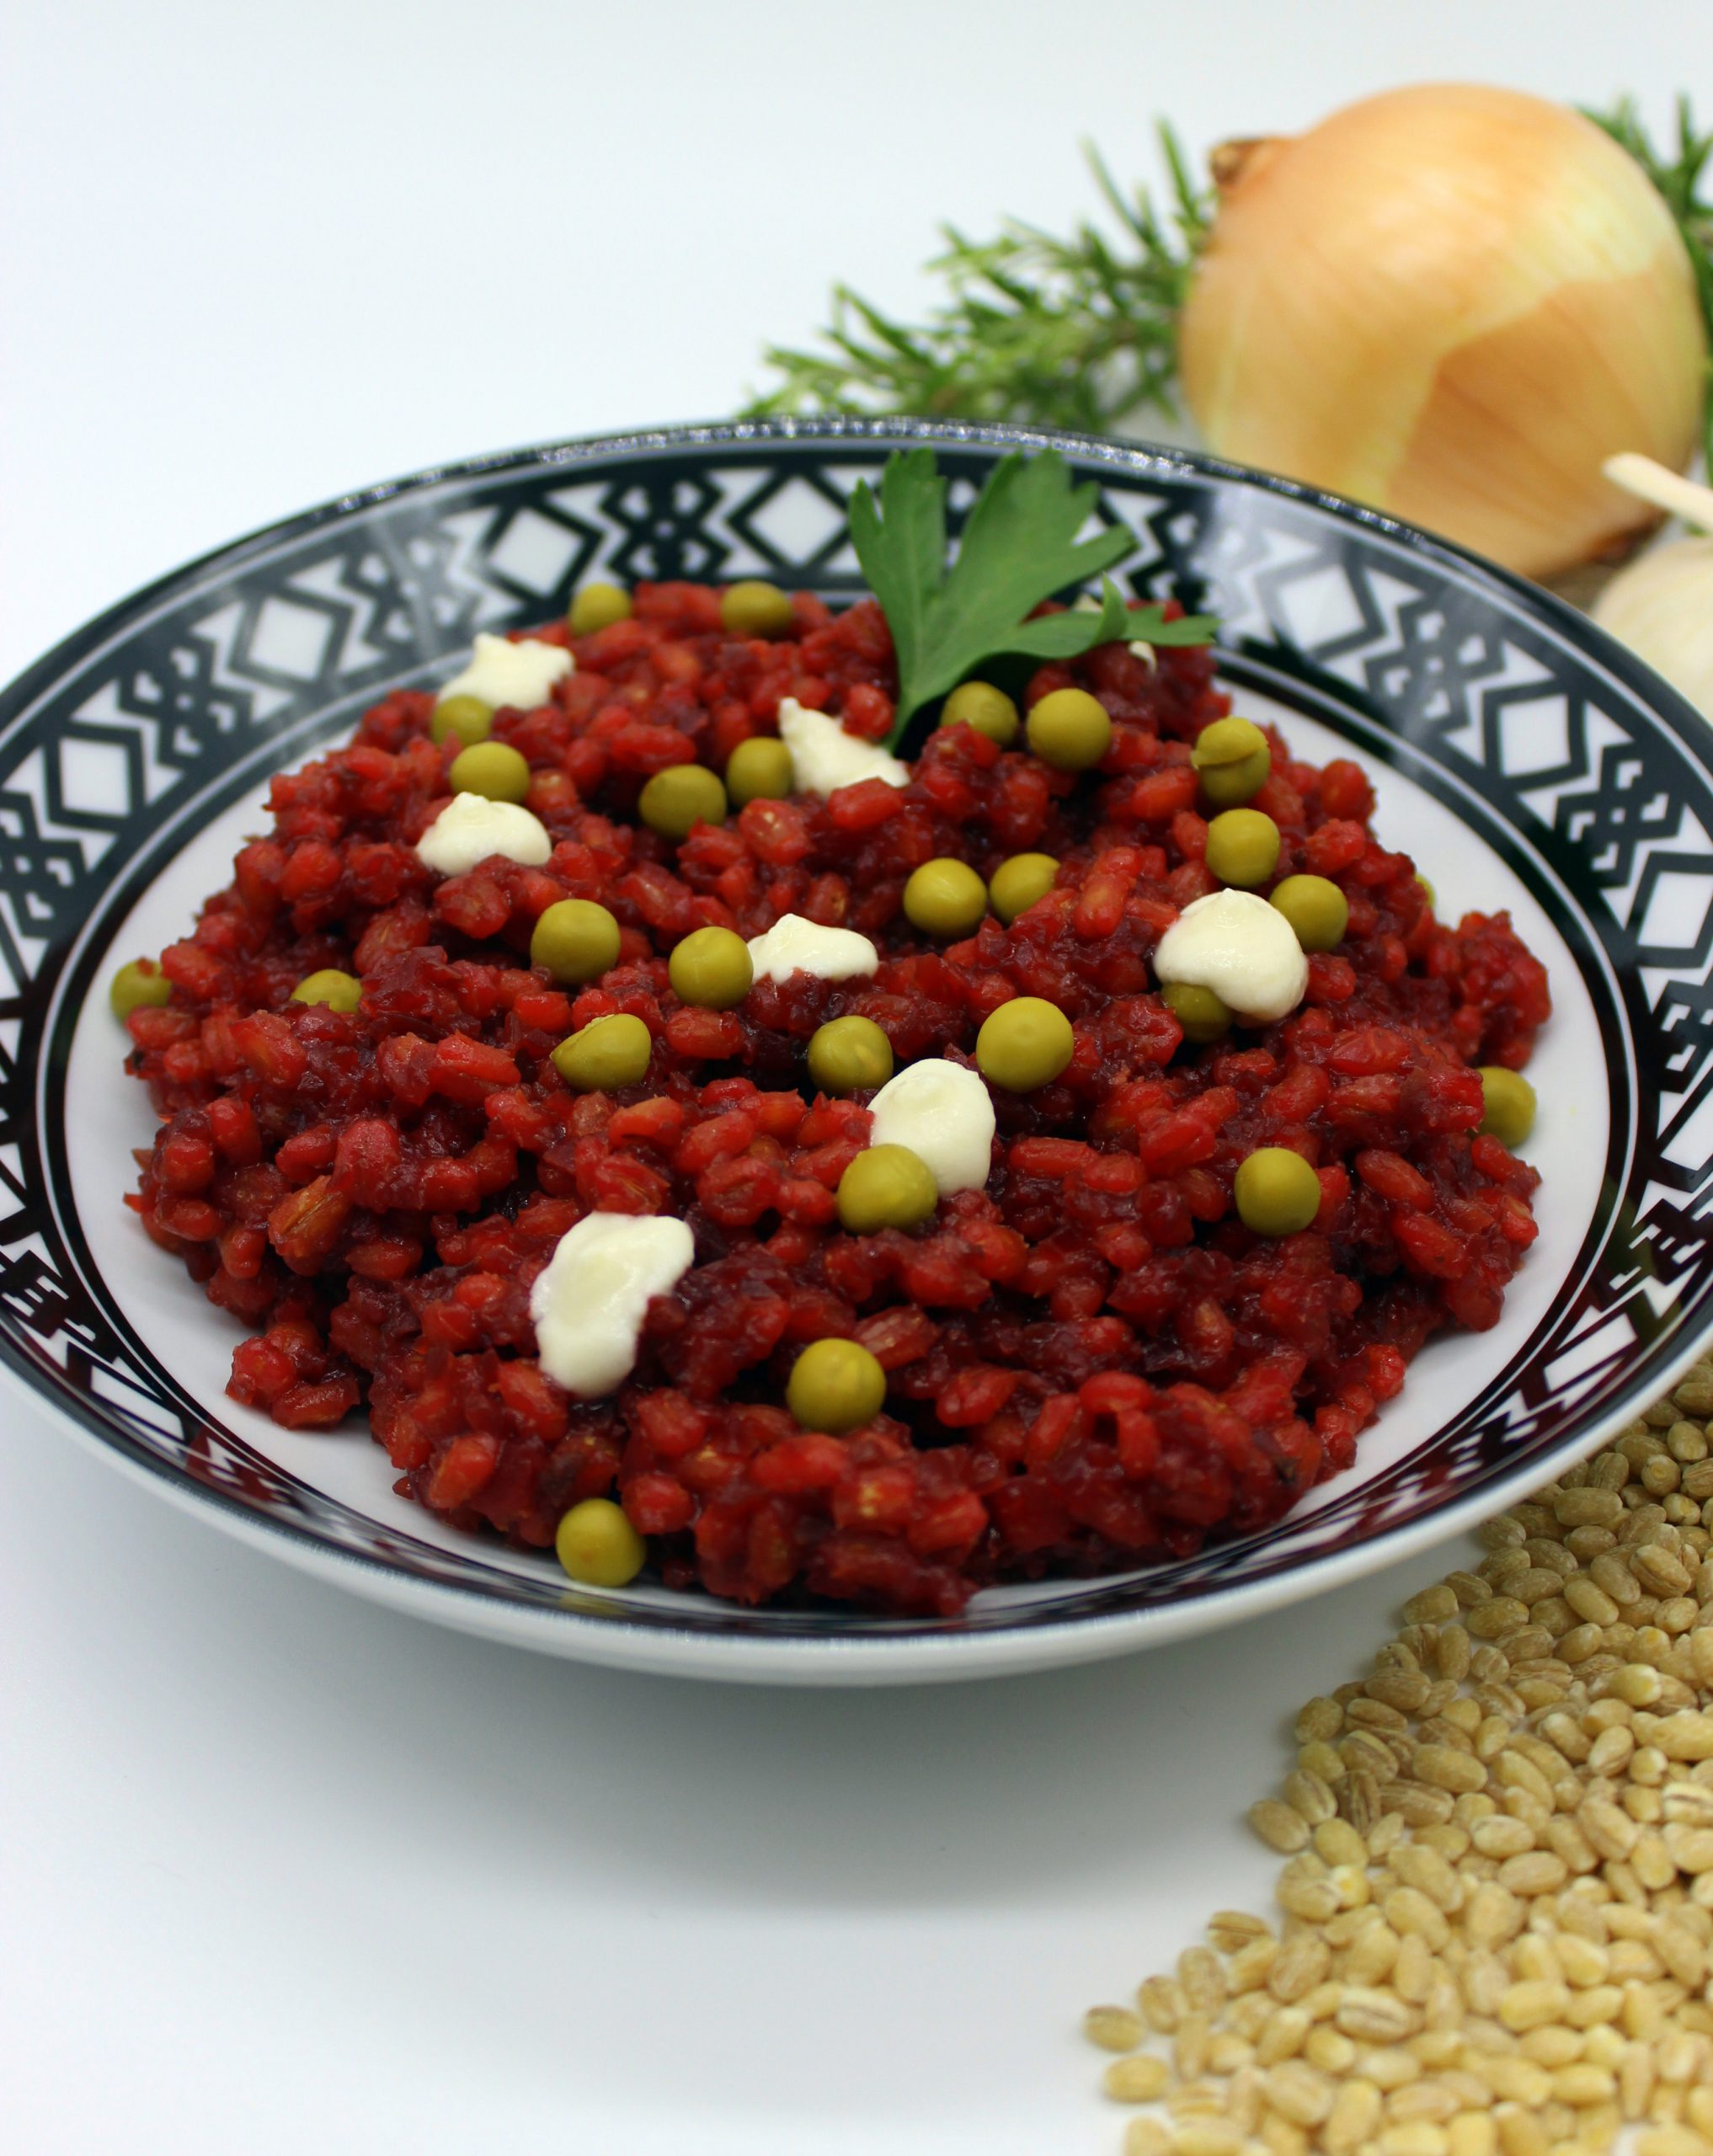
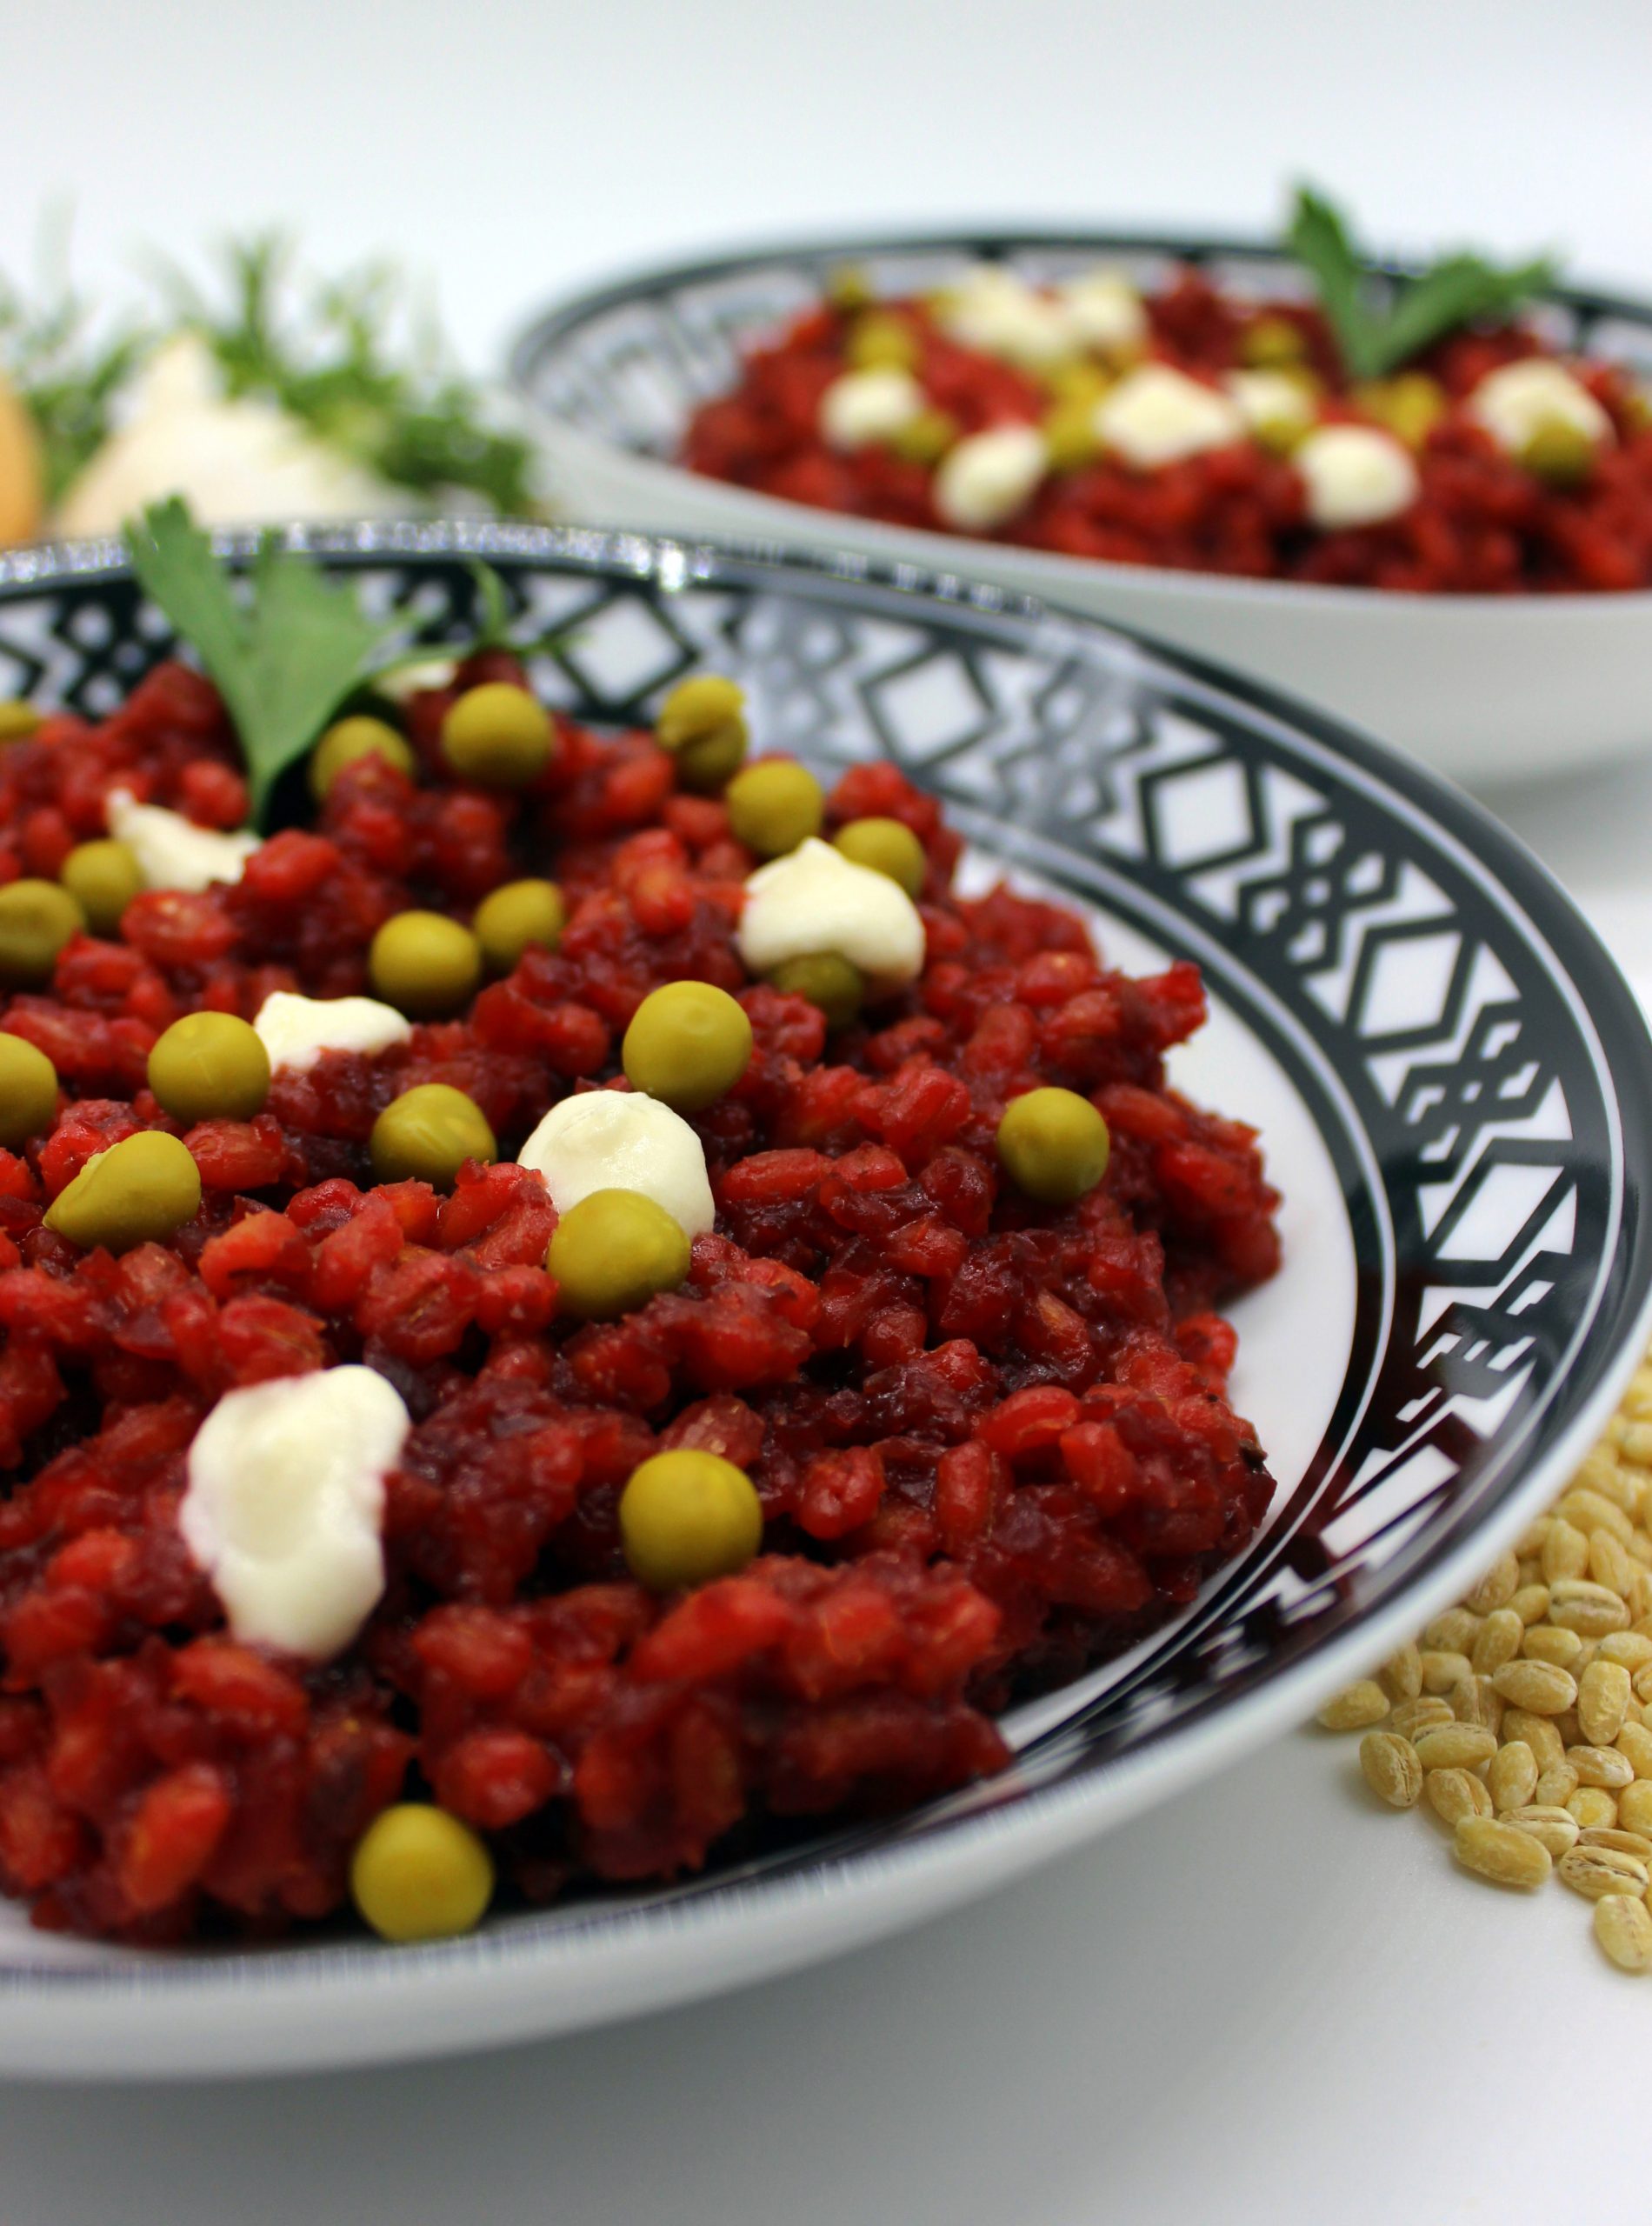
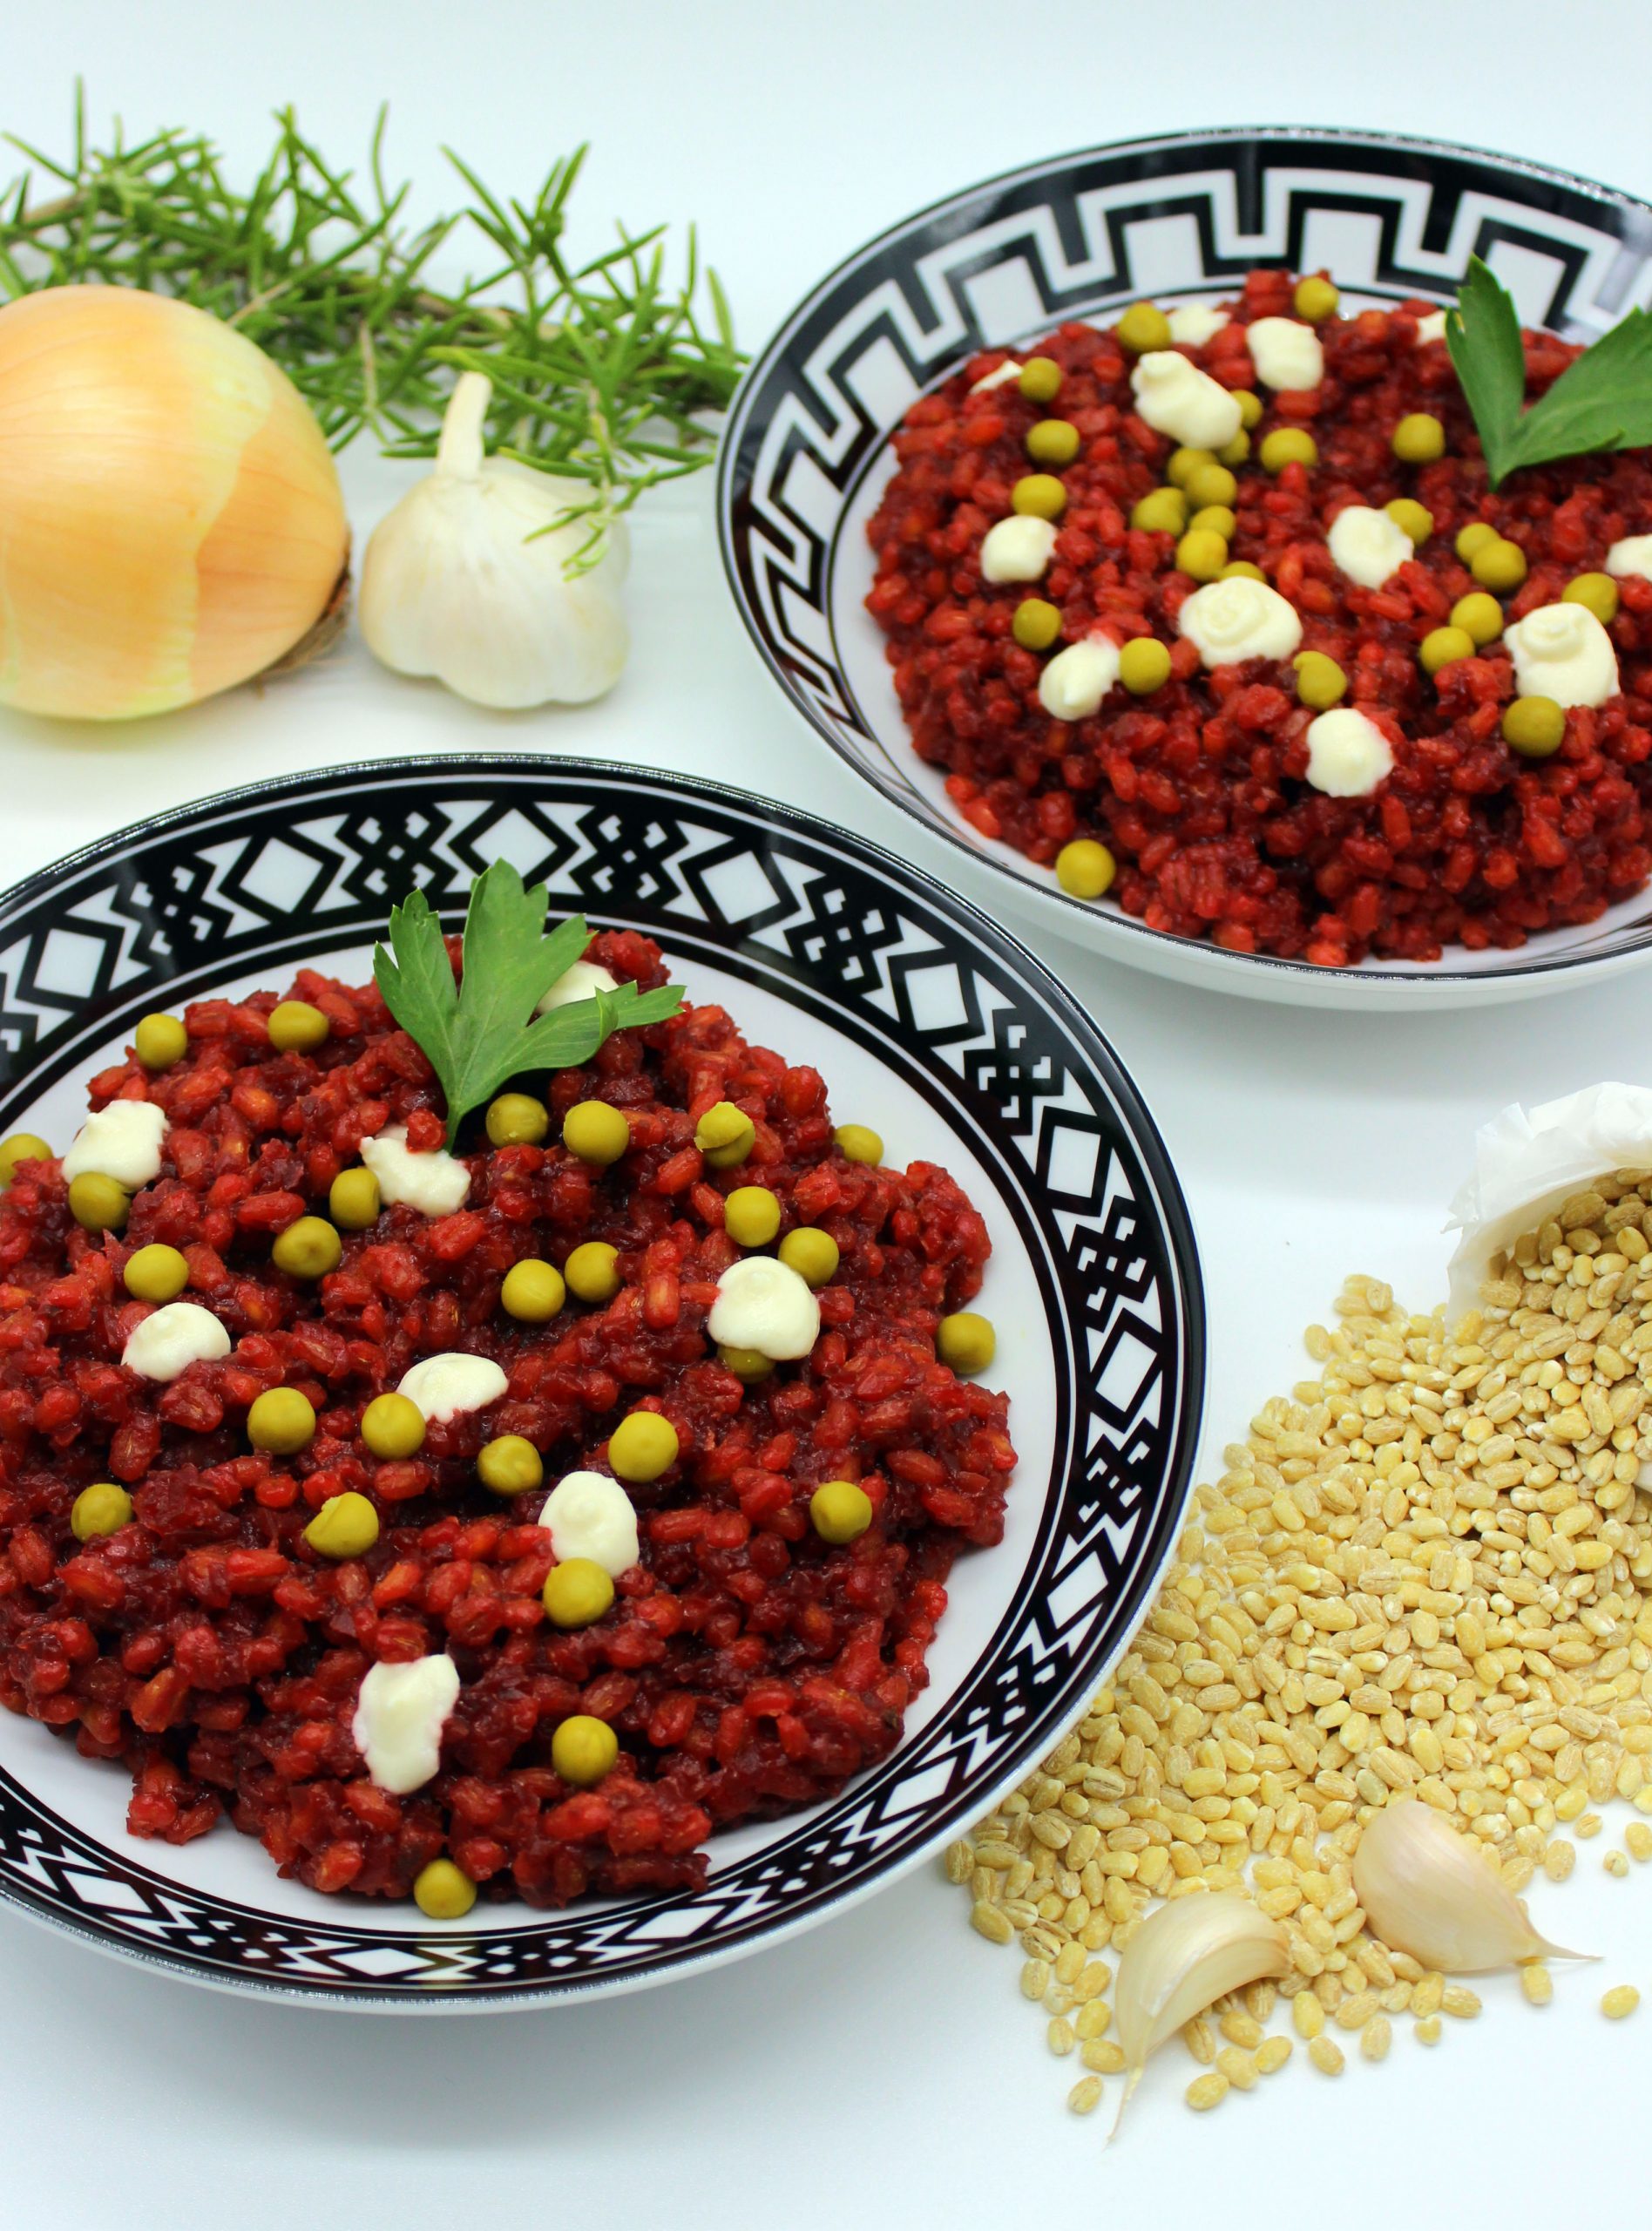
Vegan beetroot pearl barley risotto
This recipe was posted on: 11/01/2021
There are some food products that are very cheap and simple and that from time to time appear in the kitchen without a specific reason. When they have been there already for a while, you suddenly realize that you don’t know how exactly to use them. Not because you don’t have imagination or great cooking skills. But mostly because you have an impression that these simple products cannot surprise you with an unexpected flavor. Fortunately, that’s not true! And my vegan beetroot pearl barley risotto will prove it to you!
Even though beetroot is not usually added to many different dishes, it is very valuable for our health. Beetroots are high in fiber, which in turn are good for your digestive system. Being low in calories, beetroots are perfect for people who follow their calorie intake. And also for people who care about their wellbeing, since beetroots contain many vitamins and minerals. Also pearl barley contains several vitamins and minerals. But apart from that it’s a great alternative to rice, in case you start to be bored with it.
How to prepare vegan beetroot pearl barley risotto
The preparation process of vegan beetroot pearl barley risotto is very easy. As ingredients you’ll need cooked beetroot, pearl parley, onion, garlic, vegetable stock and some salt, pepper and oil. I added to my vegan beetroot pearl barley risotto also green peas and some drops of unsweetened soy yoghurt. But that’s completely optional. Your vegan beetroot pearl barley risotto will taste great also without the mentioned decorative ingredients. So, to prepare this pearl barley risotto first you need to cook onion and garlic for some minutes. While onion and garlic pieces are cooking, grate the cooked beetroots very thinly and set them aside. Then add in the frying pan pearl barley and toast it for a bit. After that you must add in the frying pan the grated beetroot and part of the vegetable stock. Mix everything and cook until ready by gradually adding additional vegetable stock if necessary.
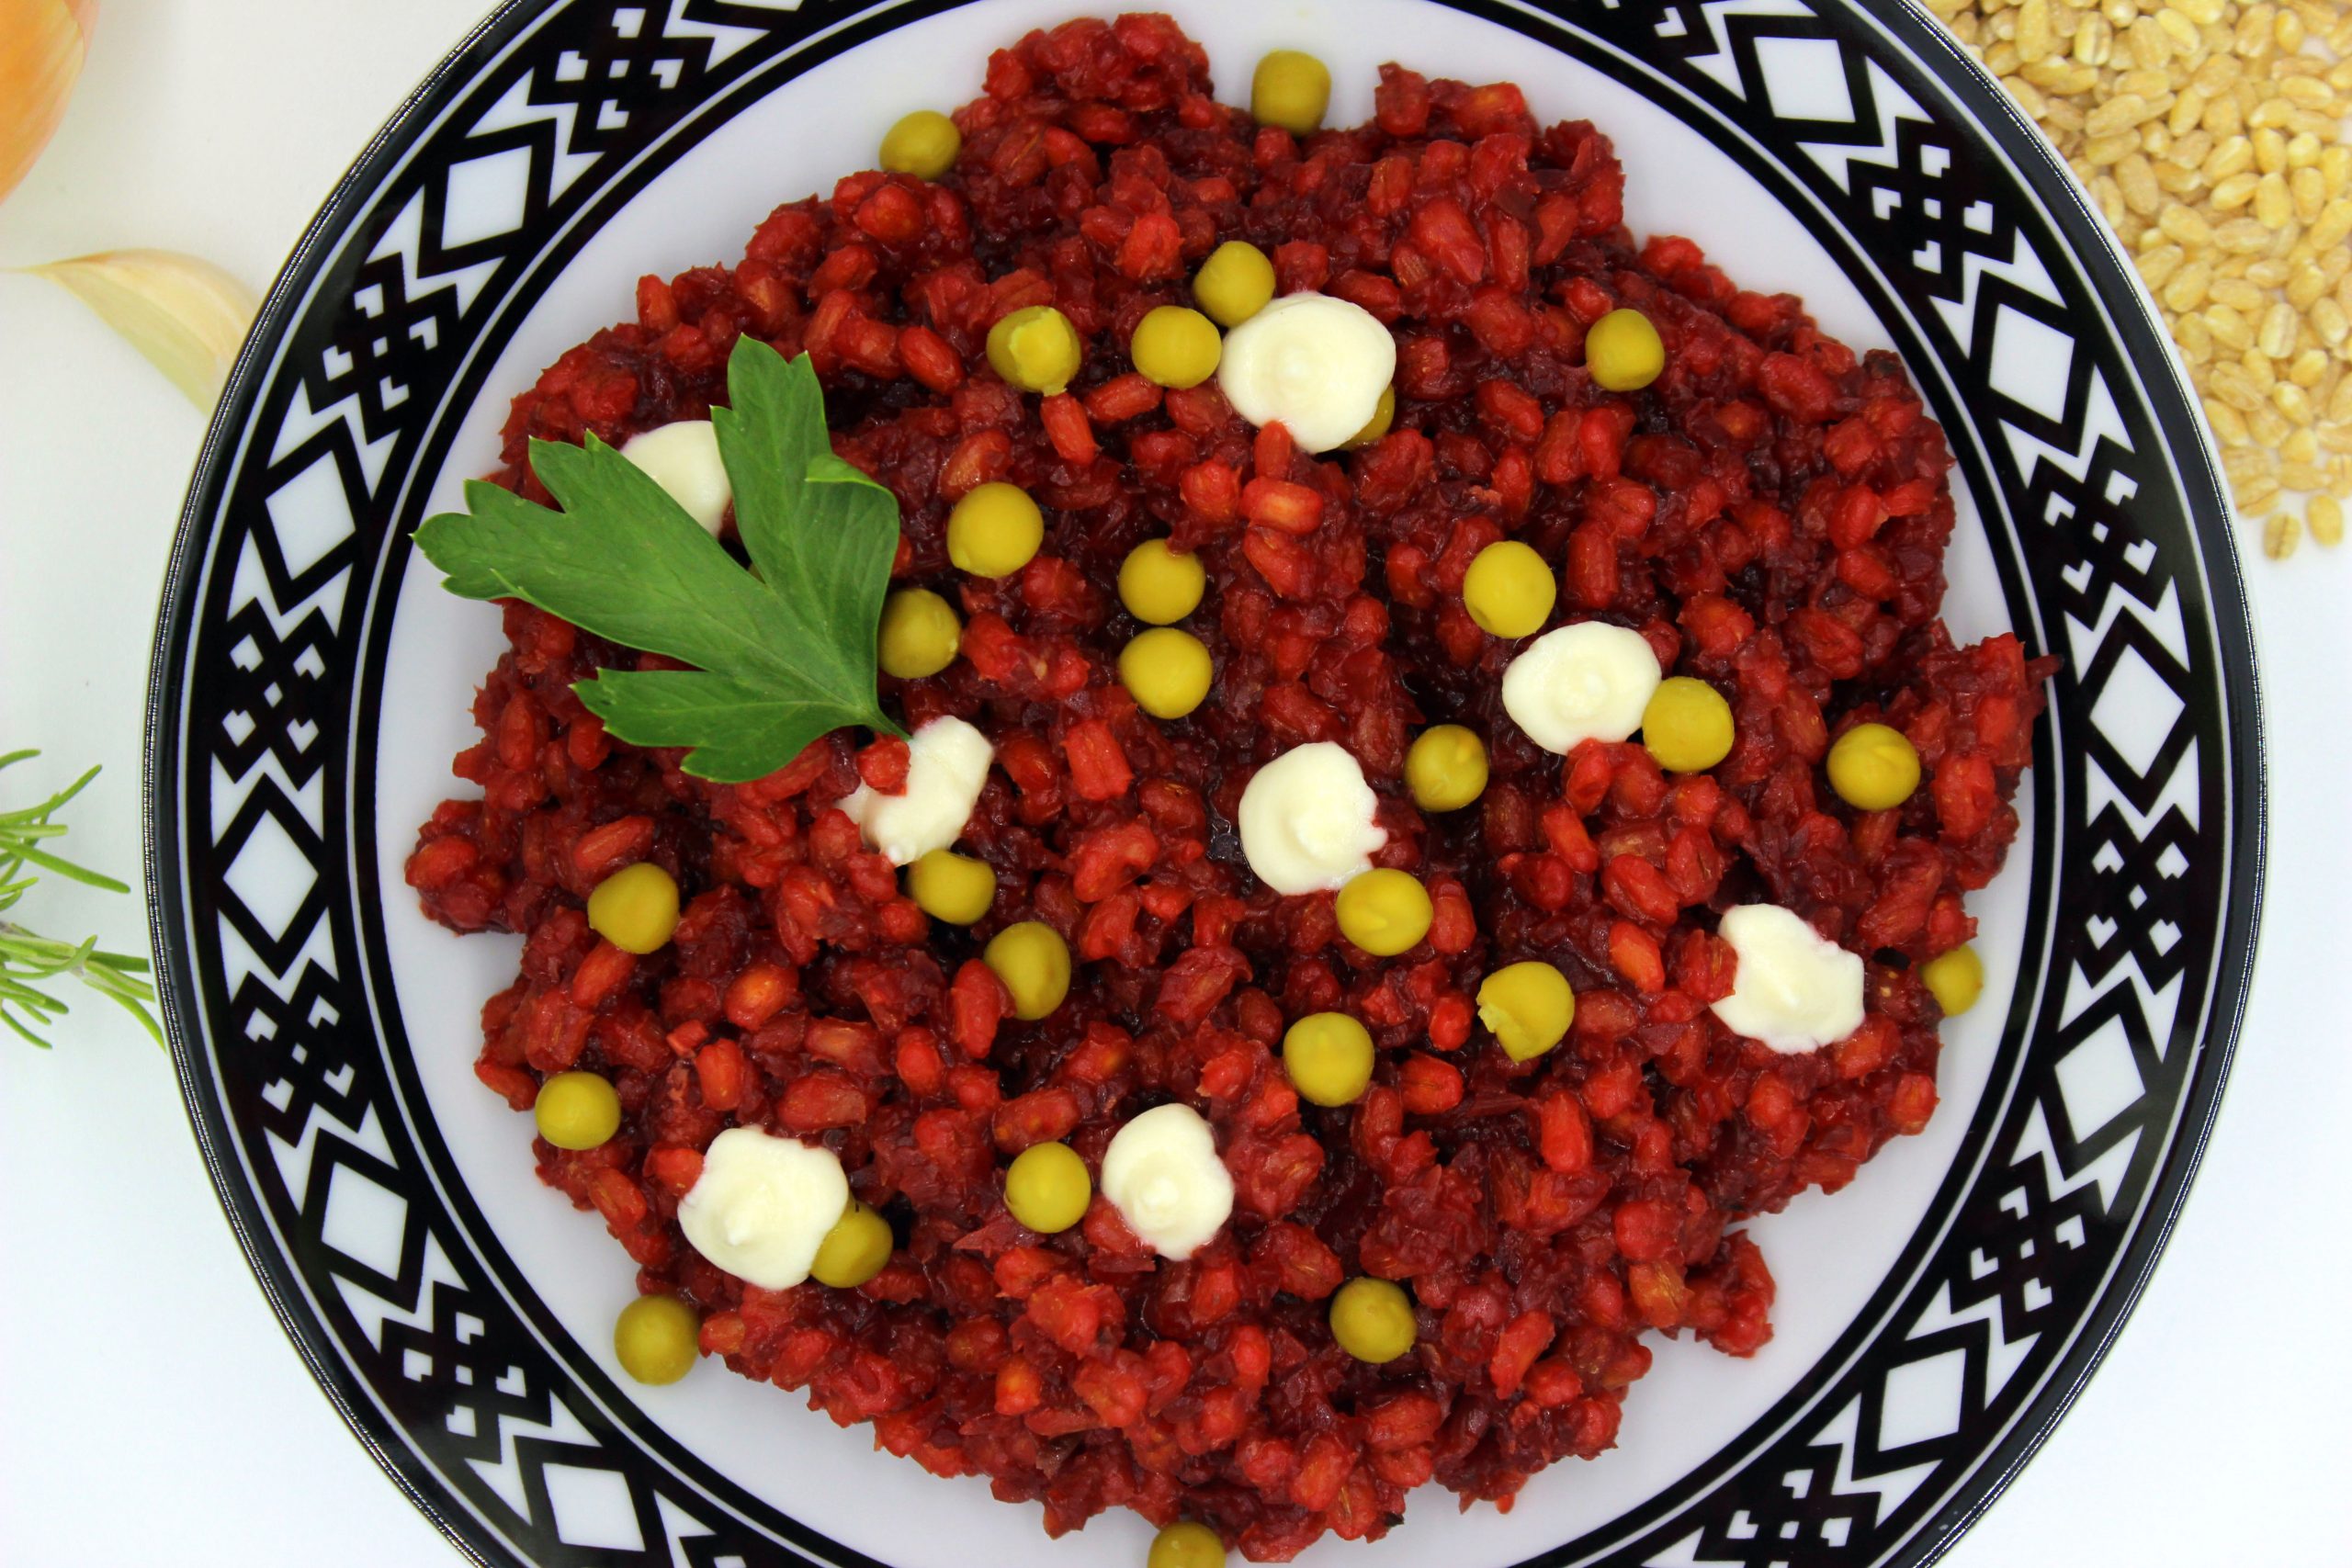
Once your vegan beetroot pearl barley risotto is ready, take it off the heat/flame. Then adjust its flavor by adding some salt and pepper. Before enjoying, let the pearl barley risotto rest for 5 minutes in the frying pan under the lid. After that serve it with green peas and some drops of unsweetened soy yogurt in order to get a contrast of colors and flavors. Or serve it with anything else that you like. As you know, Specky was a huge fan of parsley, so in his opinion parsley was the best decoration for this dish. I’m talking in past tense, because if you’re following us already for a while, you probably know that unfortunately Specky – the superstar of this blog – passed away recently. But since this recipe was created when Specky was still with us, in my opinion, it would be wrong not to post his picture here.
Other delicious vegan dishes made with grains and beetroot
In case you are a real grain lover, after you have tried my vegan beetroot pearl barley risotto, I advise you to try my other dishes that contain grains. For example, if you like rice combined with some slightly exotic flavors, you should try my vegan lemon tofu with rice. Or if you’re searching for an extremely healthy and delicious salad recipe, I’m definitely advising you to try my fresh and healthy farro salad. But in case you thought that neither grains, nor beetroot fit for a sweet recipe, I must say that you are wrong. I have a delicious recipe for vegan beetroot ice cream with chocolate pieces that will blow your mind!
The options in kitchen are limitless! Sometimes by combining some ingredients that might seem incompatible or too simple you can be rewarded with a delicious and healthy meal. Just like it is in this case with my beetroot pearl parley risotto, which is:
-
vegan
- creamy
- easy to make
- healthy
- flavorful
- visually appetizing
- nutritious
- and simply yummy!
Let me know, if you try this recipe! Leave a comment or even more: snap a picture of your masterpiece and post it on Instagram by tagging @vegan_bunnymommycooks or Facebook by tagging @bunnymommycooks. And feel free to let your animal family members join in the picture!
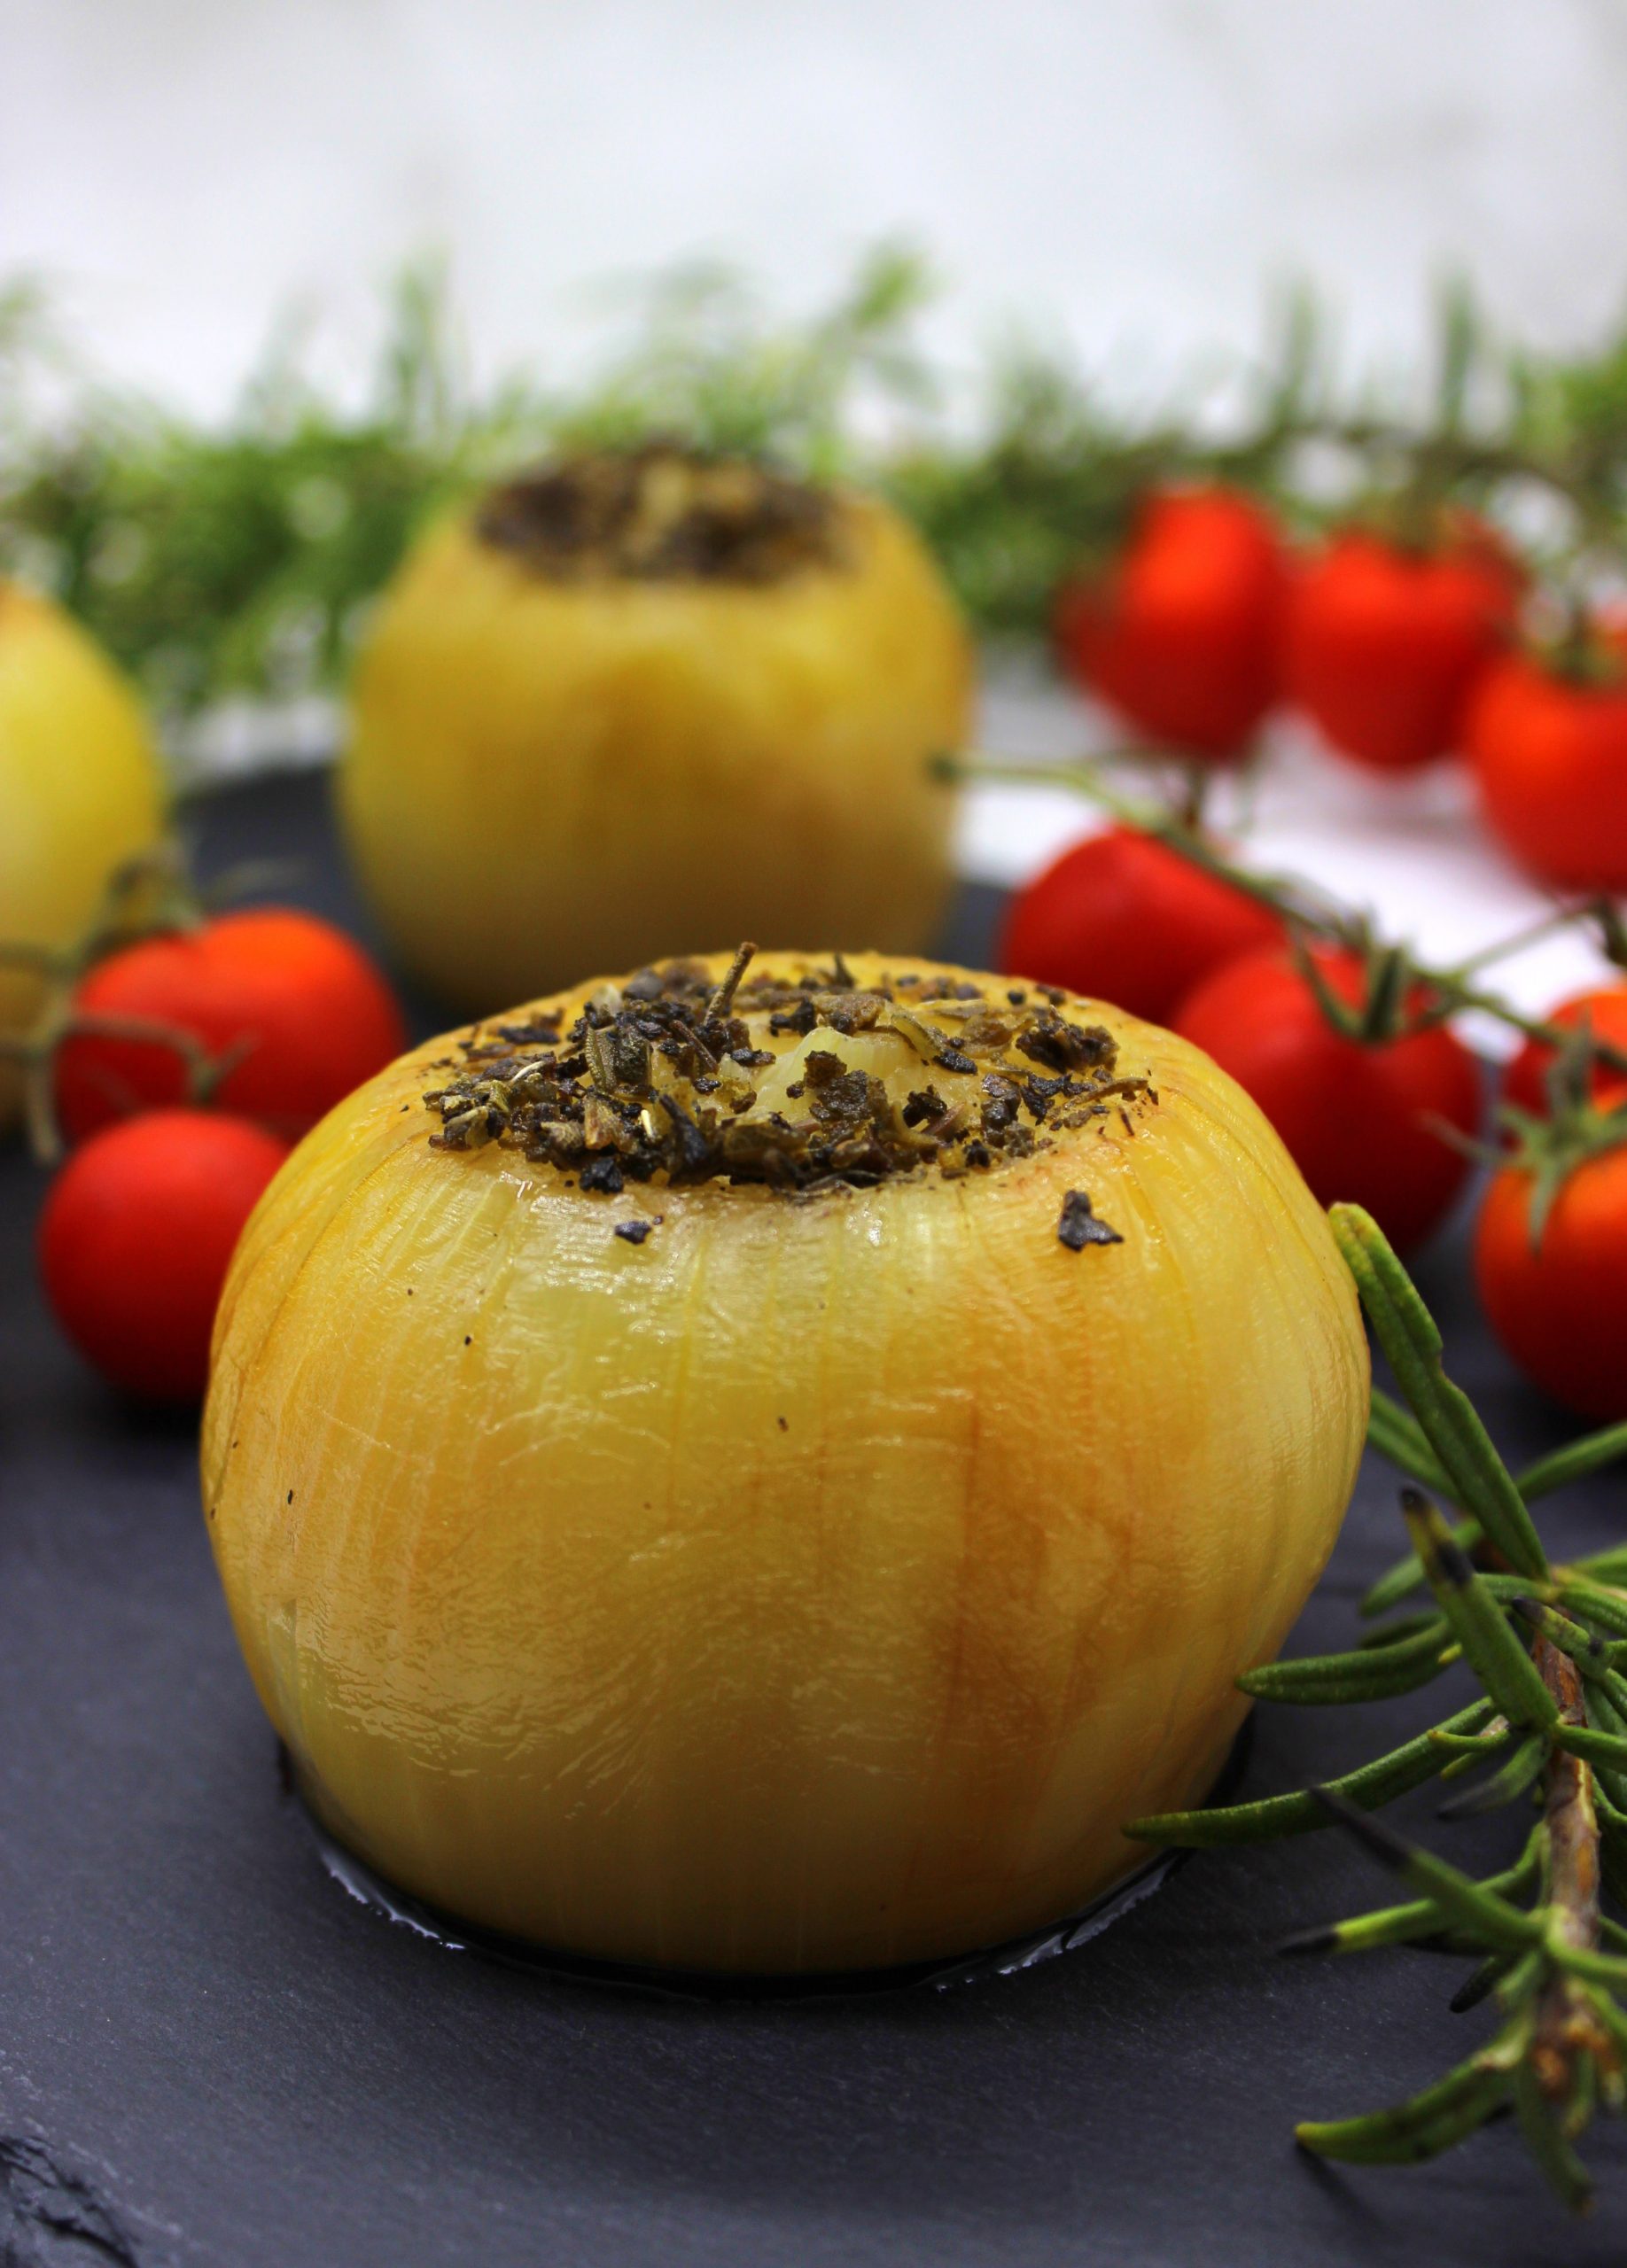
Juicy sweet roasted onions
This recipe was posted on: 17/11/2020
Usually when we think about side dishes the first things that pop in our minds are salad and potatoes. For sure, both these things are delicious and easy to make. But sometimes there’s a need for something different. For something that not only goes together with many other dishes, but that is full of a unique flavor. In my opinion, my juicy sweet roasted onions fit this description perfectly.
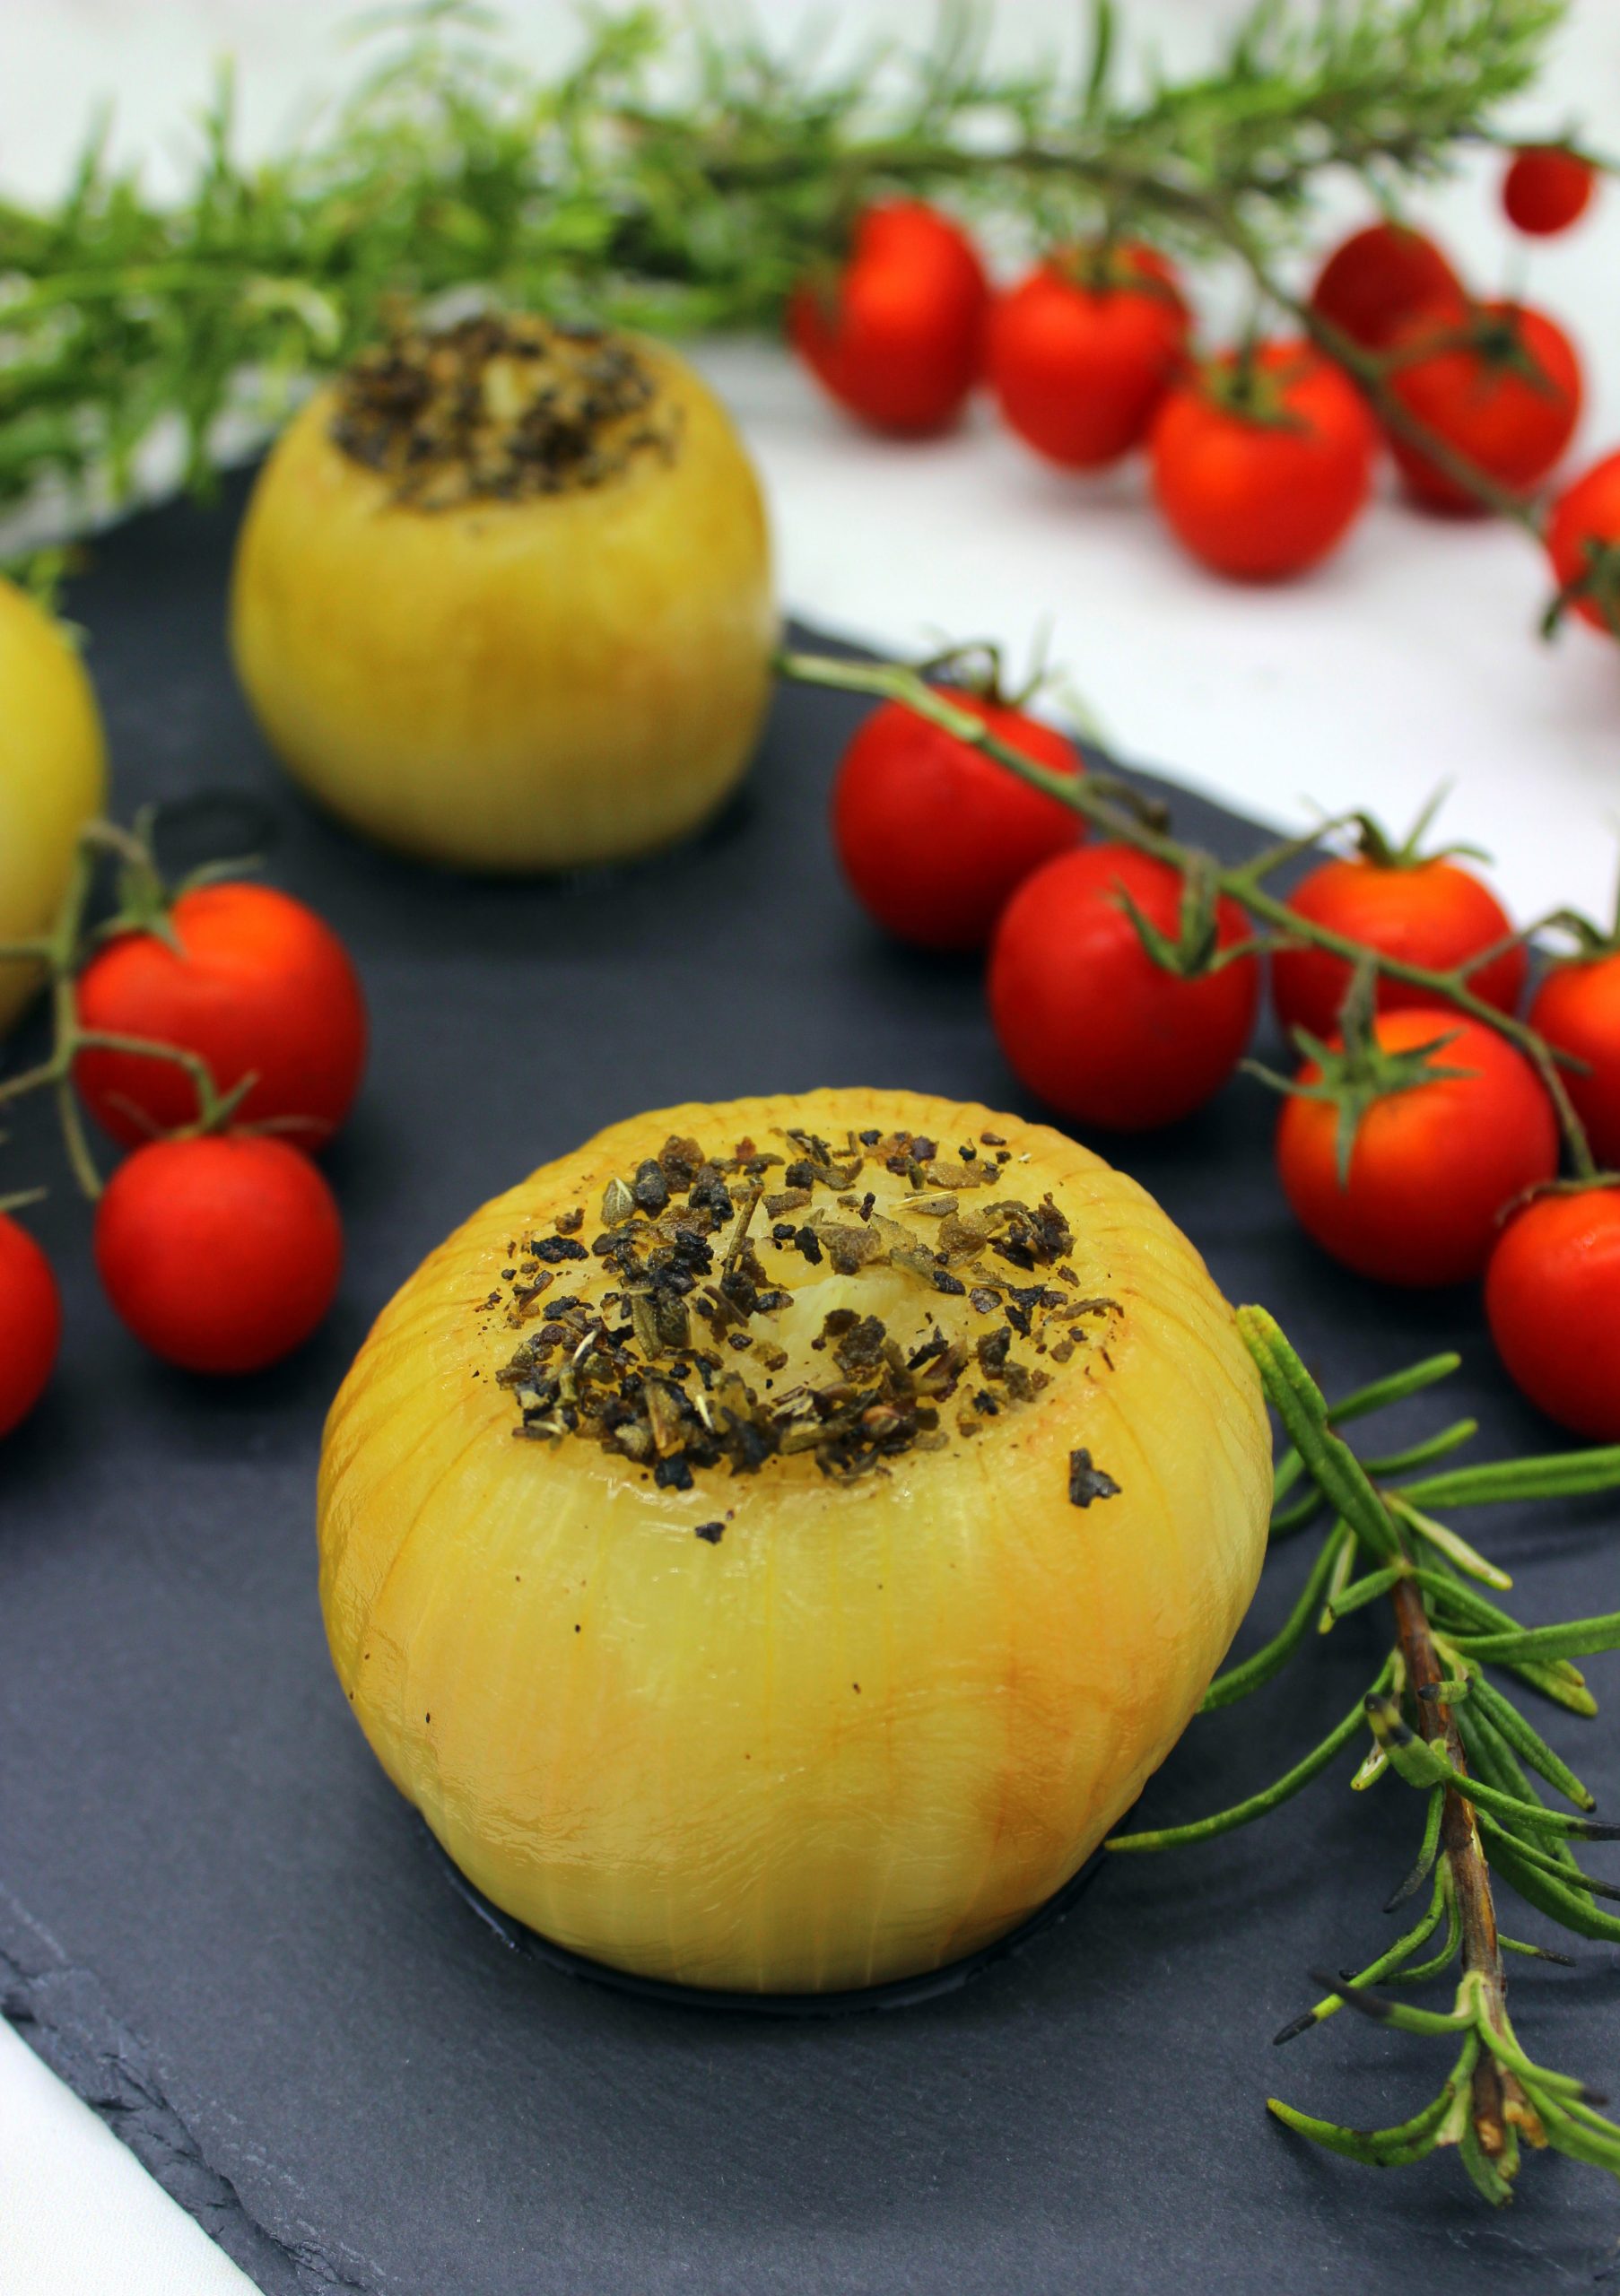
You might think that eating a whole onion is crazy, because of the powerful aroma and flavor. But don’t forget that all of it goes away once it’s cooked. The things that remain are the sweet flavor and the soft texture. And the best part of these juicy sweet roasted onions is that you can use them in many different ways. For example, you can use them as a side dish or as one of the ingredients for soups or main dishes. And there’s more! Not only the onion itself is eatable. Also the liquid that will remain after roasting the onions in the oven is a real gem! It’s so flavorful that you can use it in sauces or soups. And if you want, you can even freeze it in the ice cube tray and use it like you would use a bouillon cube.
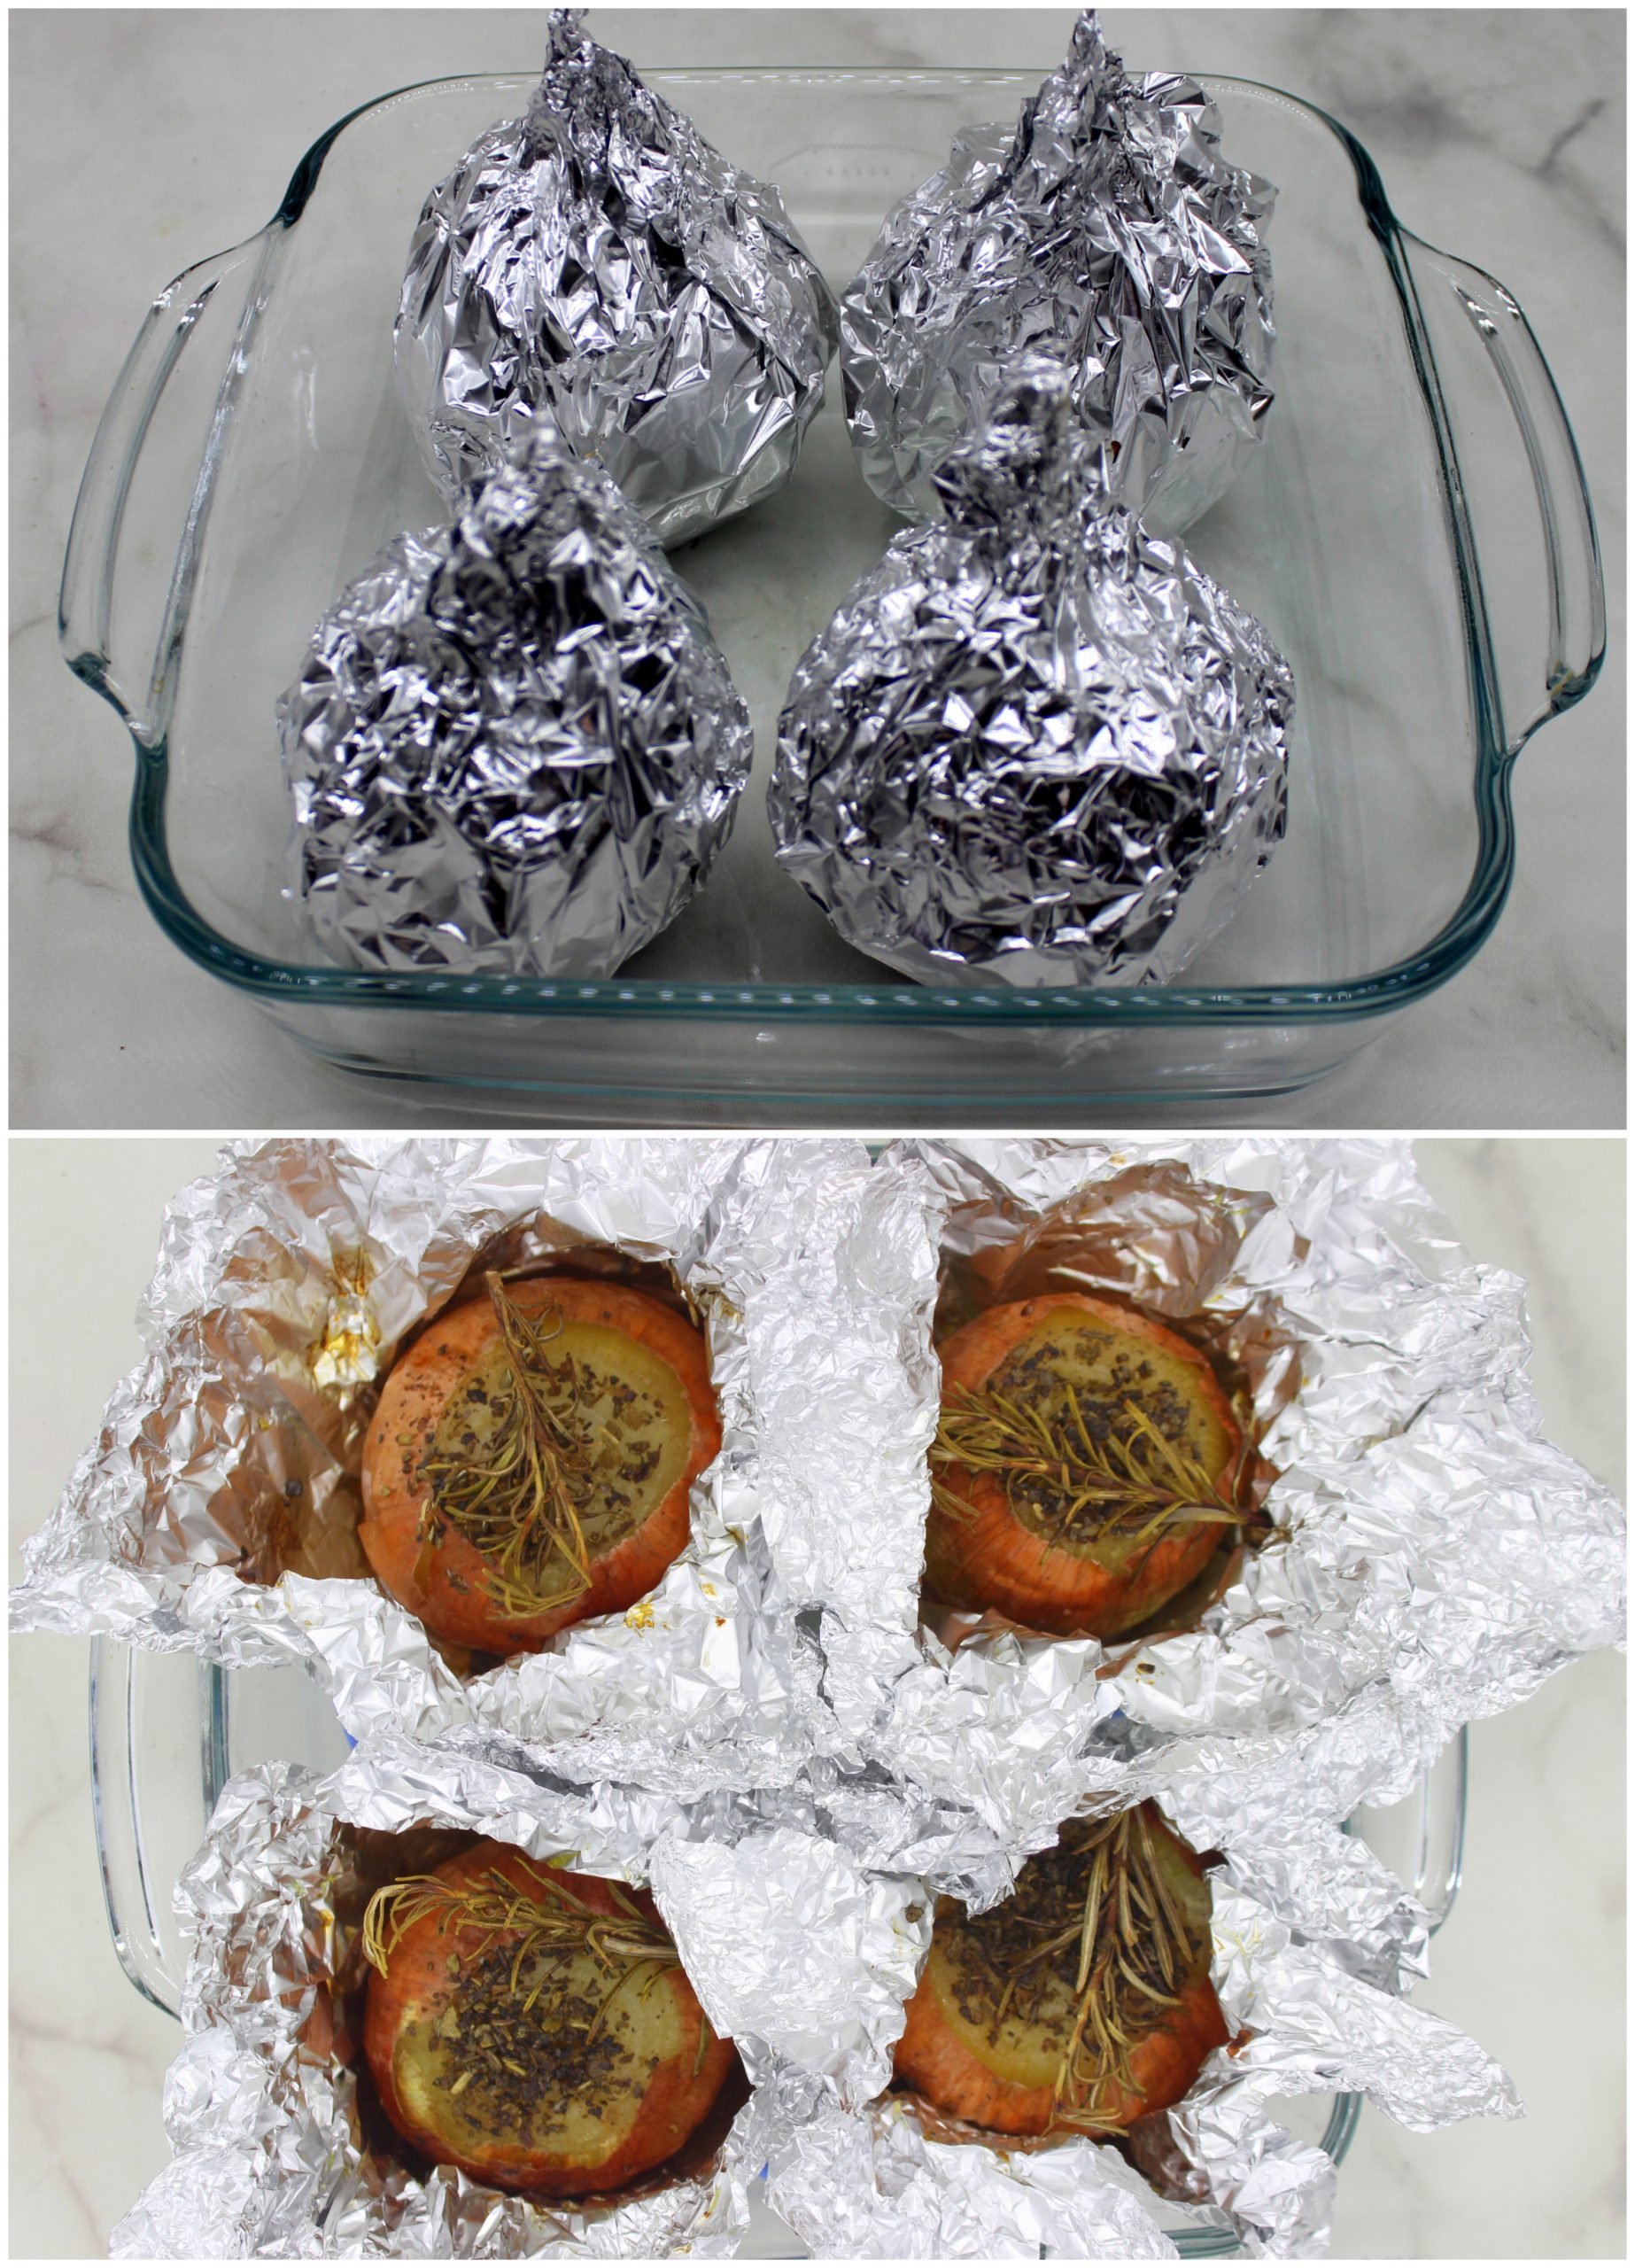
How to prepare juicy sweet roasted onions
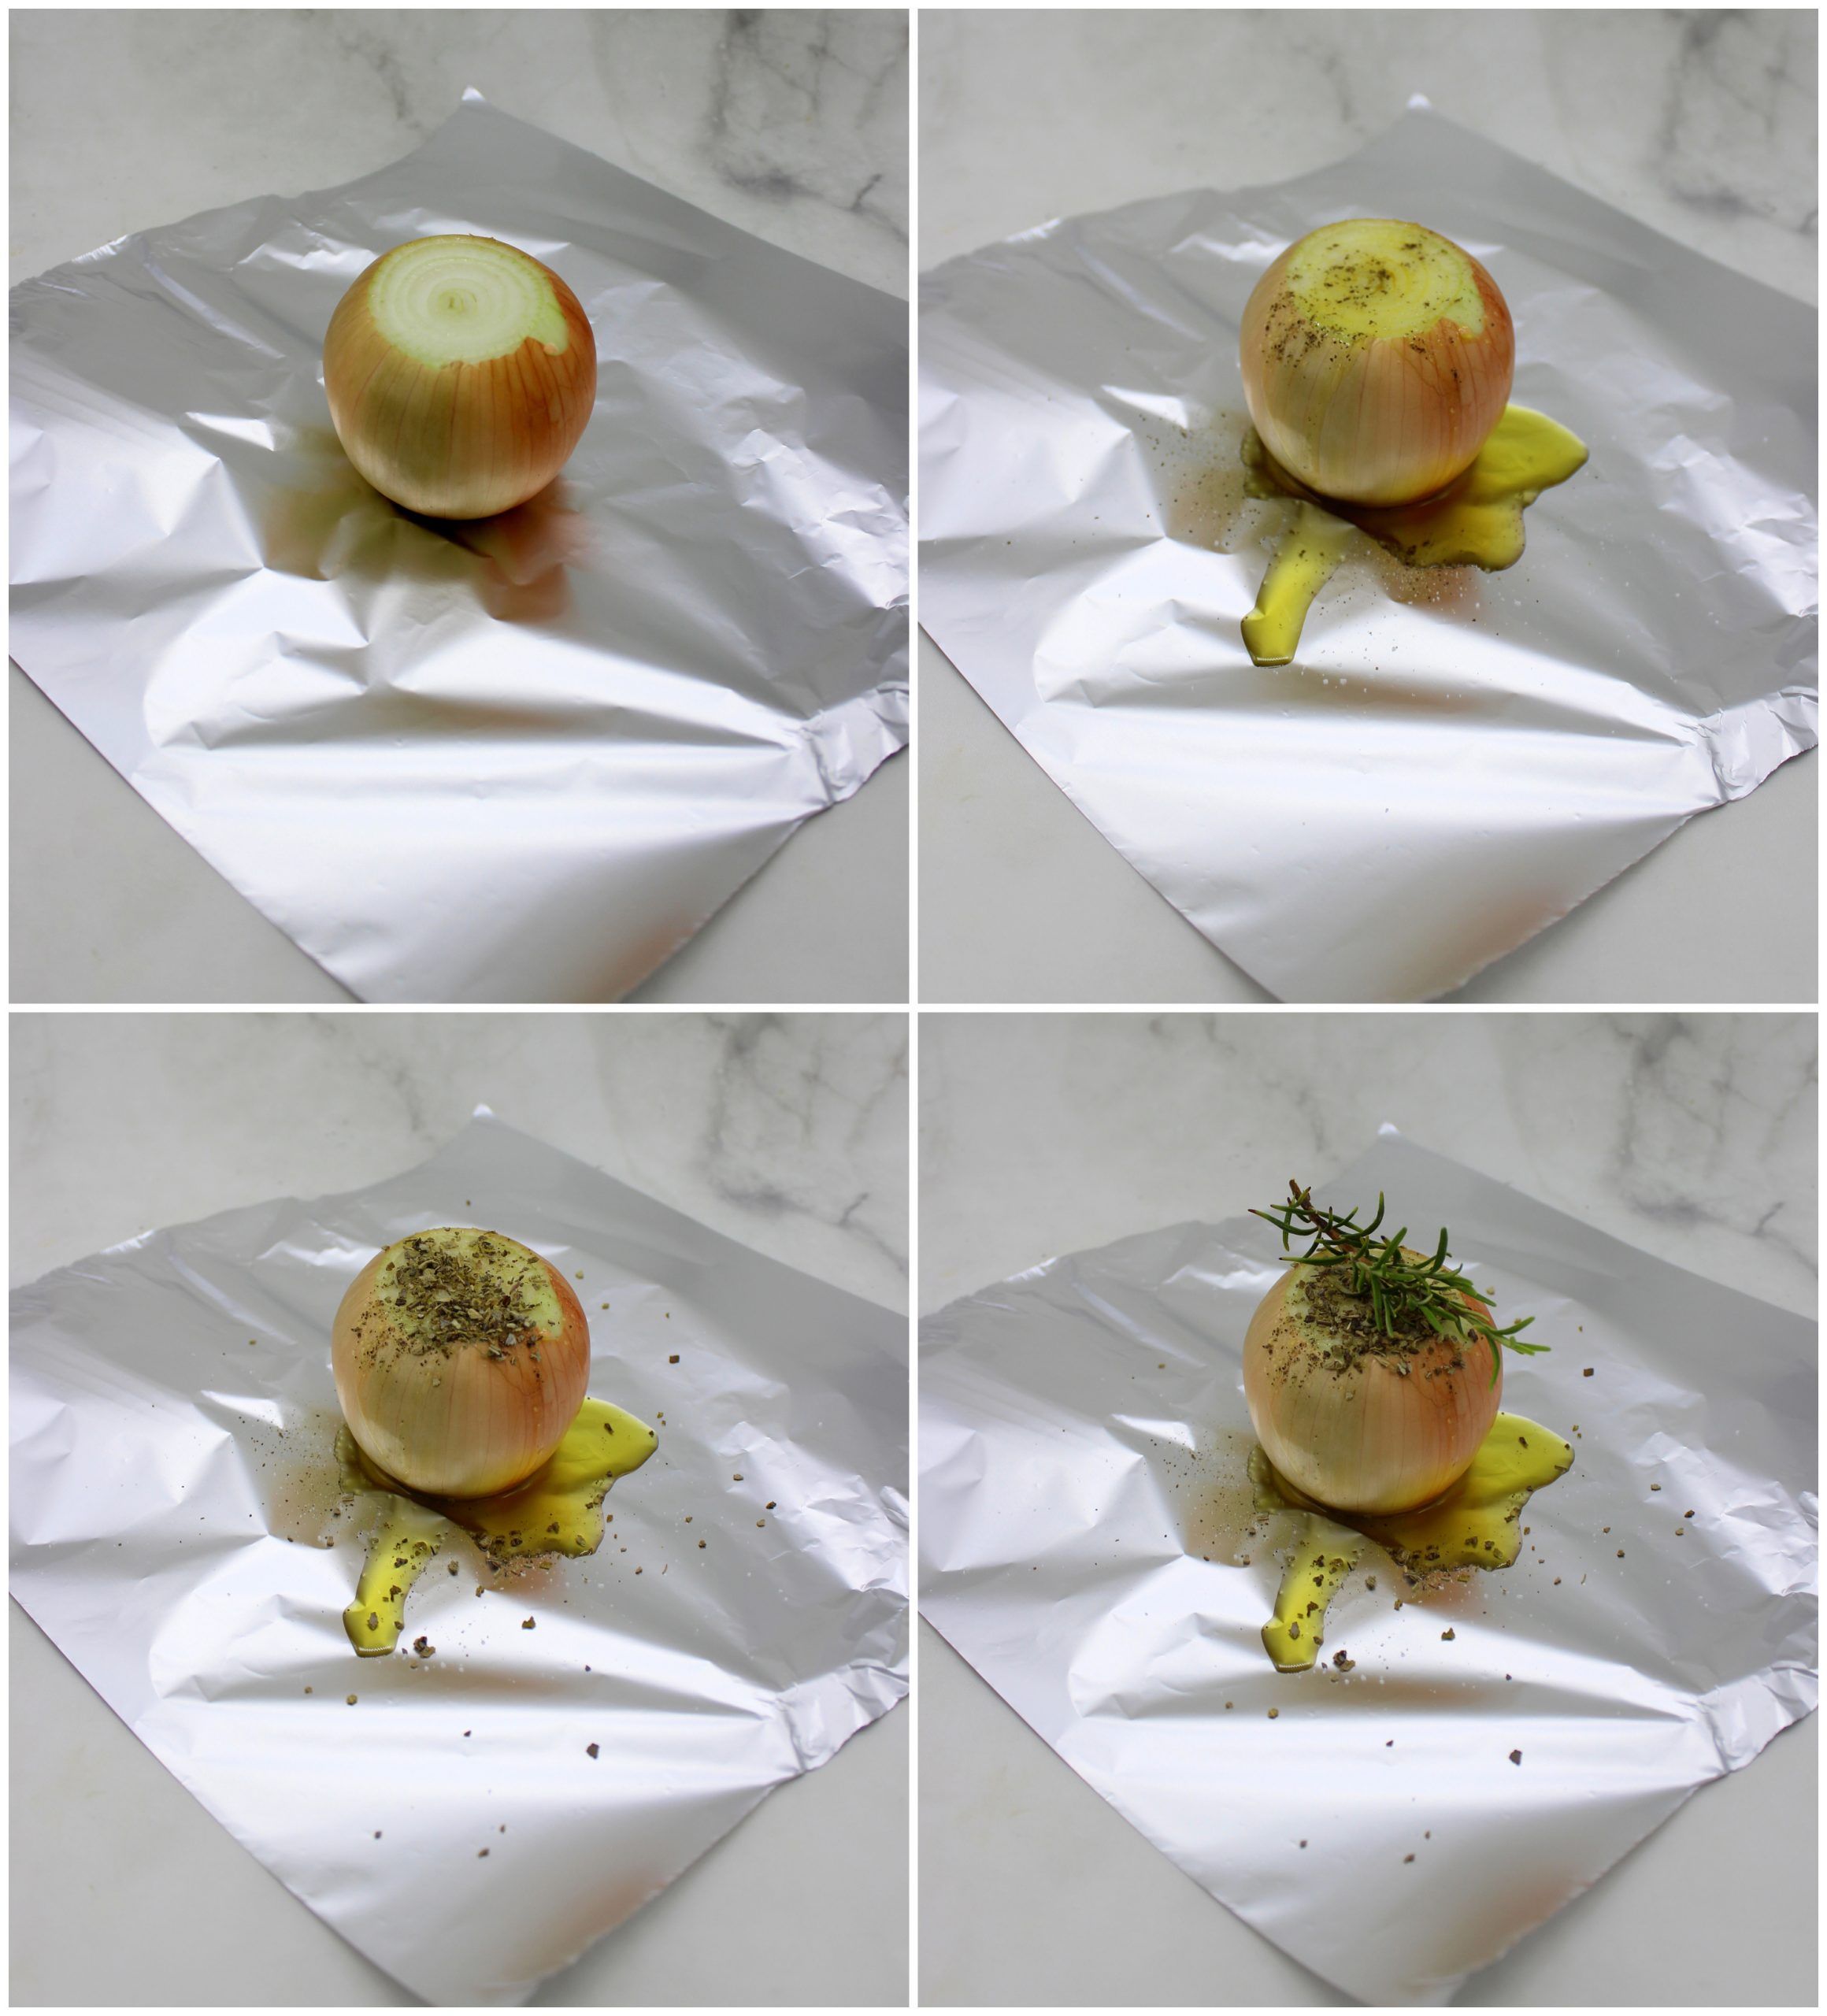
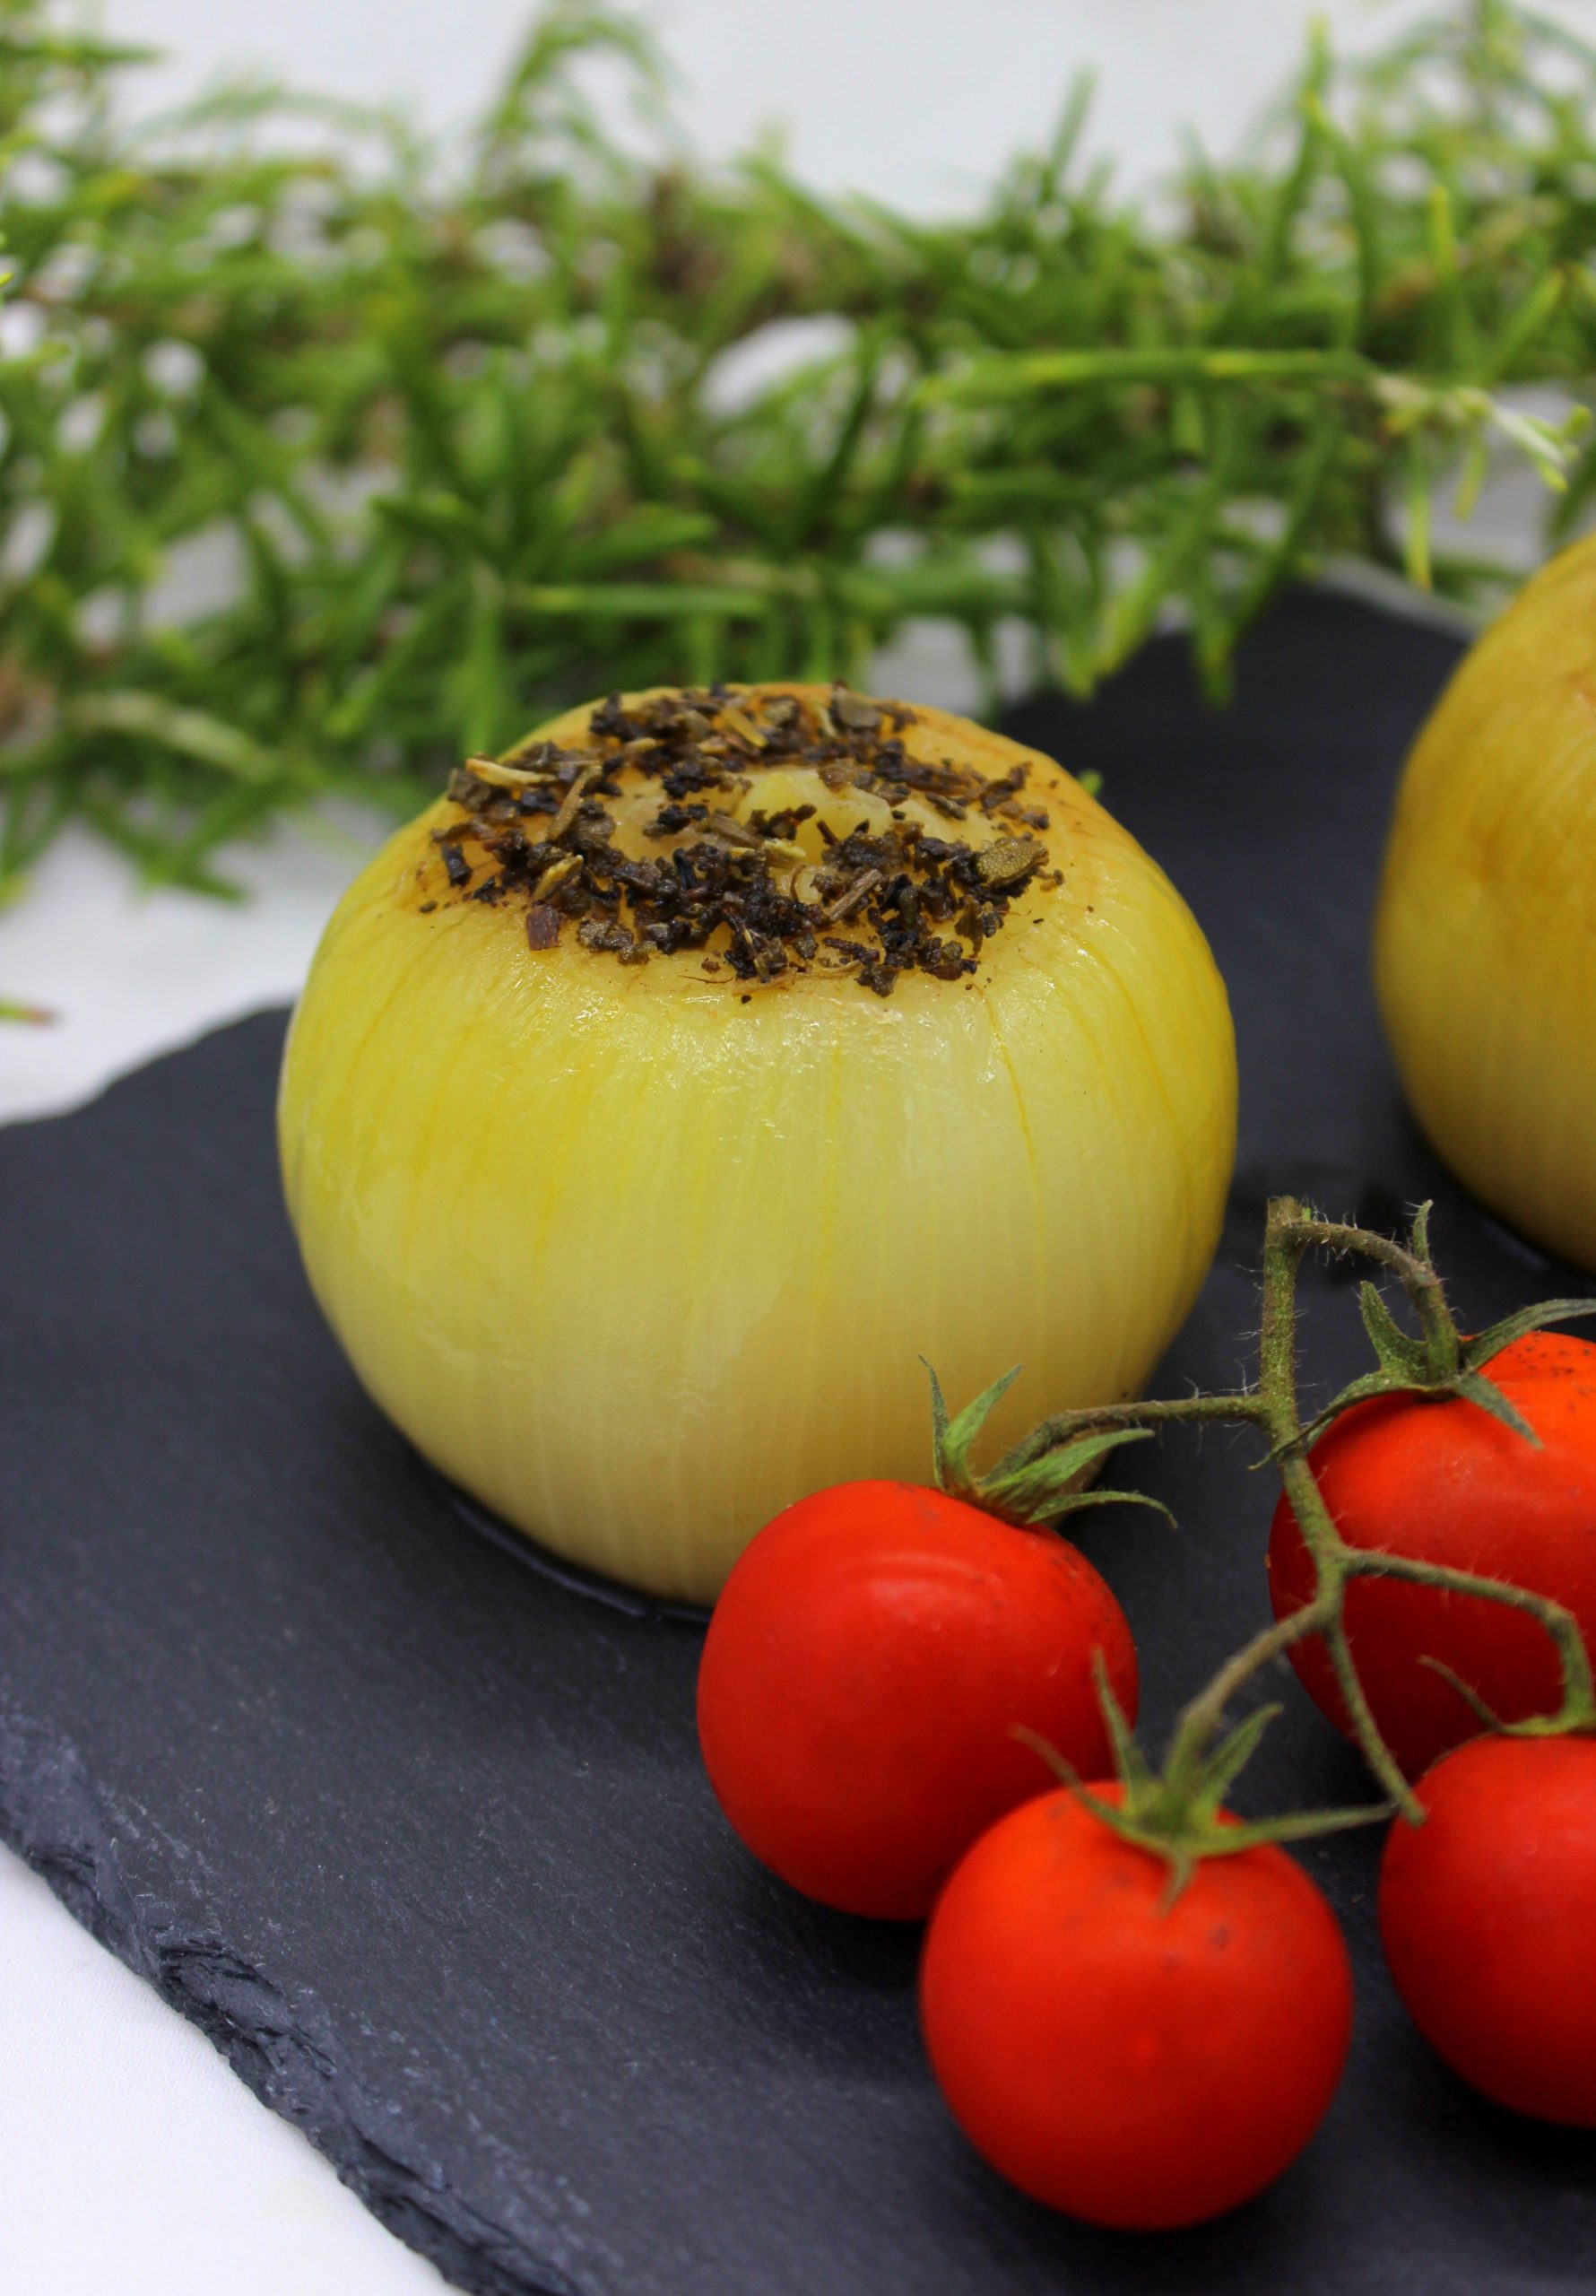
The total time that is necessary to prepare these juicy sweet roasted onions might seem long. But actually, it’s the cooking time that is long. The time that you’ll spend to prepare the onions before they’re ready to be put in the oven is really meaningless. It won’t take you more than 10 minutes! Basically, you’ll need to cut off both ends of each onion and then place each onion in the middle of a piece of aluminium foil. Then you’ll need to add on top of each onion some oil and spices. And then wrap each onion in the aluminium foil together with a tiny rosemary branch. That’s it! Your onions then are ready to be placed in the oven. The onions should be cooked at least 1 hour. After that you must check if they’re soft enough to be served. If not, cook them for some extra minutes.
Serving ideas for juicy sweet roasted onions
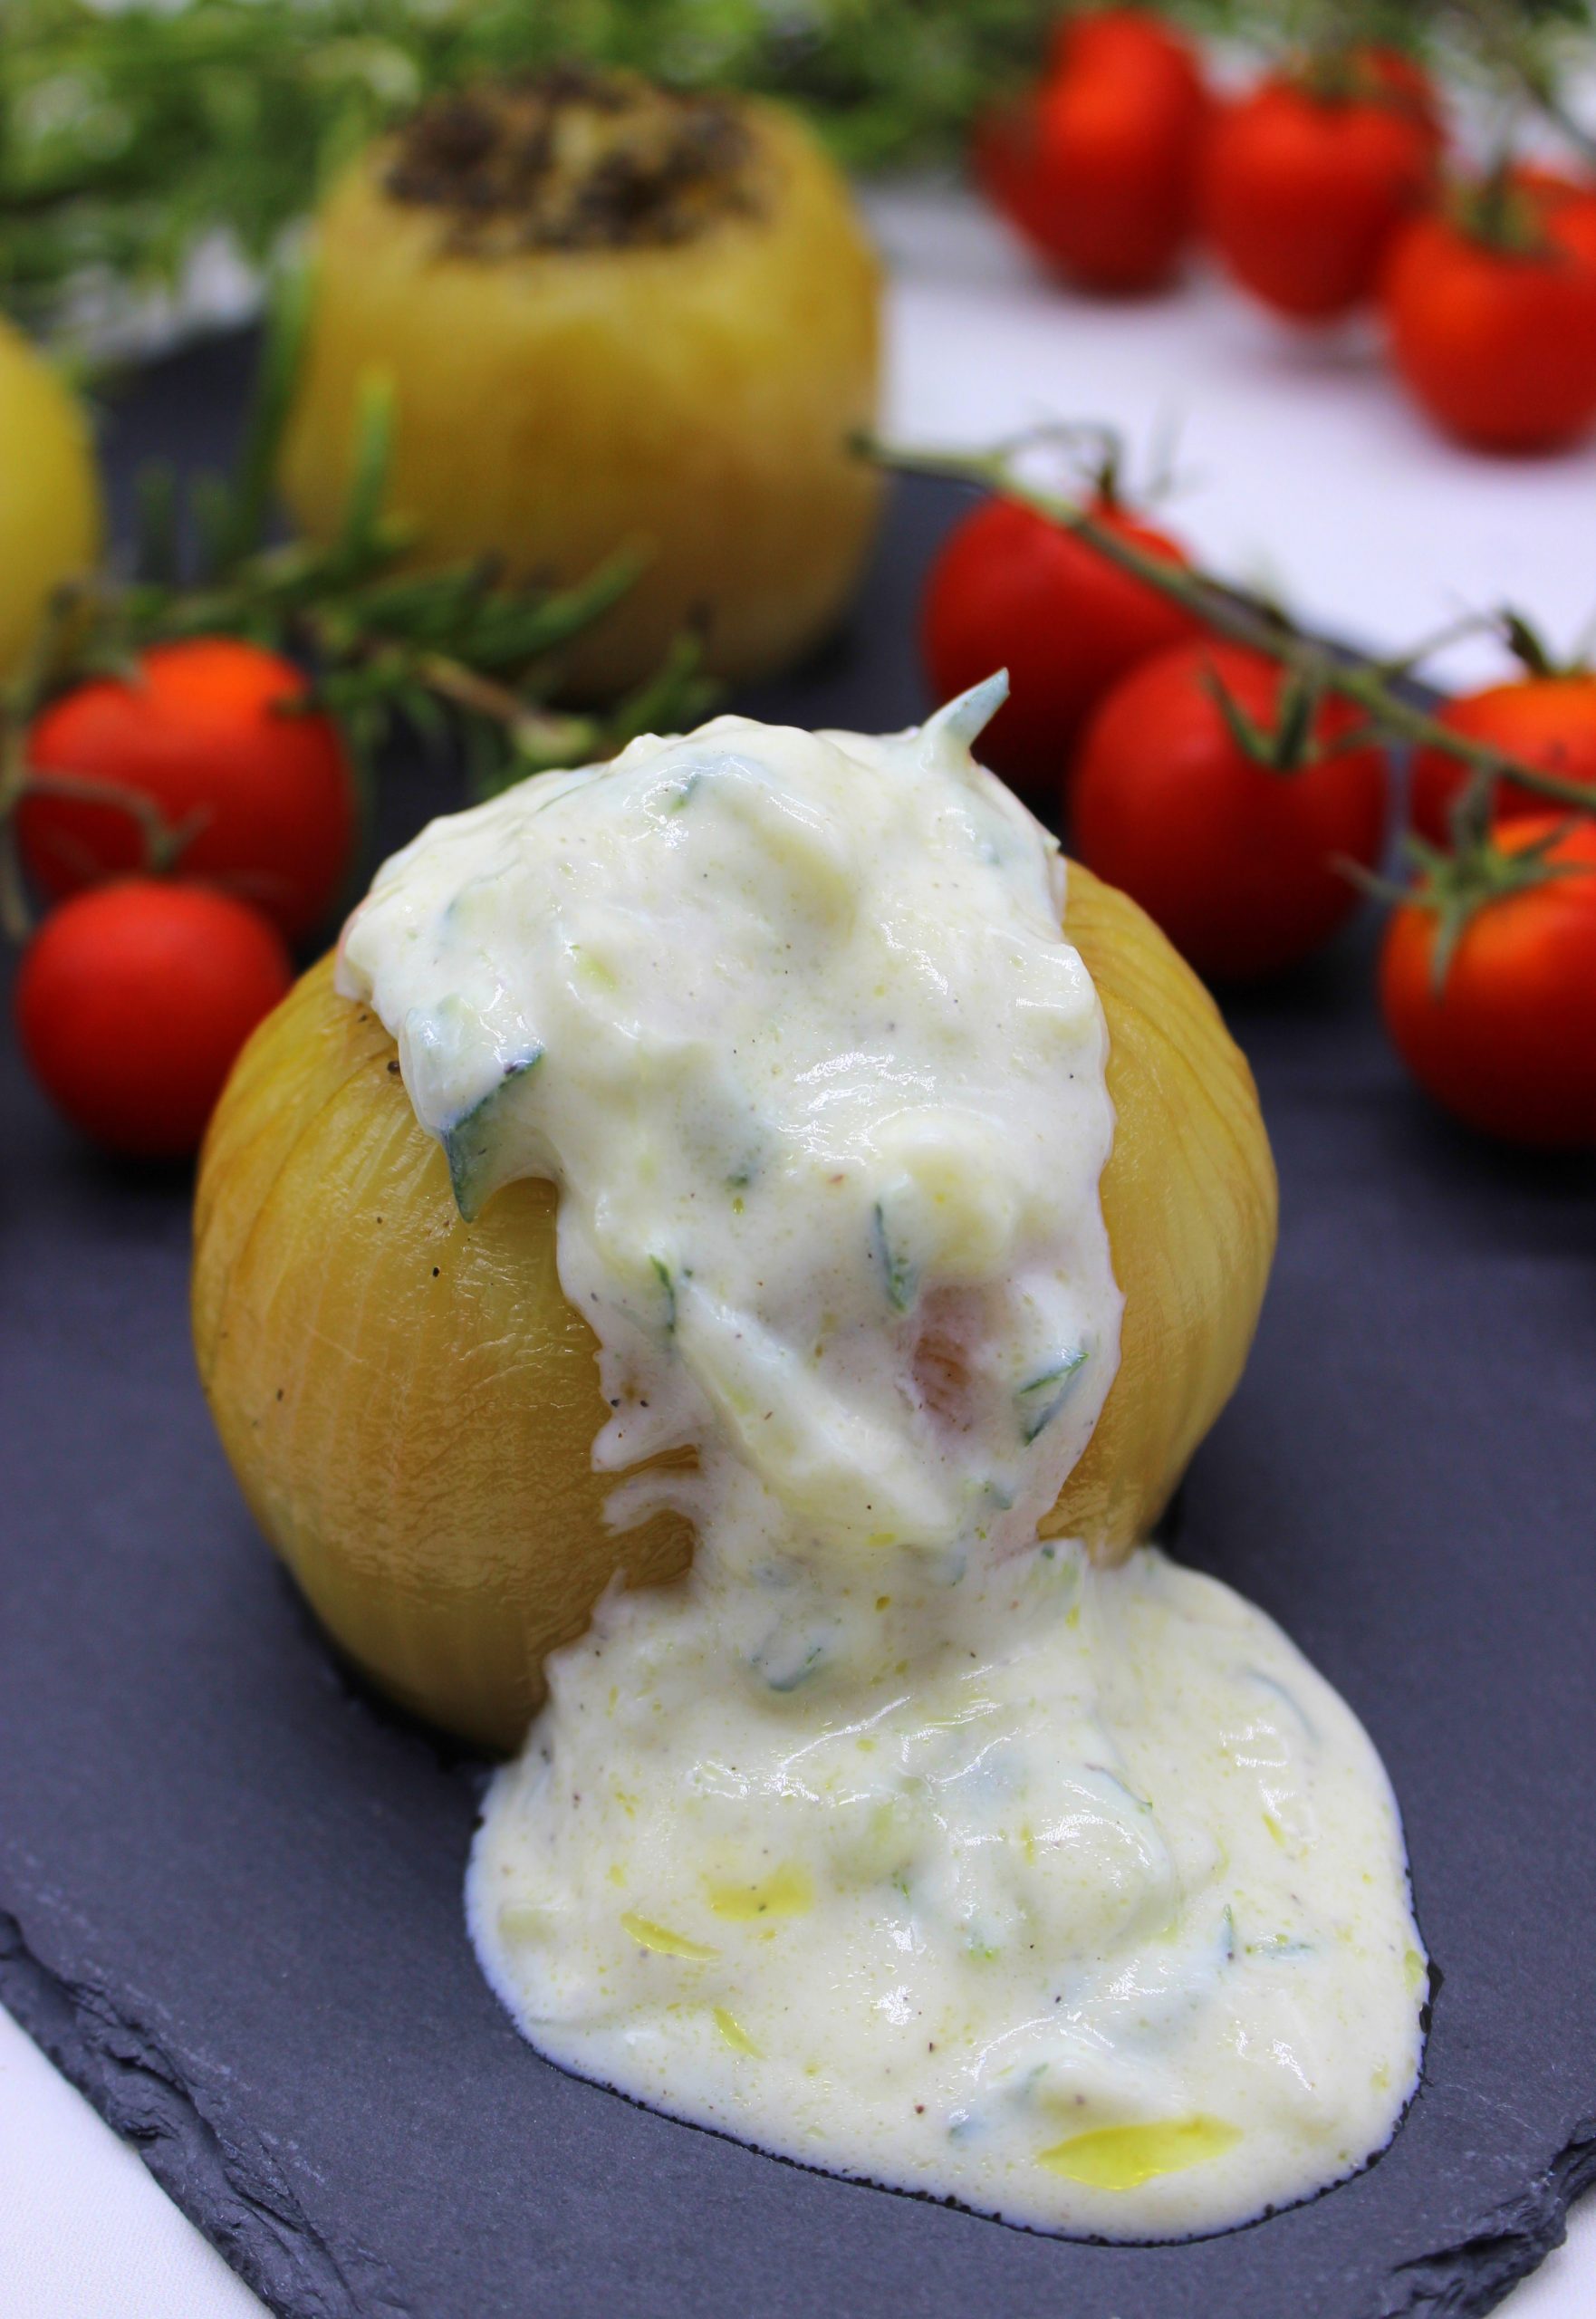
It might seem that it’s not easy to combine this side dish with other vegan dishes, since usually roasted onions are served with meat. But fortunately, it’s not like that! For example, I’ve served these juicy sweet roasted onions together with vegan Tzatziki sauce. The combination of fresh cucumbers and roasted onions at first might seem strange, but trust me – it tastes great together! The sweetness of the onions combines perfectly with the mild spiciness of the Tzatziki sauce. Then, of course, you can always serve them with some vegan burger. Like with my eggplant and sundried tomato burger, for example. Or, in case you’re not that convinced about this recipe, but you’d still like to try something made of onions, try my healthy oven-baked onion rings!
If you’re following us already for a while, you probably know that unfortunately Specky – the superstar of this blog – passed away recently. But since this recipe was created when Specky was still with us, in my opinion, it would be wrong not to post his picture here. Because he always did his best as a bunny supermodel. Especially for this recipe, since he really didn’t like onions… But I’m sure that you instead will be able to appreciate the rich flavor of these juicy sweet roasted onions.
To find out if roasted onions are your “thing”, you simply need to prepare them. Once you’ve done it, I’m quite sure that you’ll agree with me that they are:
-
vegan
- juicy
- mildly sweet
- creamy
- easy to make
- soft
- healthy
- flavorful
- versatile in usage
- and simply yummy!
Let me know, if you try this recipe! Leave a comment or even more: snap a picture of your masterpiece and post it on Instagram by tagging @vegan_bunnymommycooks or Facebook by tagging @bunnymommycooks. And feel free to let your animal family members join in the picture!
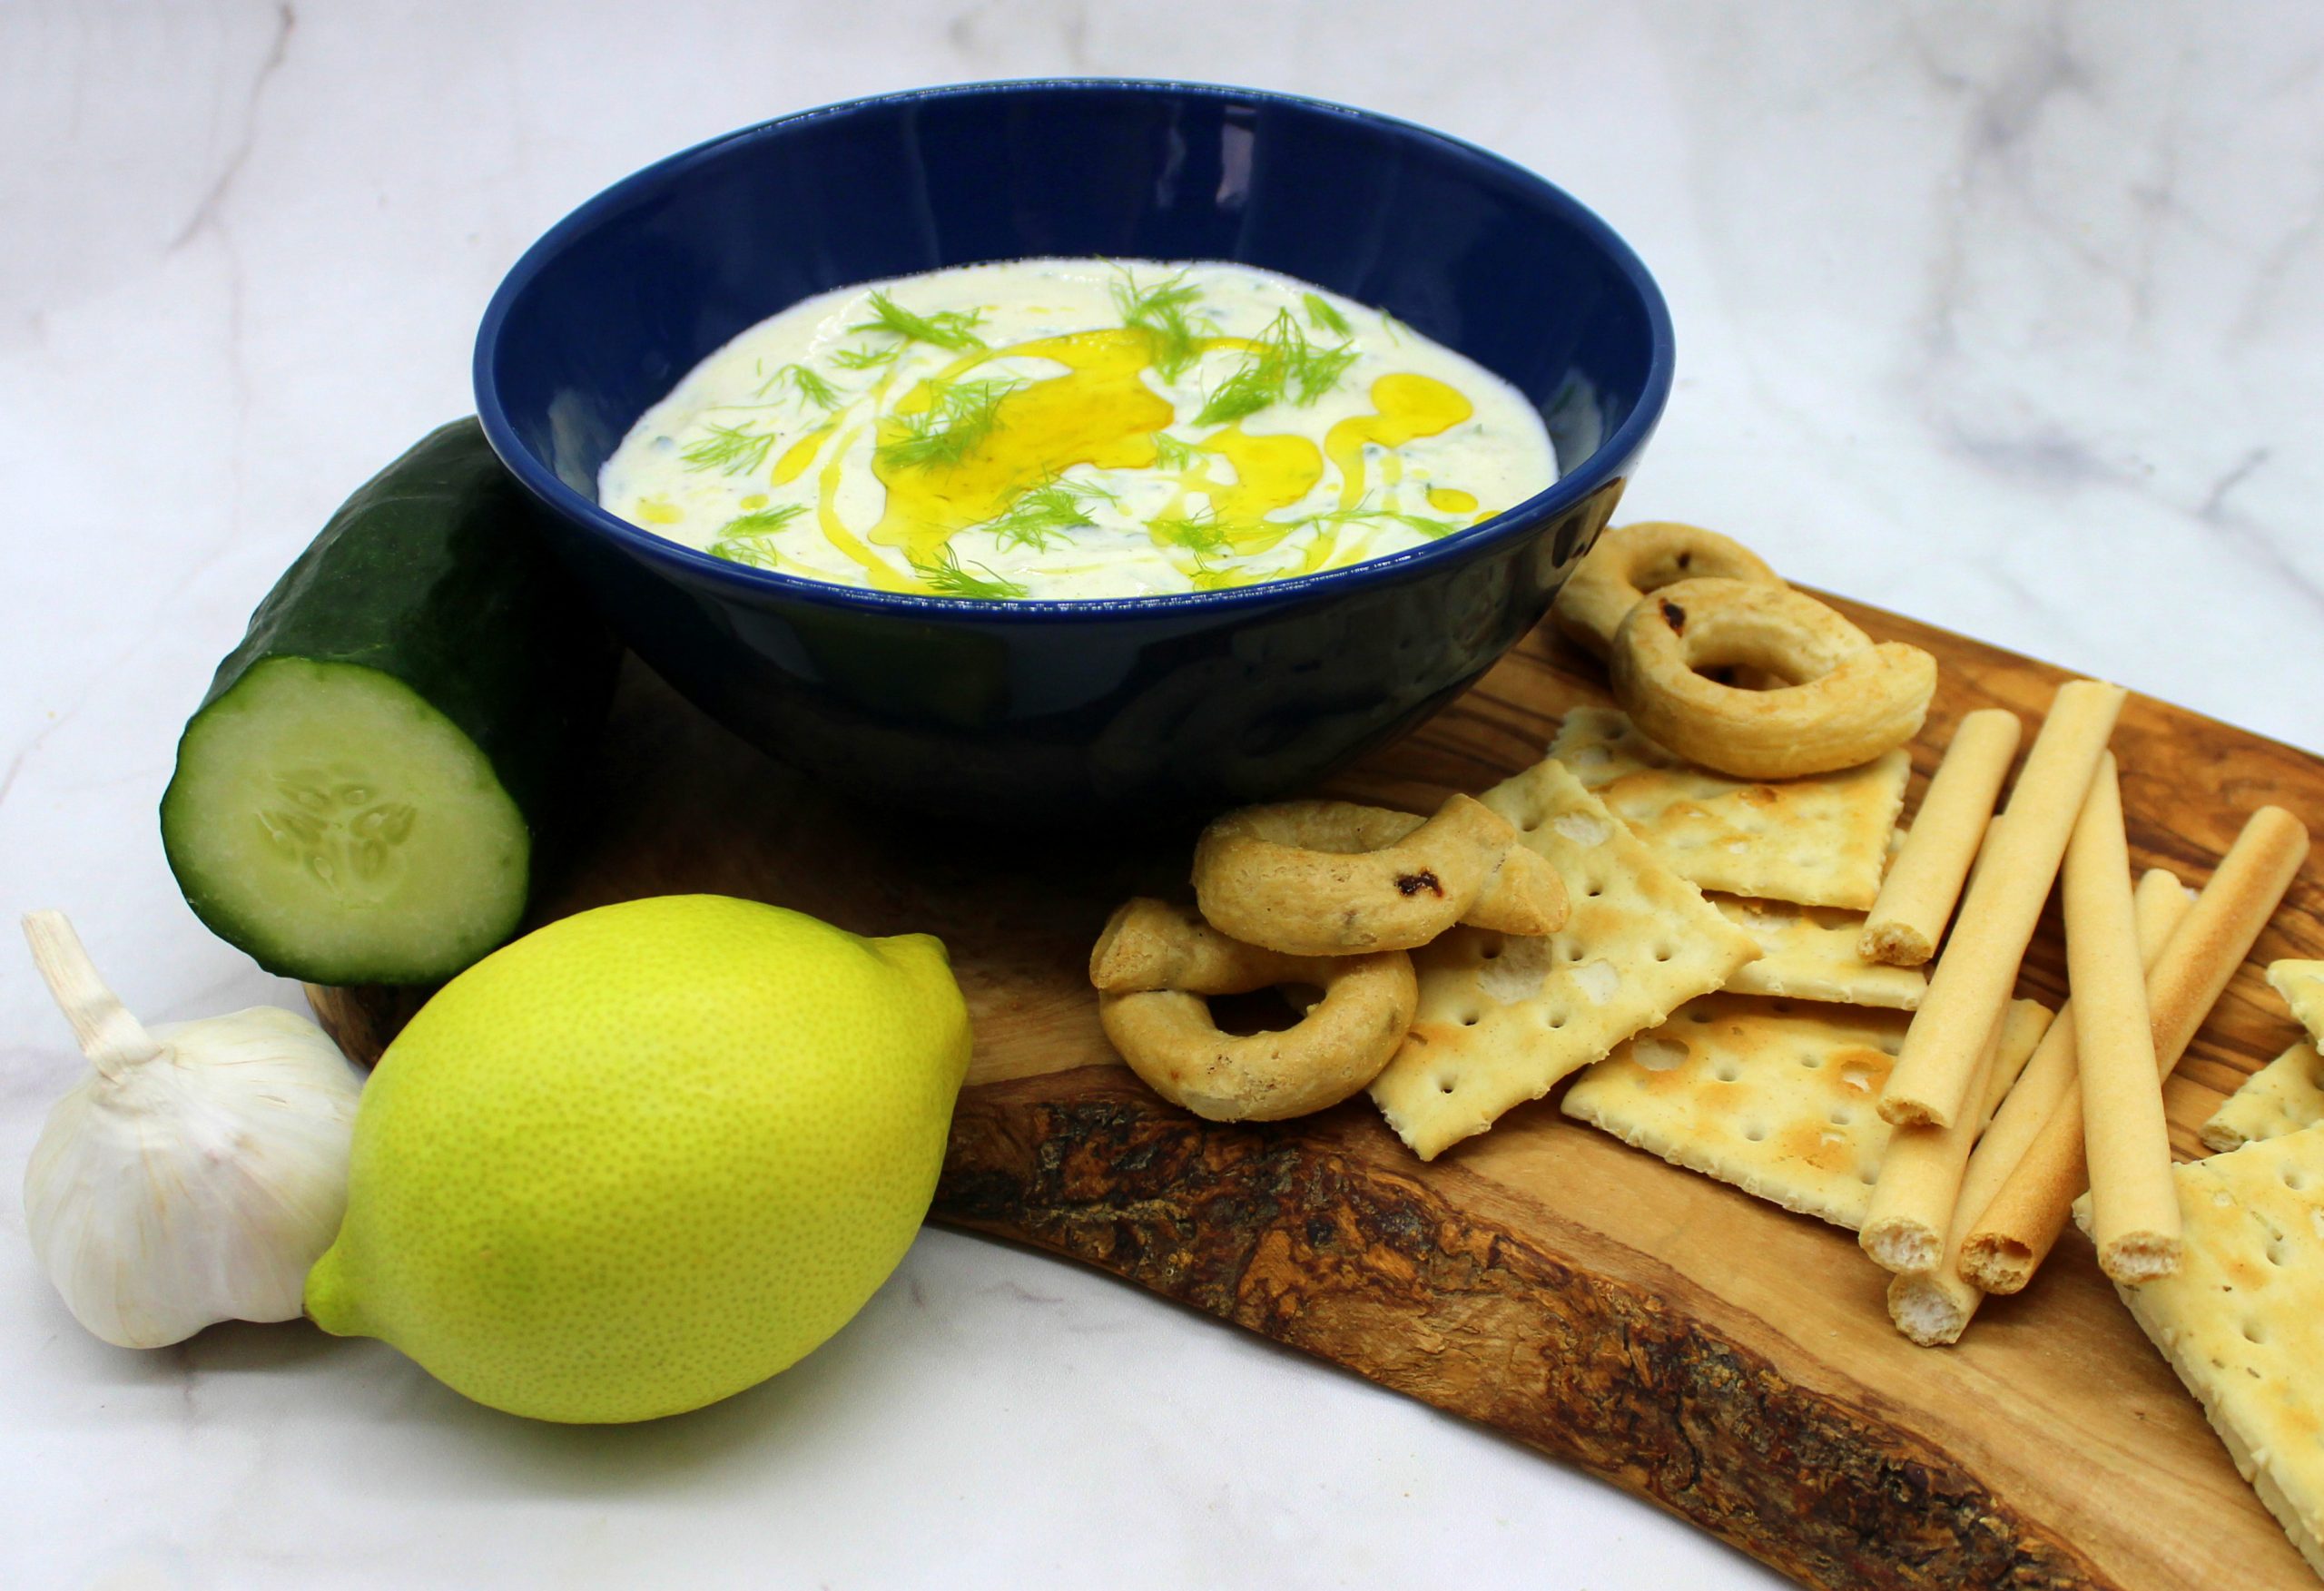
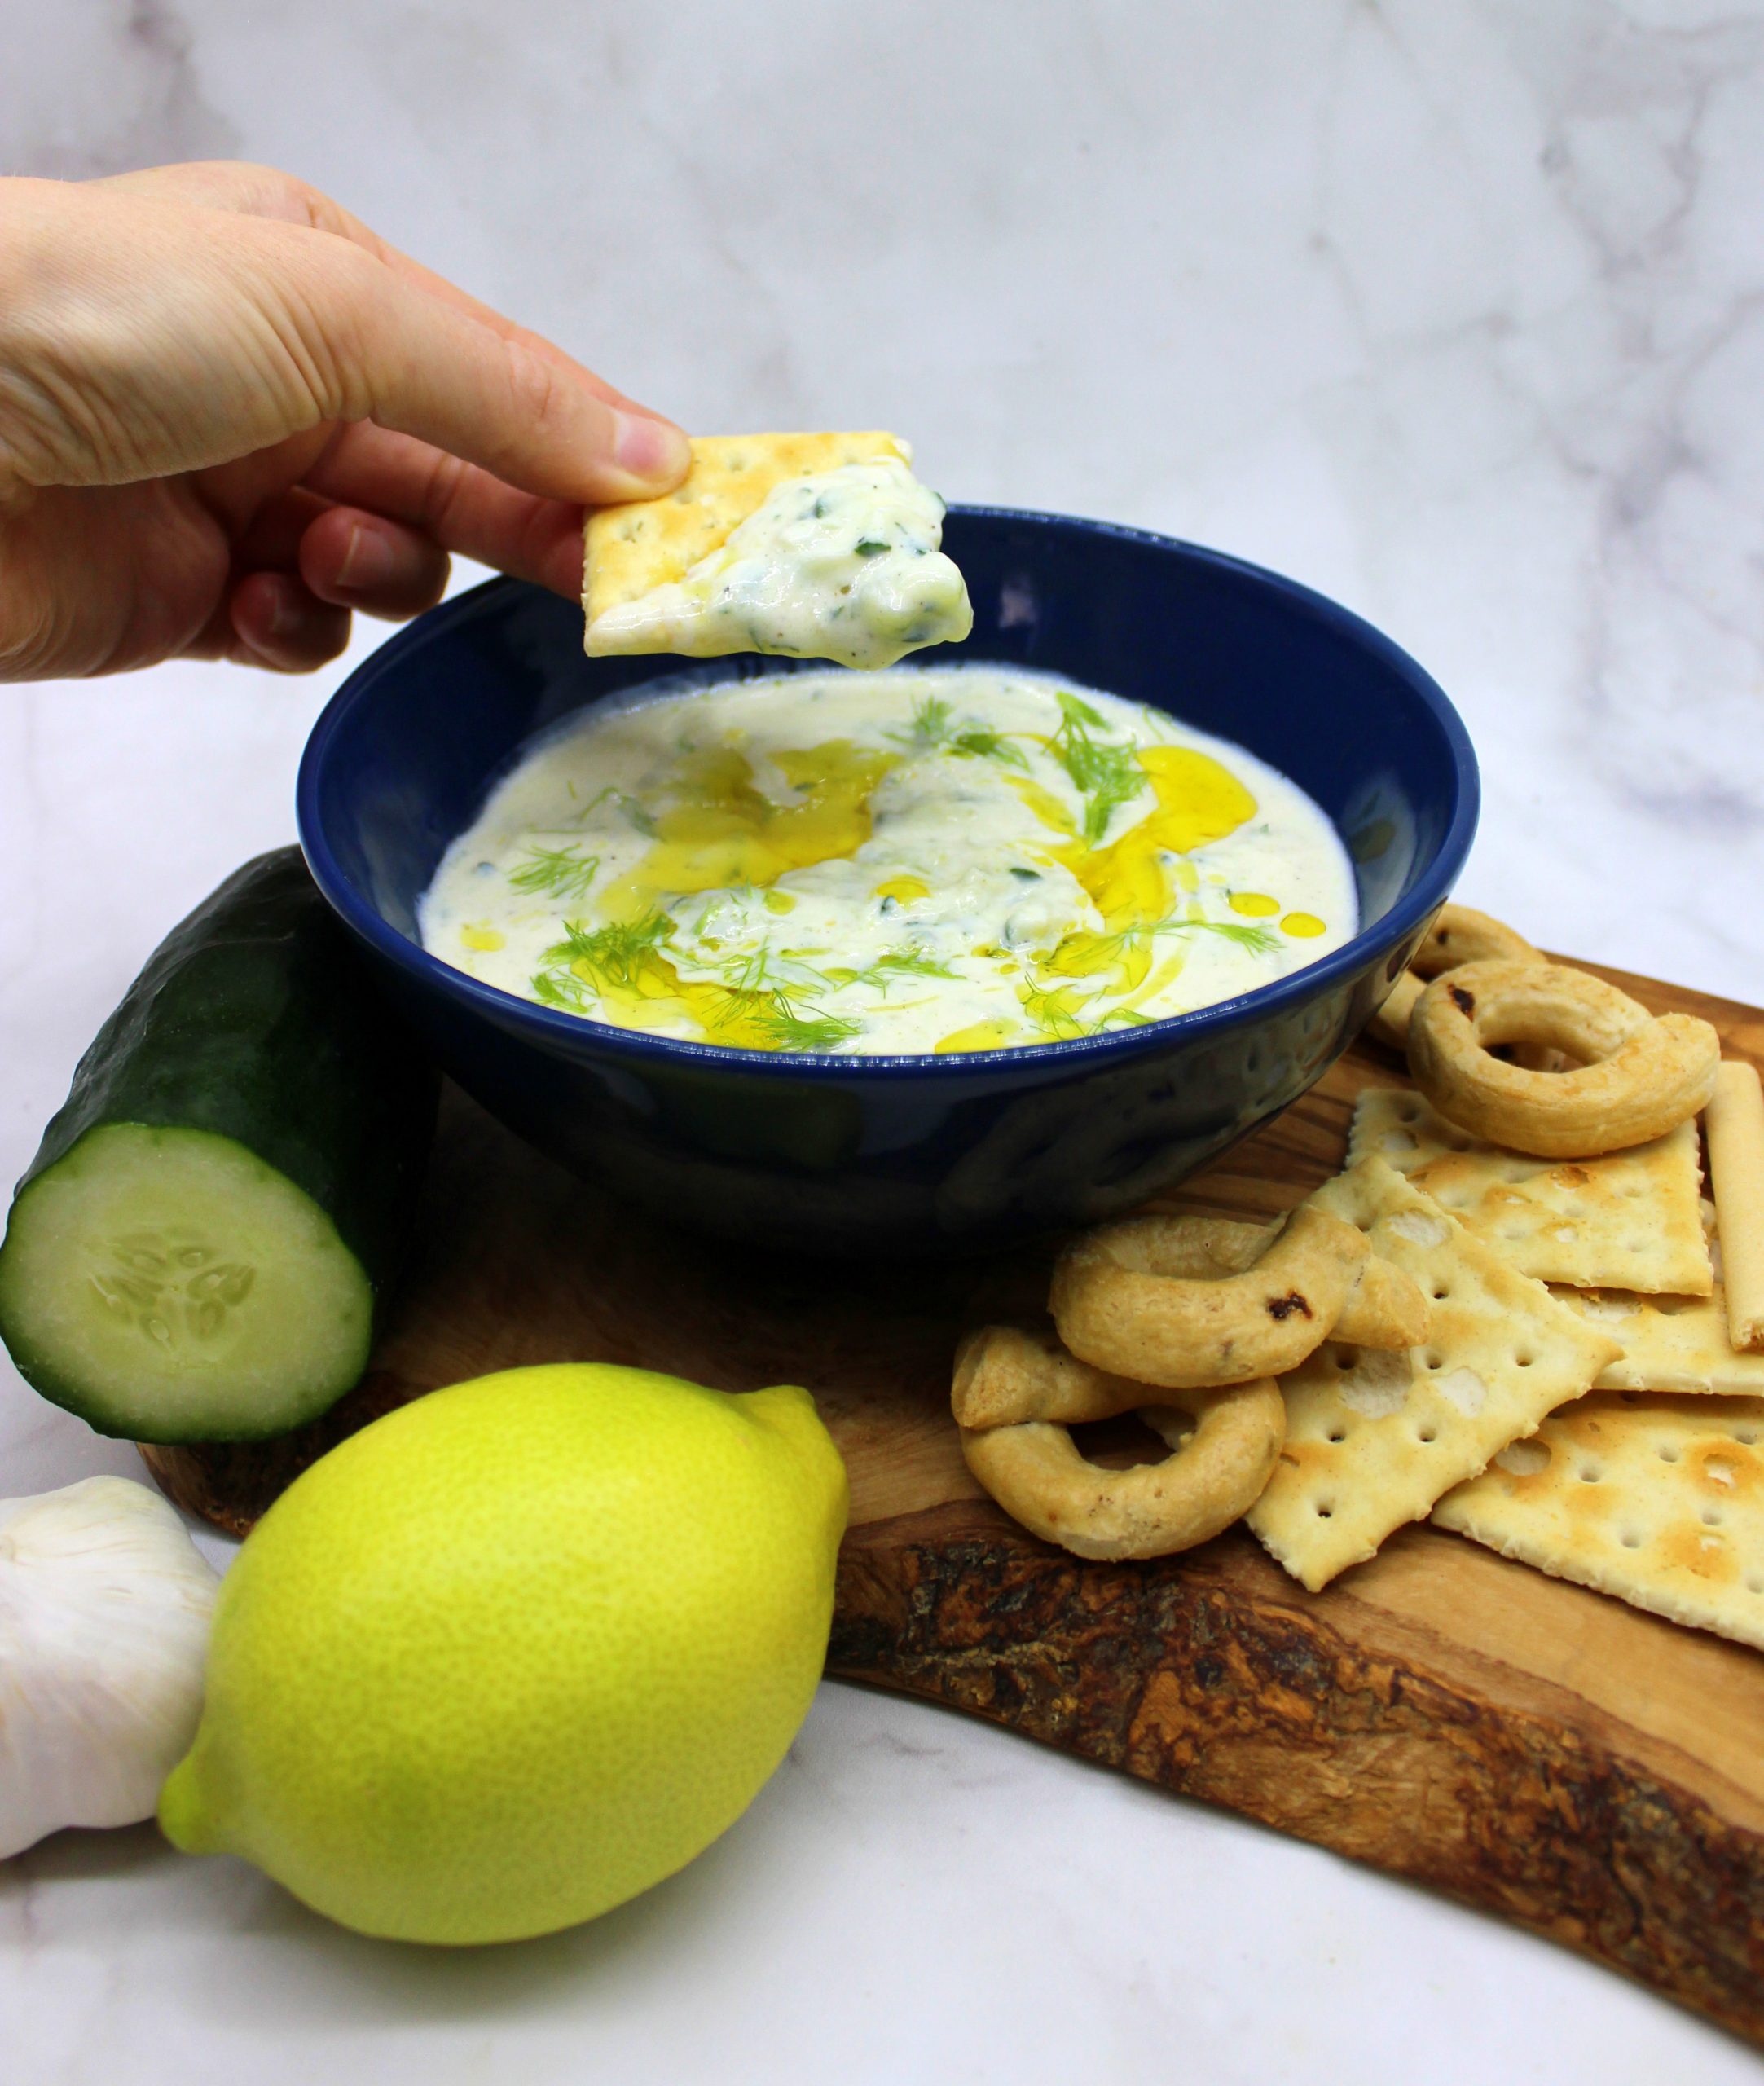
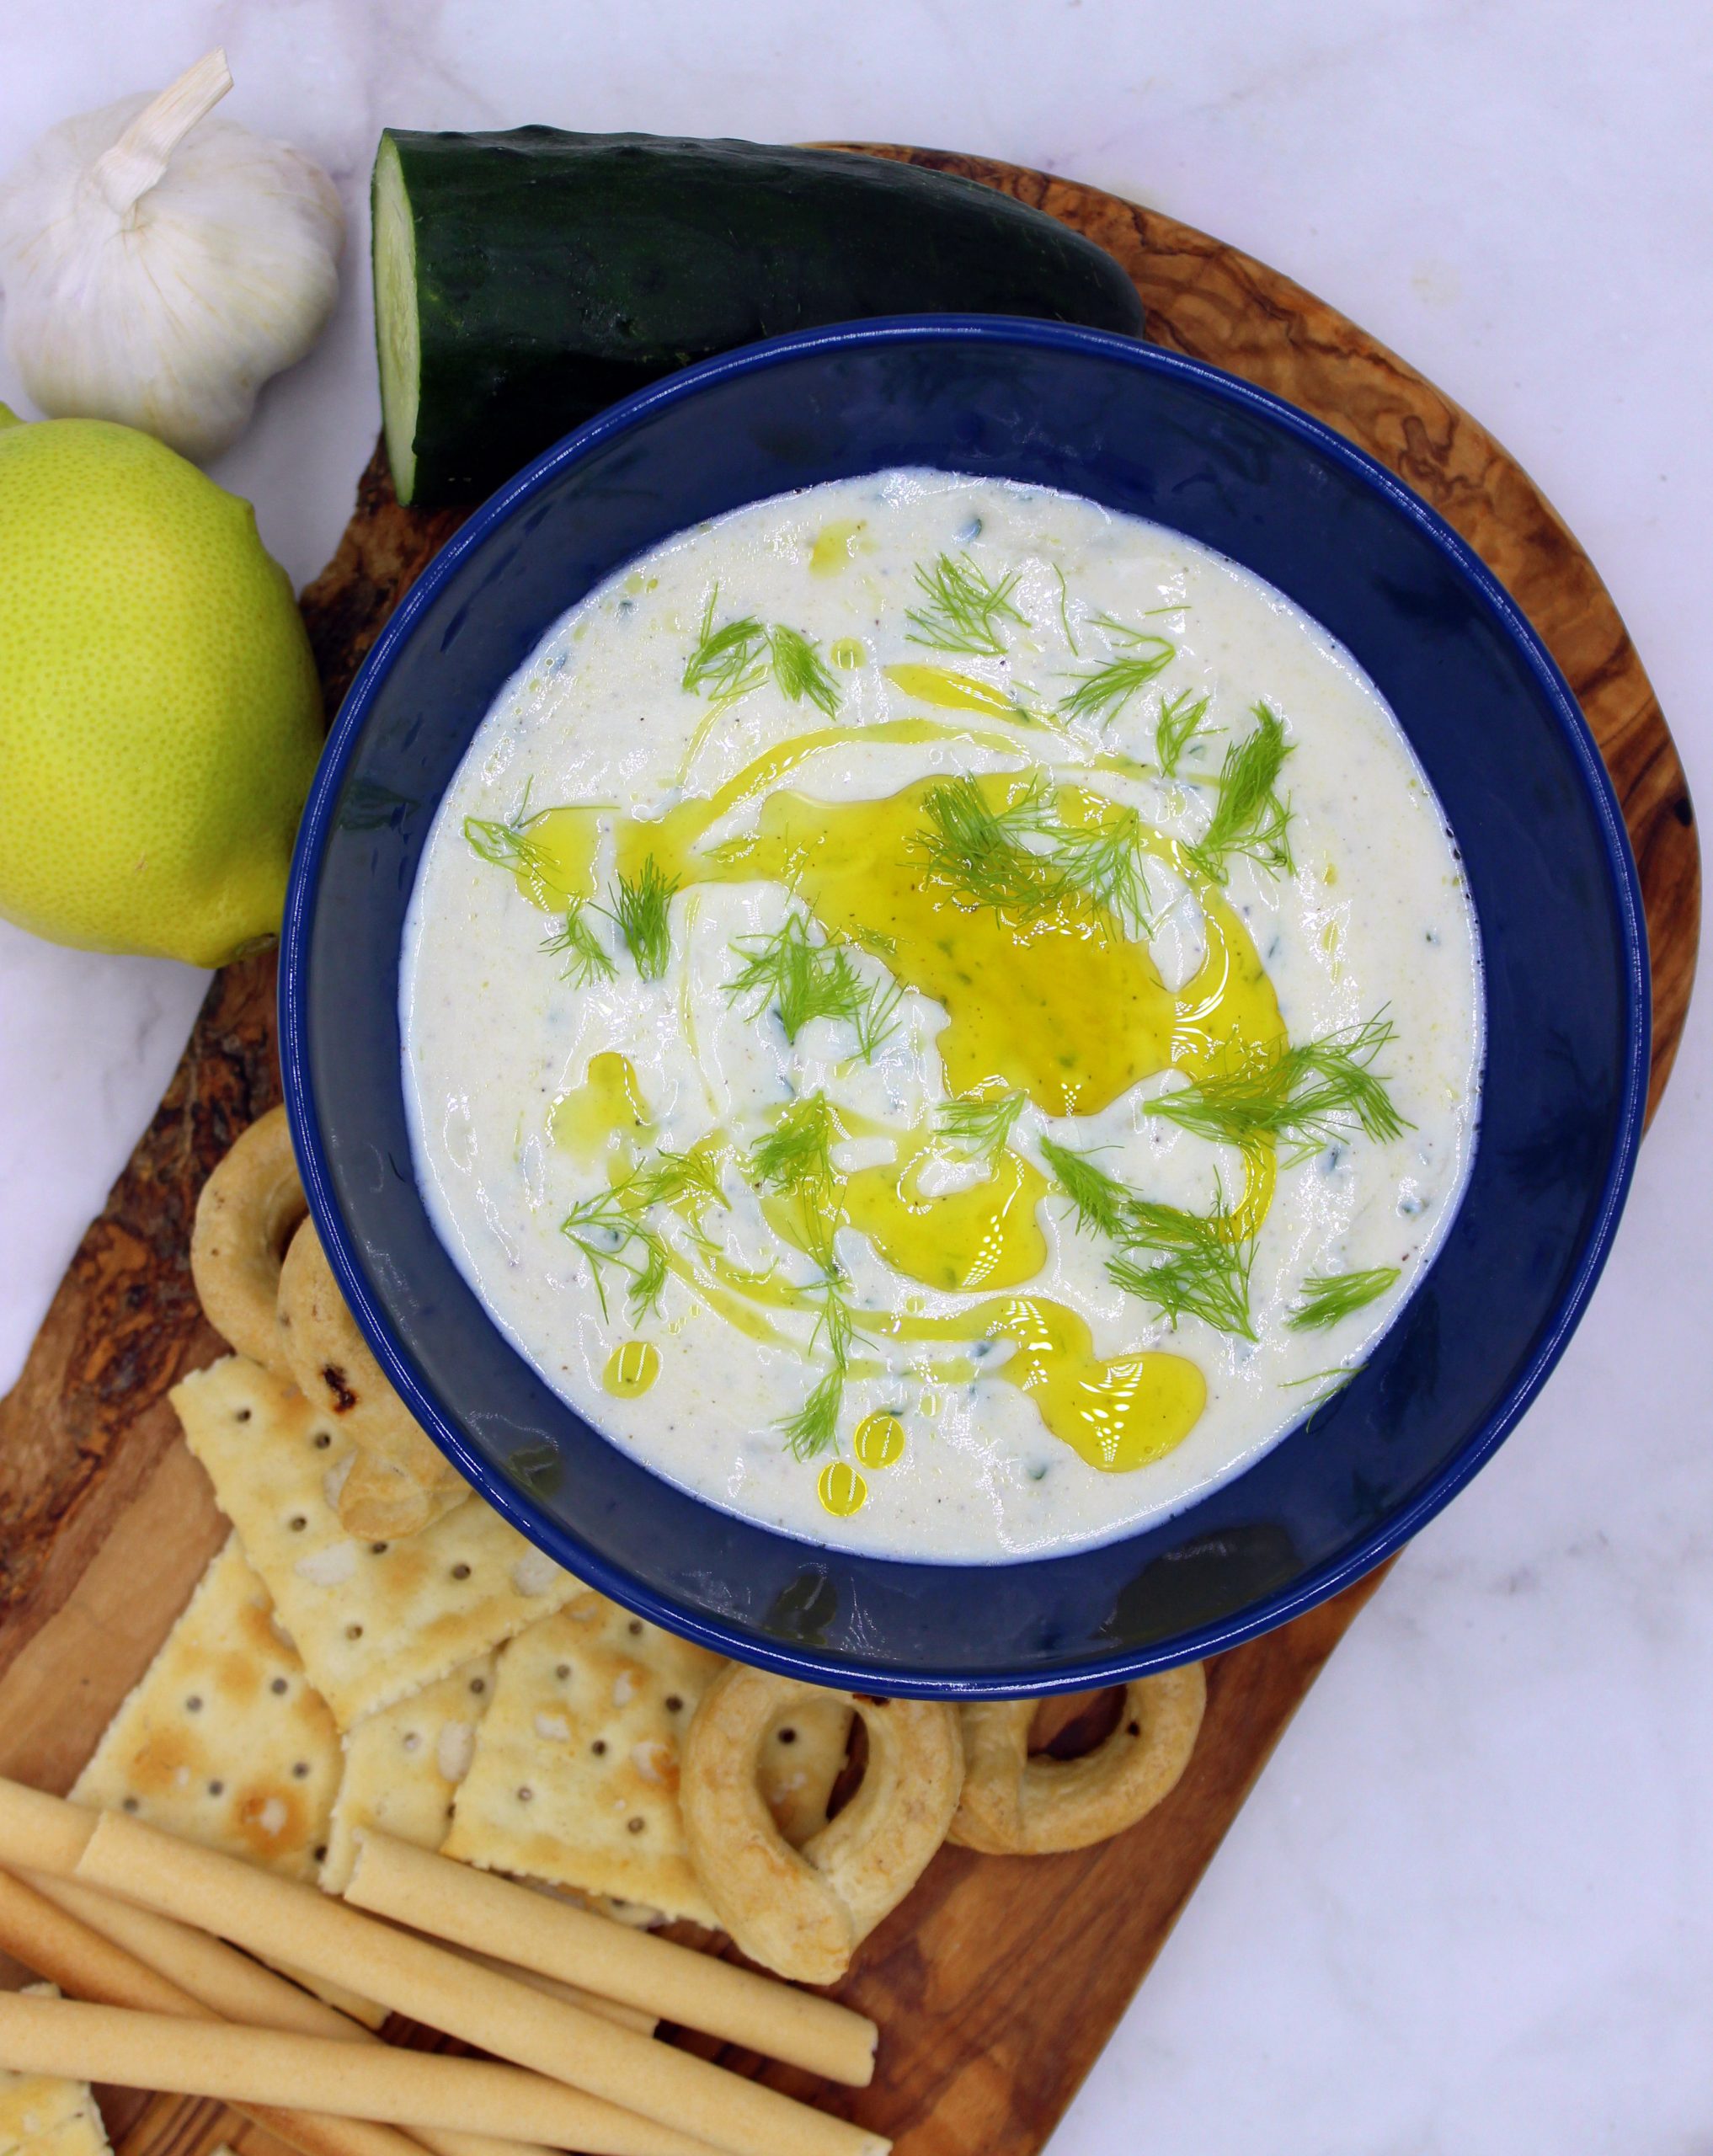
Quick and easy vegan Tzatziki
This recipe was posted on: 19/10/2020
Unfortunately, many world- famous foods originally are not vegan. But nowadays, thanks to the growing demand of vegan products, it’s quite easy to veganize almost everything. For example, do you know the famous Tzatziki sauce that is made with fresh cucumbers? Well, originally it contains milk products. But nowadays it’s easy to find unsweetened soy or coconut yoghurt almost in every supermarket, which you can use to make this quick and easy vegan Tzatziki.
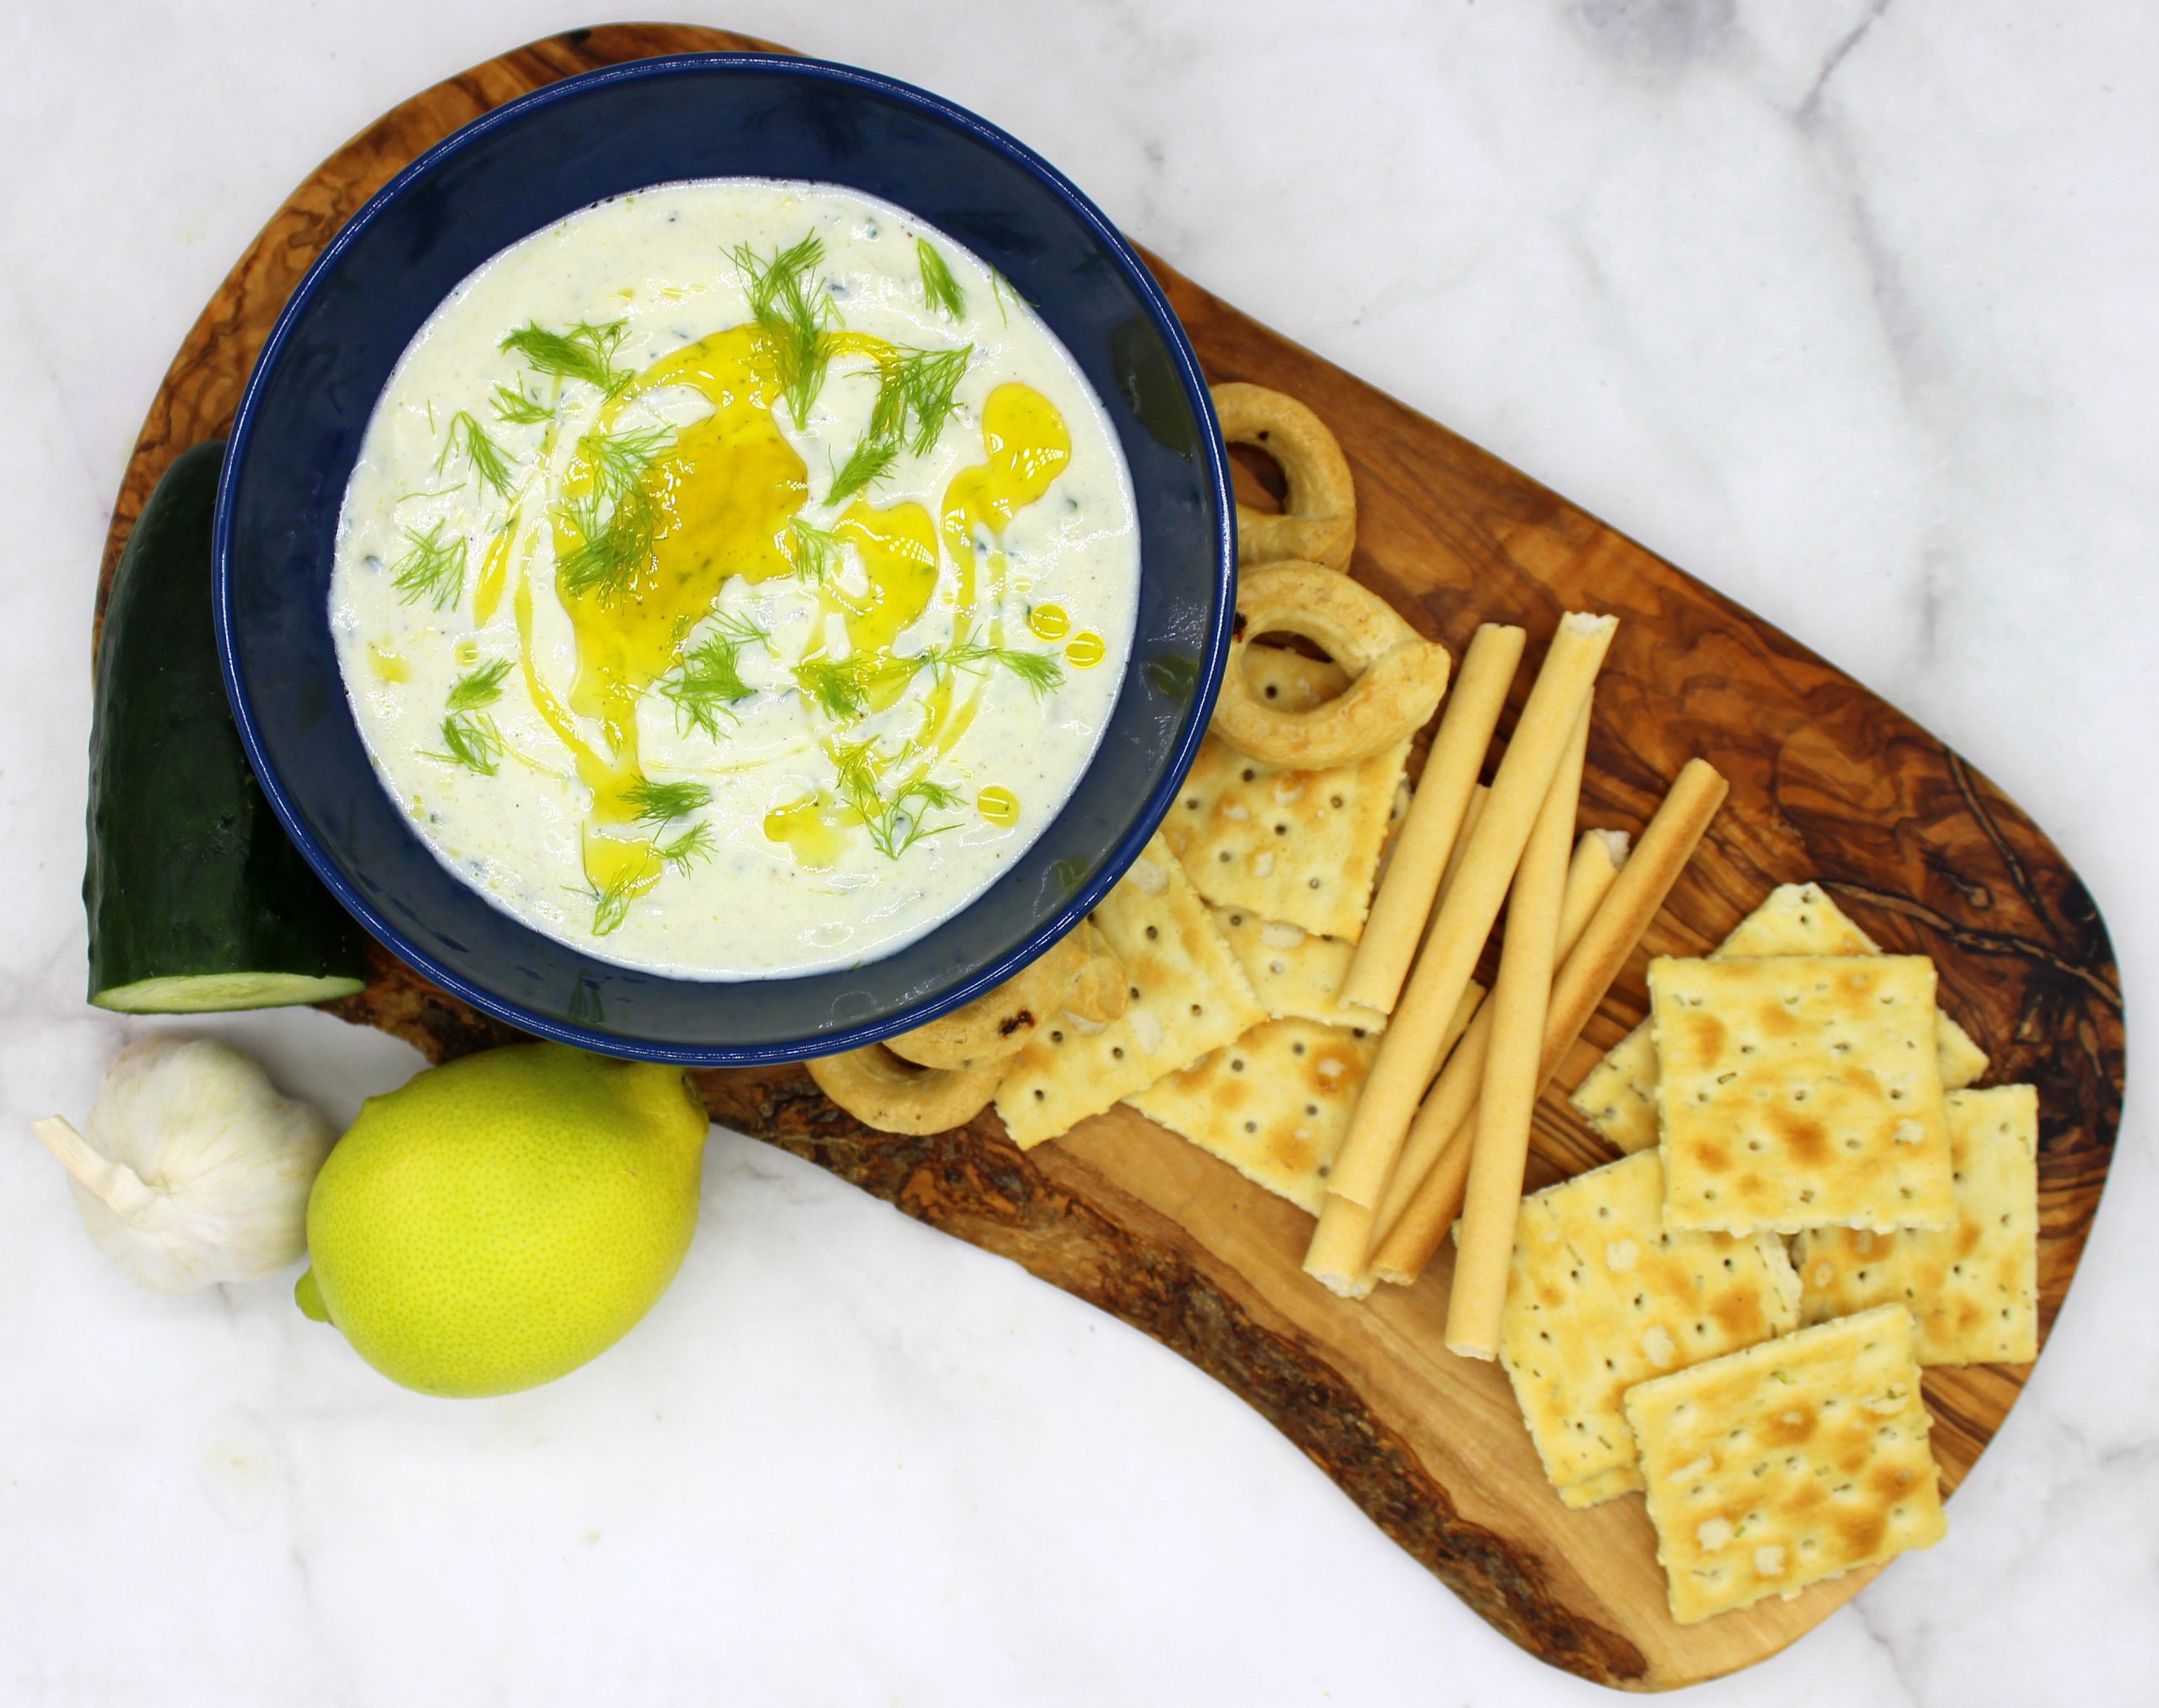
Apart from all the other ingredients, Tzatziki is well-known for the fact that it contains fresh cucumbers. Even if you’re not a big fan of cucumbers, in this sauce they really fit perfectly. The mild and refreshing flavor of cucumber together with the spiciness of garlic and acidity of lemon juice make a divine combination of flavors. Tzatziki usually is served together with some bread snacks. But actually, you can use it together with everything that you want. For example, in my opinion it would taste great also together with my oven-baked vegan onion rings!
How to make quick and easy vegan Tzatziki
To prepare this quick and easy vegan Tzatziki, you’ll need unsweetened vegan yoghurt, garlic, fresh cucumber, salt and pepper, olive oil, lemon juice and some fresh dill. The preparation itself is very easy and basically takes no time! You simply need to mix together yoghurt, olive oil, salt, pepper, lemon juice and crushed garlic. Then you must grate the cucumber, press off its liquid and add it to the prepared mixture. Top it all with a tablespoon of olive oil and fresh dill and you’re ready to go! In general, you can eat the vegan Tzatziki immediately. But it will taste even better, if you let it stay for 1 – 2 h in fridge before using.
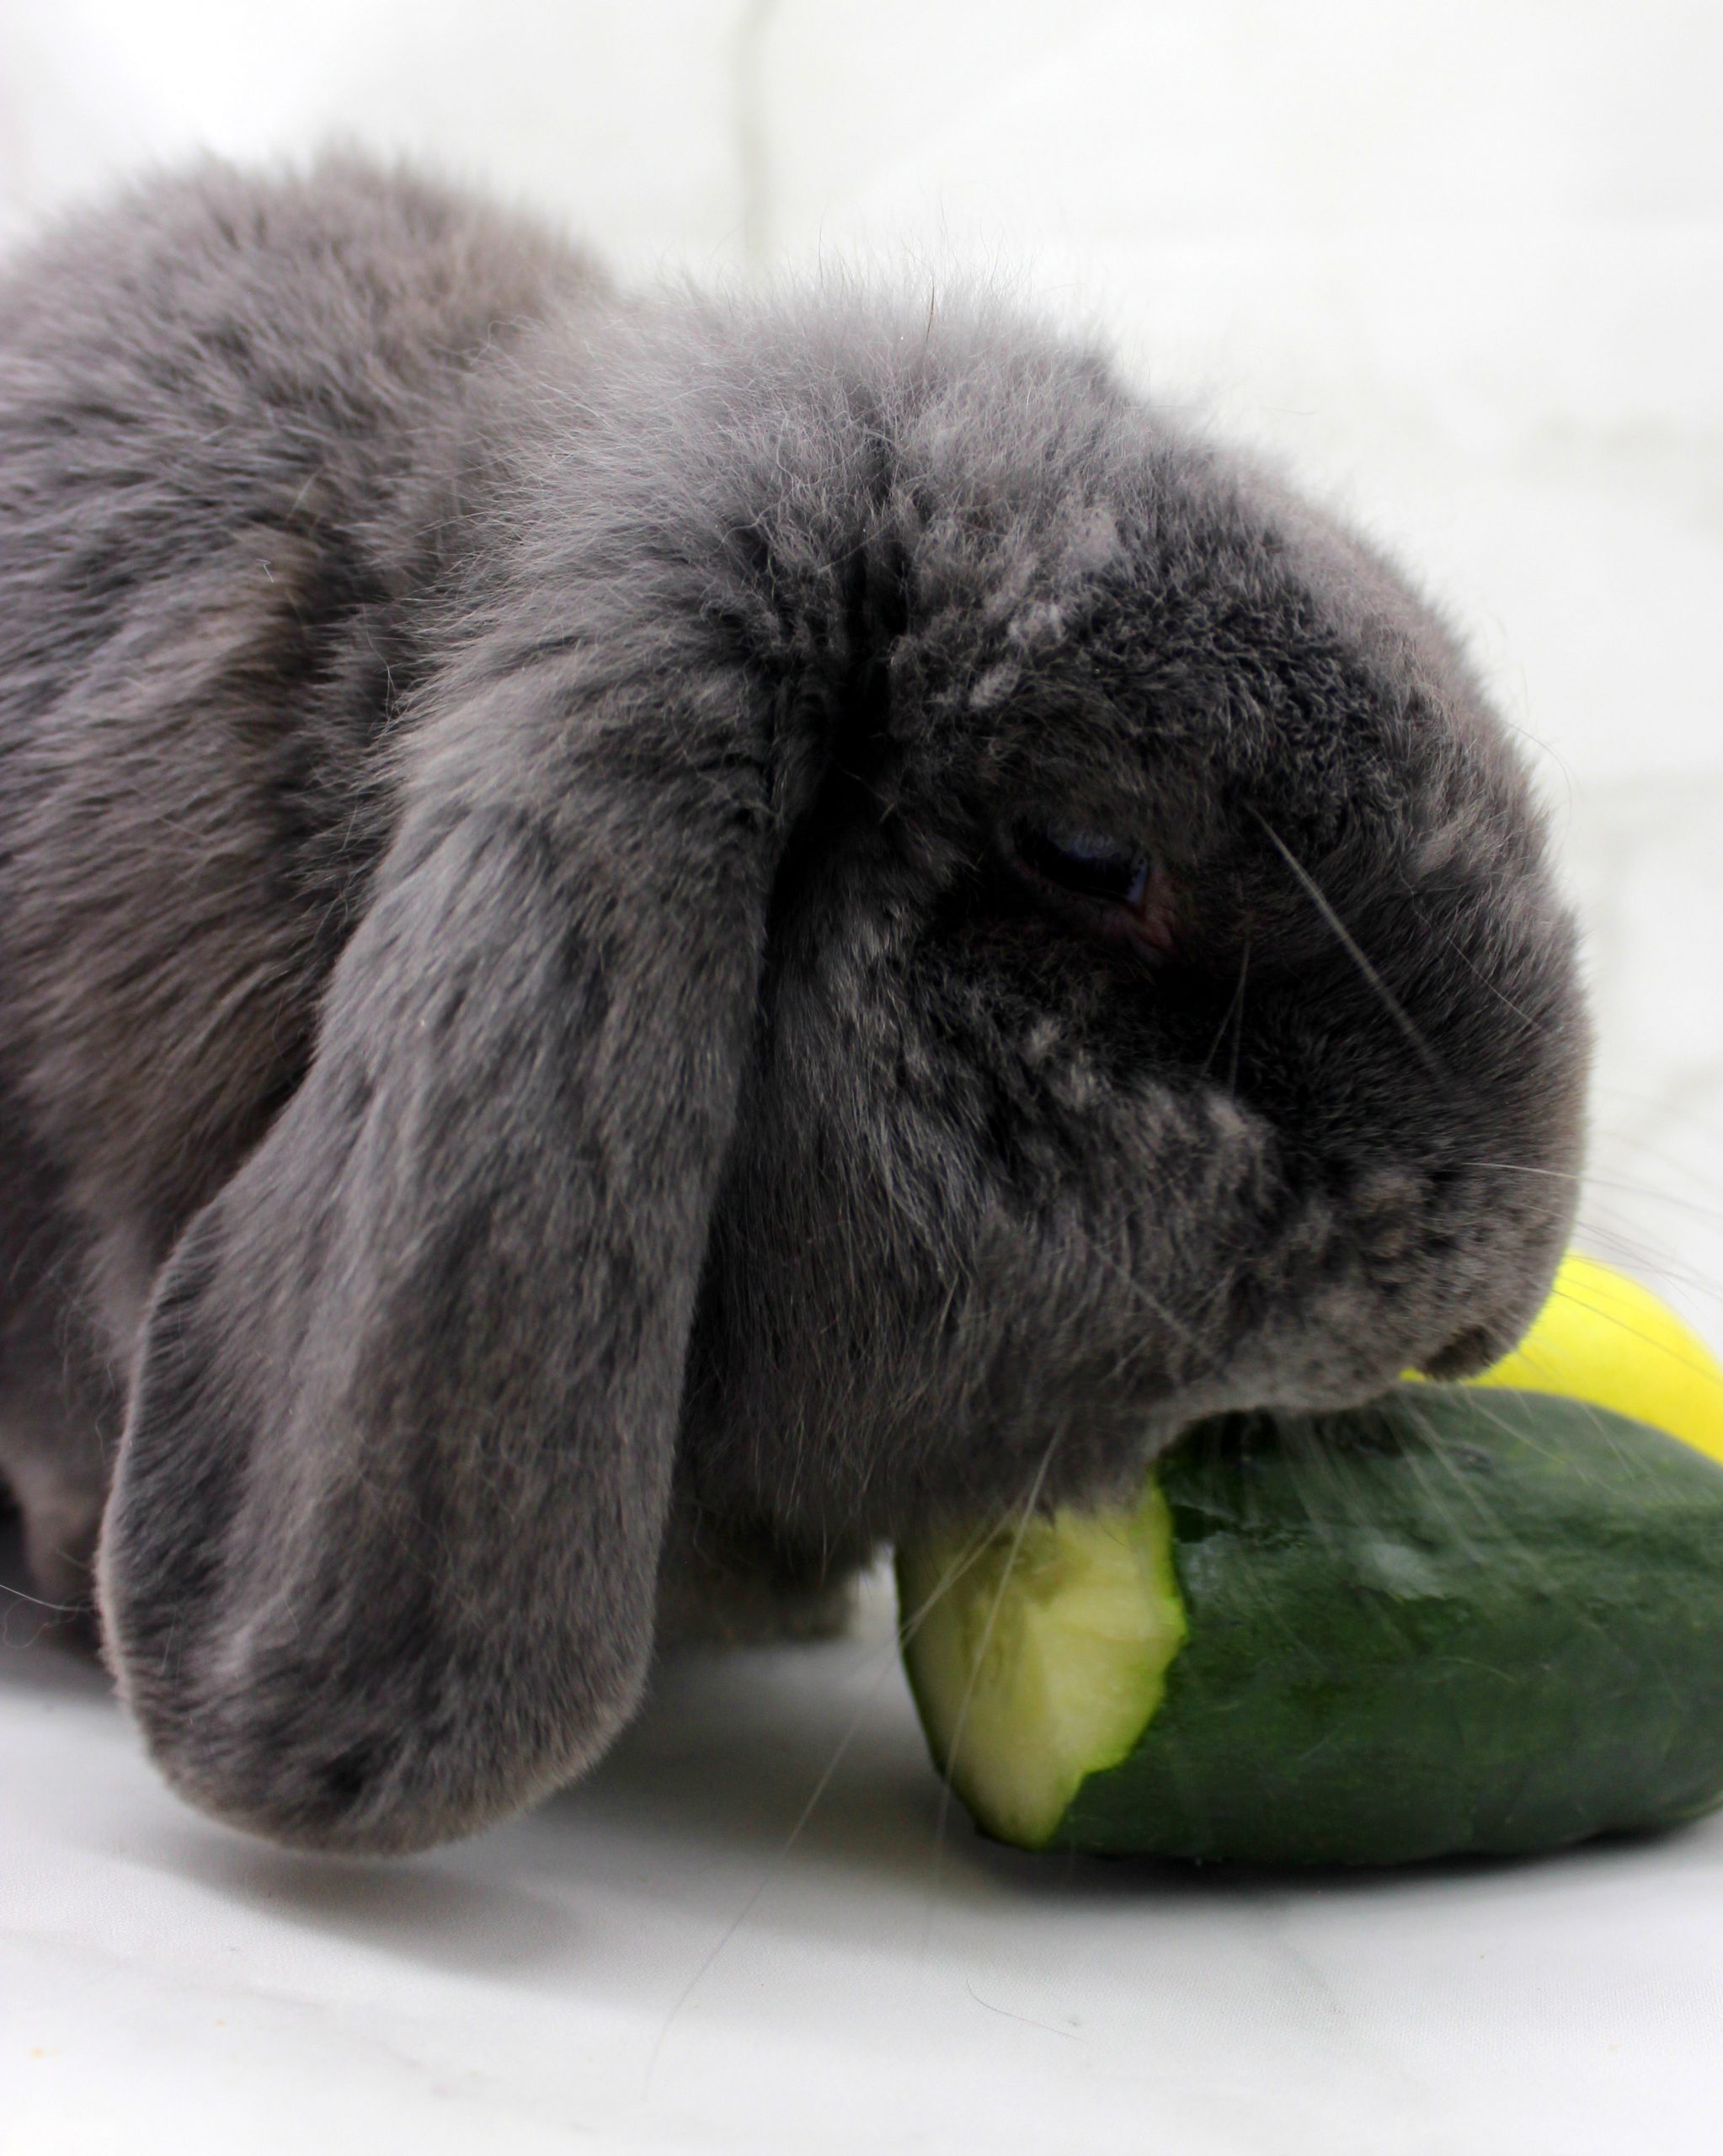
This time Specky was quite satisfied with my choice to prepare this quick and easy vegan Tzatziki. Because with this recipe he had the opportunity to enjoy a tiny bit of a fresh cucumber.
I always try to keep in fridge food products that combined can quickly turn into something very delicious. And this Tzatziki sauce definitely fits the description since it’s:
-
vegan
- healthy
- easy to make
- quick to make
- refreshing
- creamy
- perfect together with bread snacks
- flavorful
- and simply yummy!
Let me know, if you try this recipe! Leave a comment or even more – make Specky happy! Snap a picture of your masterpiece and post it on Instagram or Facebook by tagging @bunnymommycooks. And feel free to let your animal family members join in the picture!
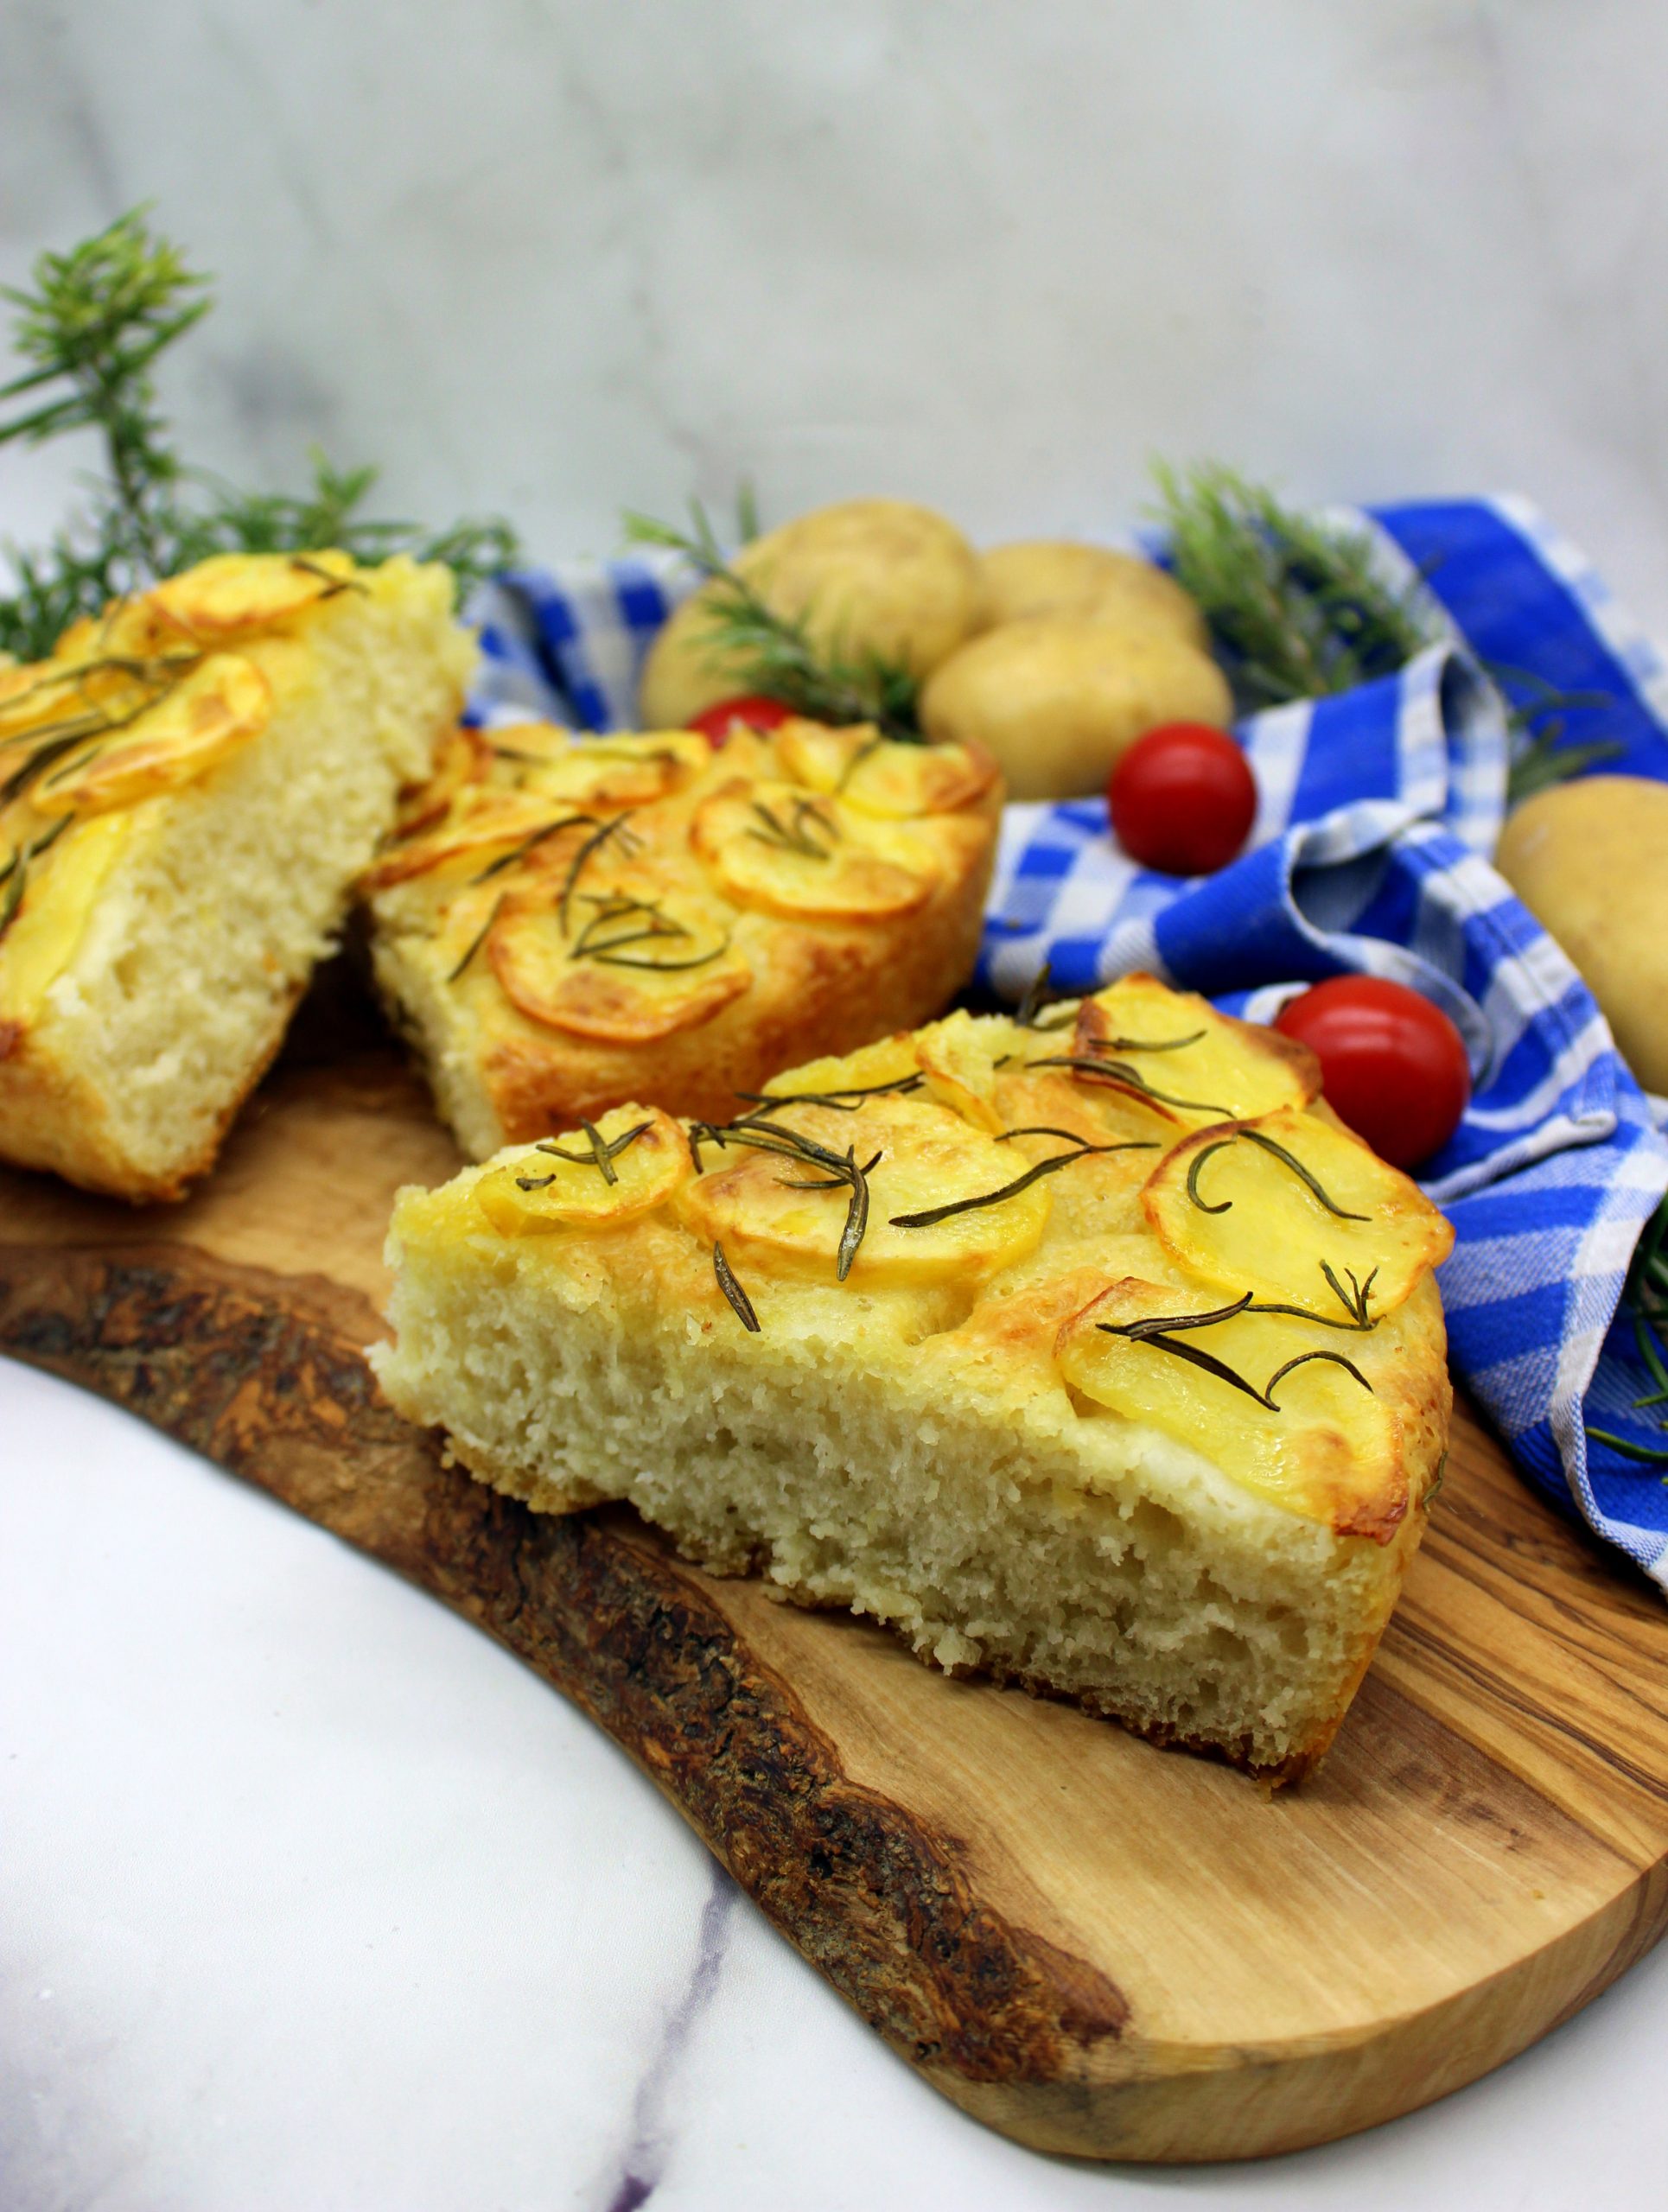
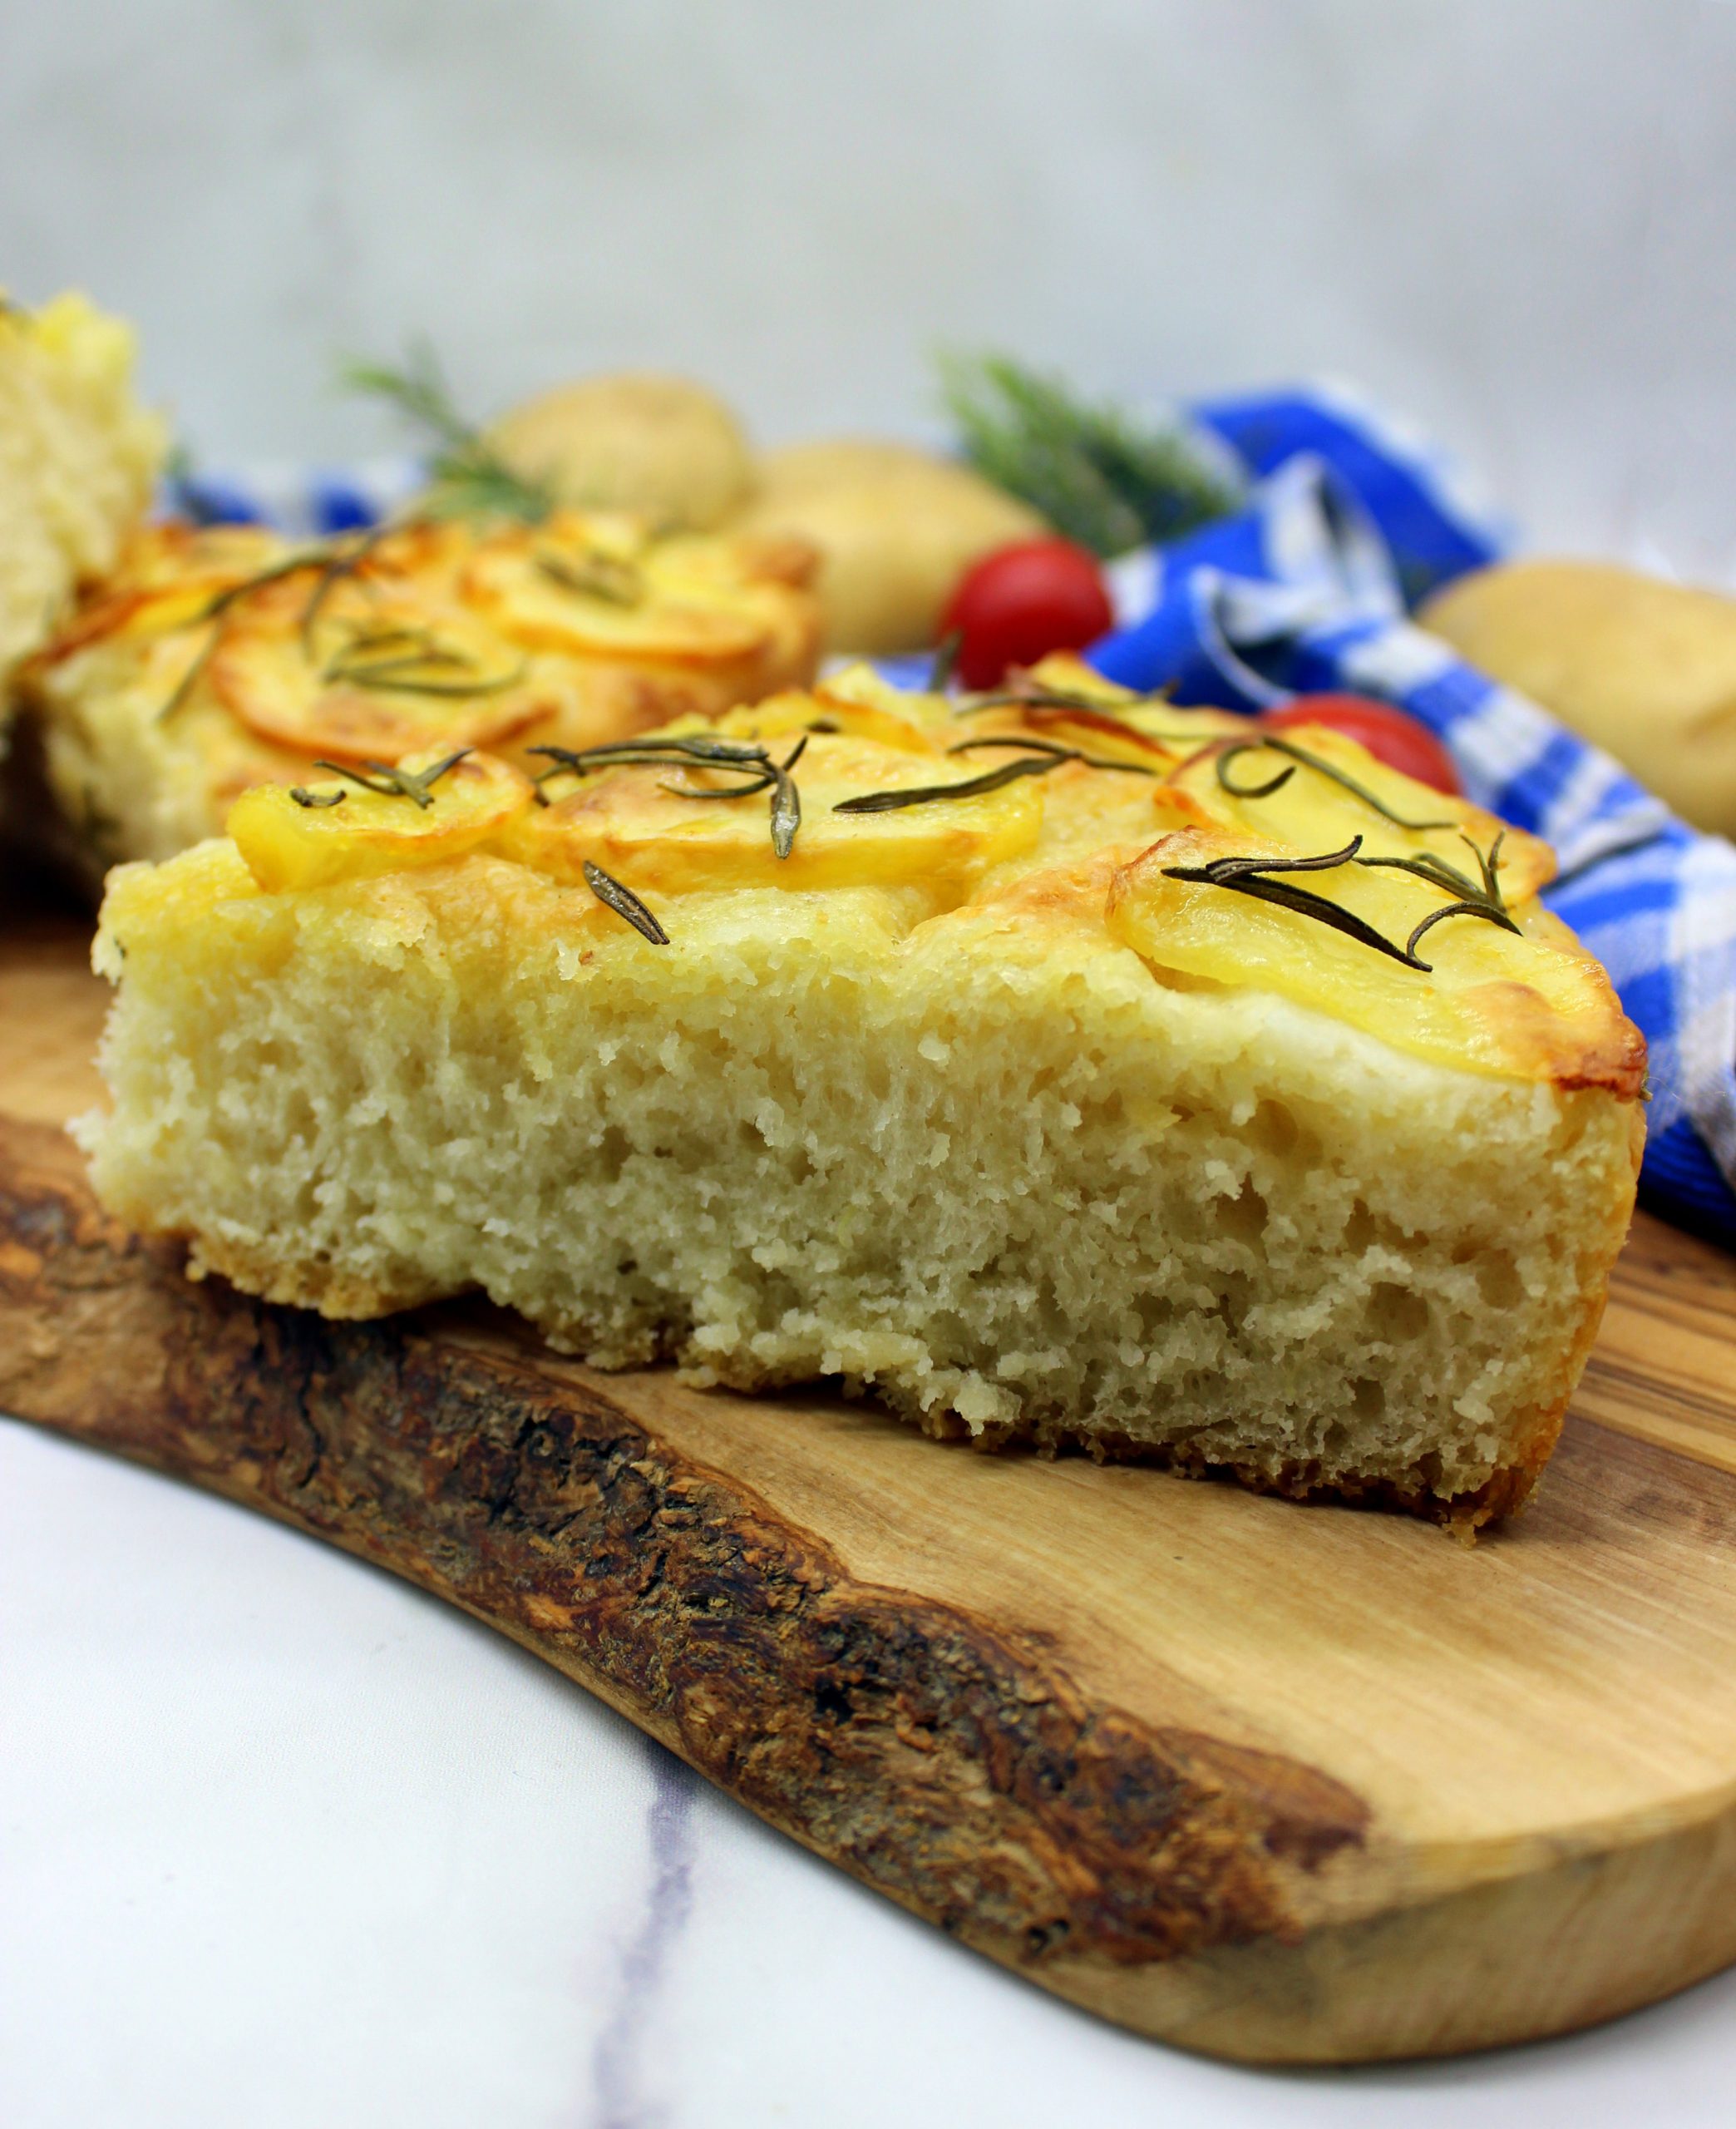
Italian Focaccia with potatoes and rosemary
This recipe was posted on: 01/10/2020
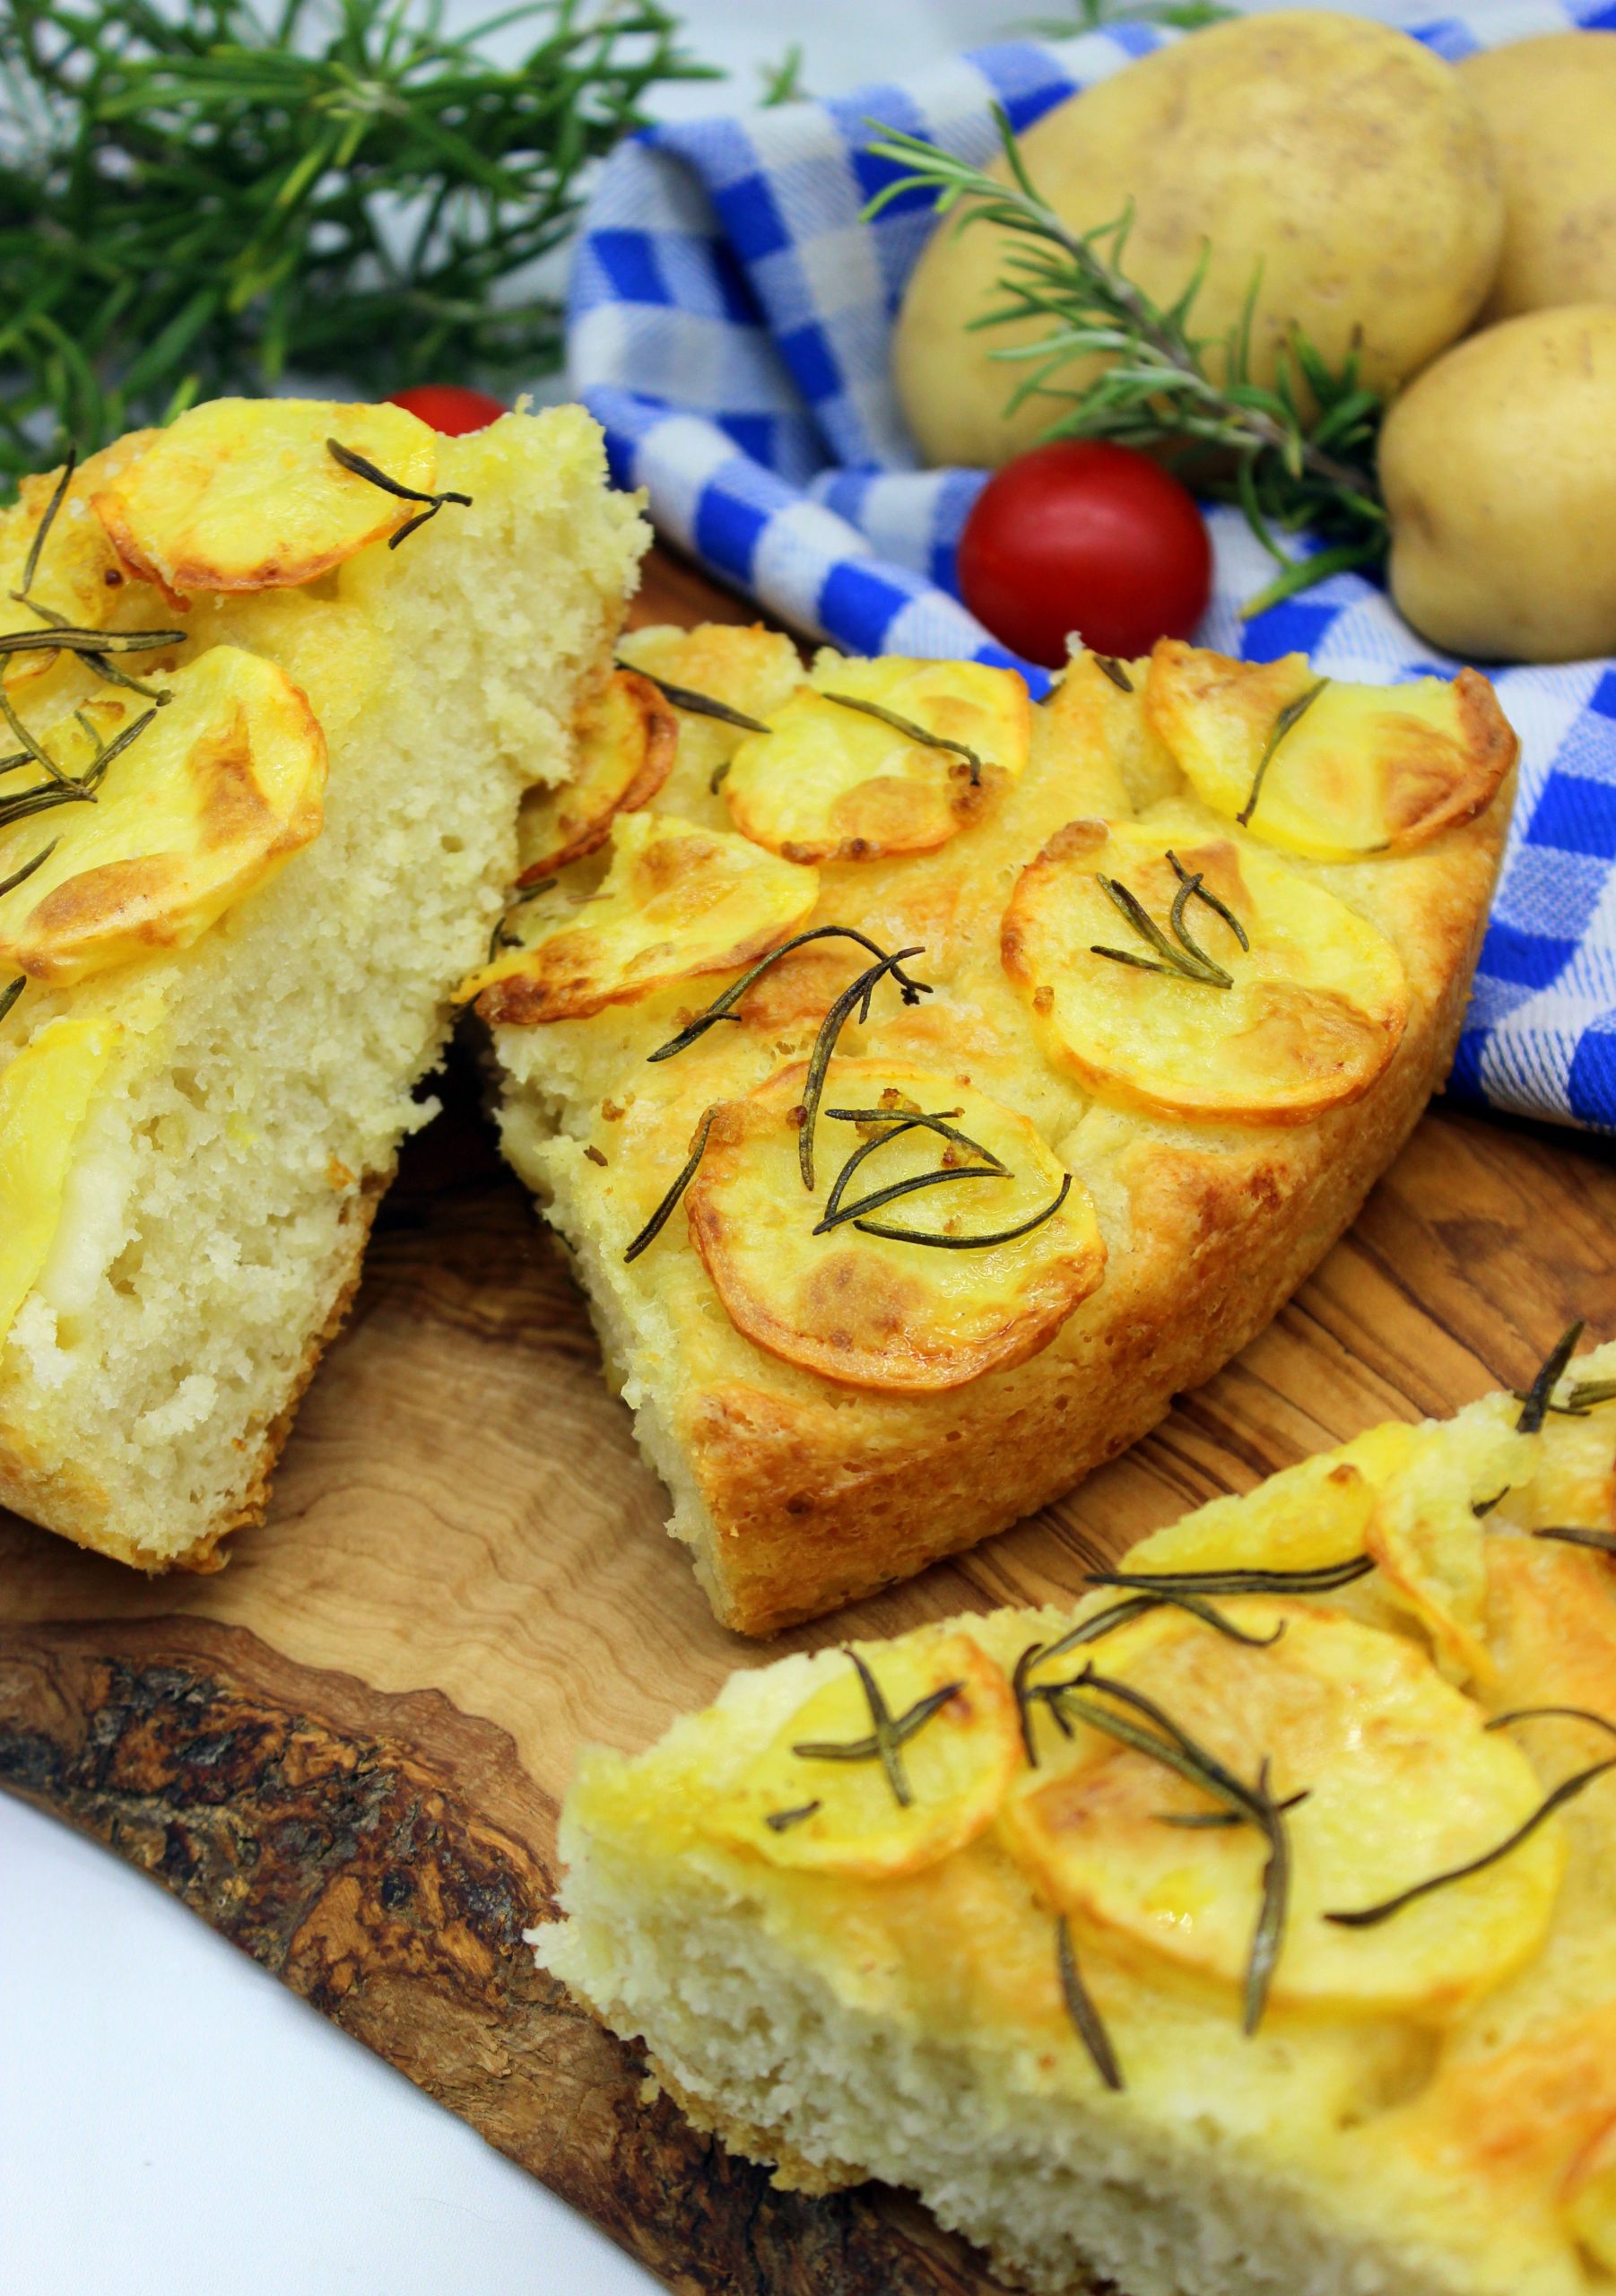
Bread, obviously, is an essential food product. But sometimes its flavor might seem very simple… Even too simple. But, if there’s a country where bread is not something that you can define as basic, then that’s Italy! In Italy bread comes in all shapes and flavors. It can be flat and crispy or thick and fluffy. It can be topped with different kind of ingredients or served simply with salt and olive oil. No matter how and with what the bread is made, it is tasty! Also my Italian Focaccia with potatoes and rosemary is very delicious, so let’s learn how to make it!
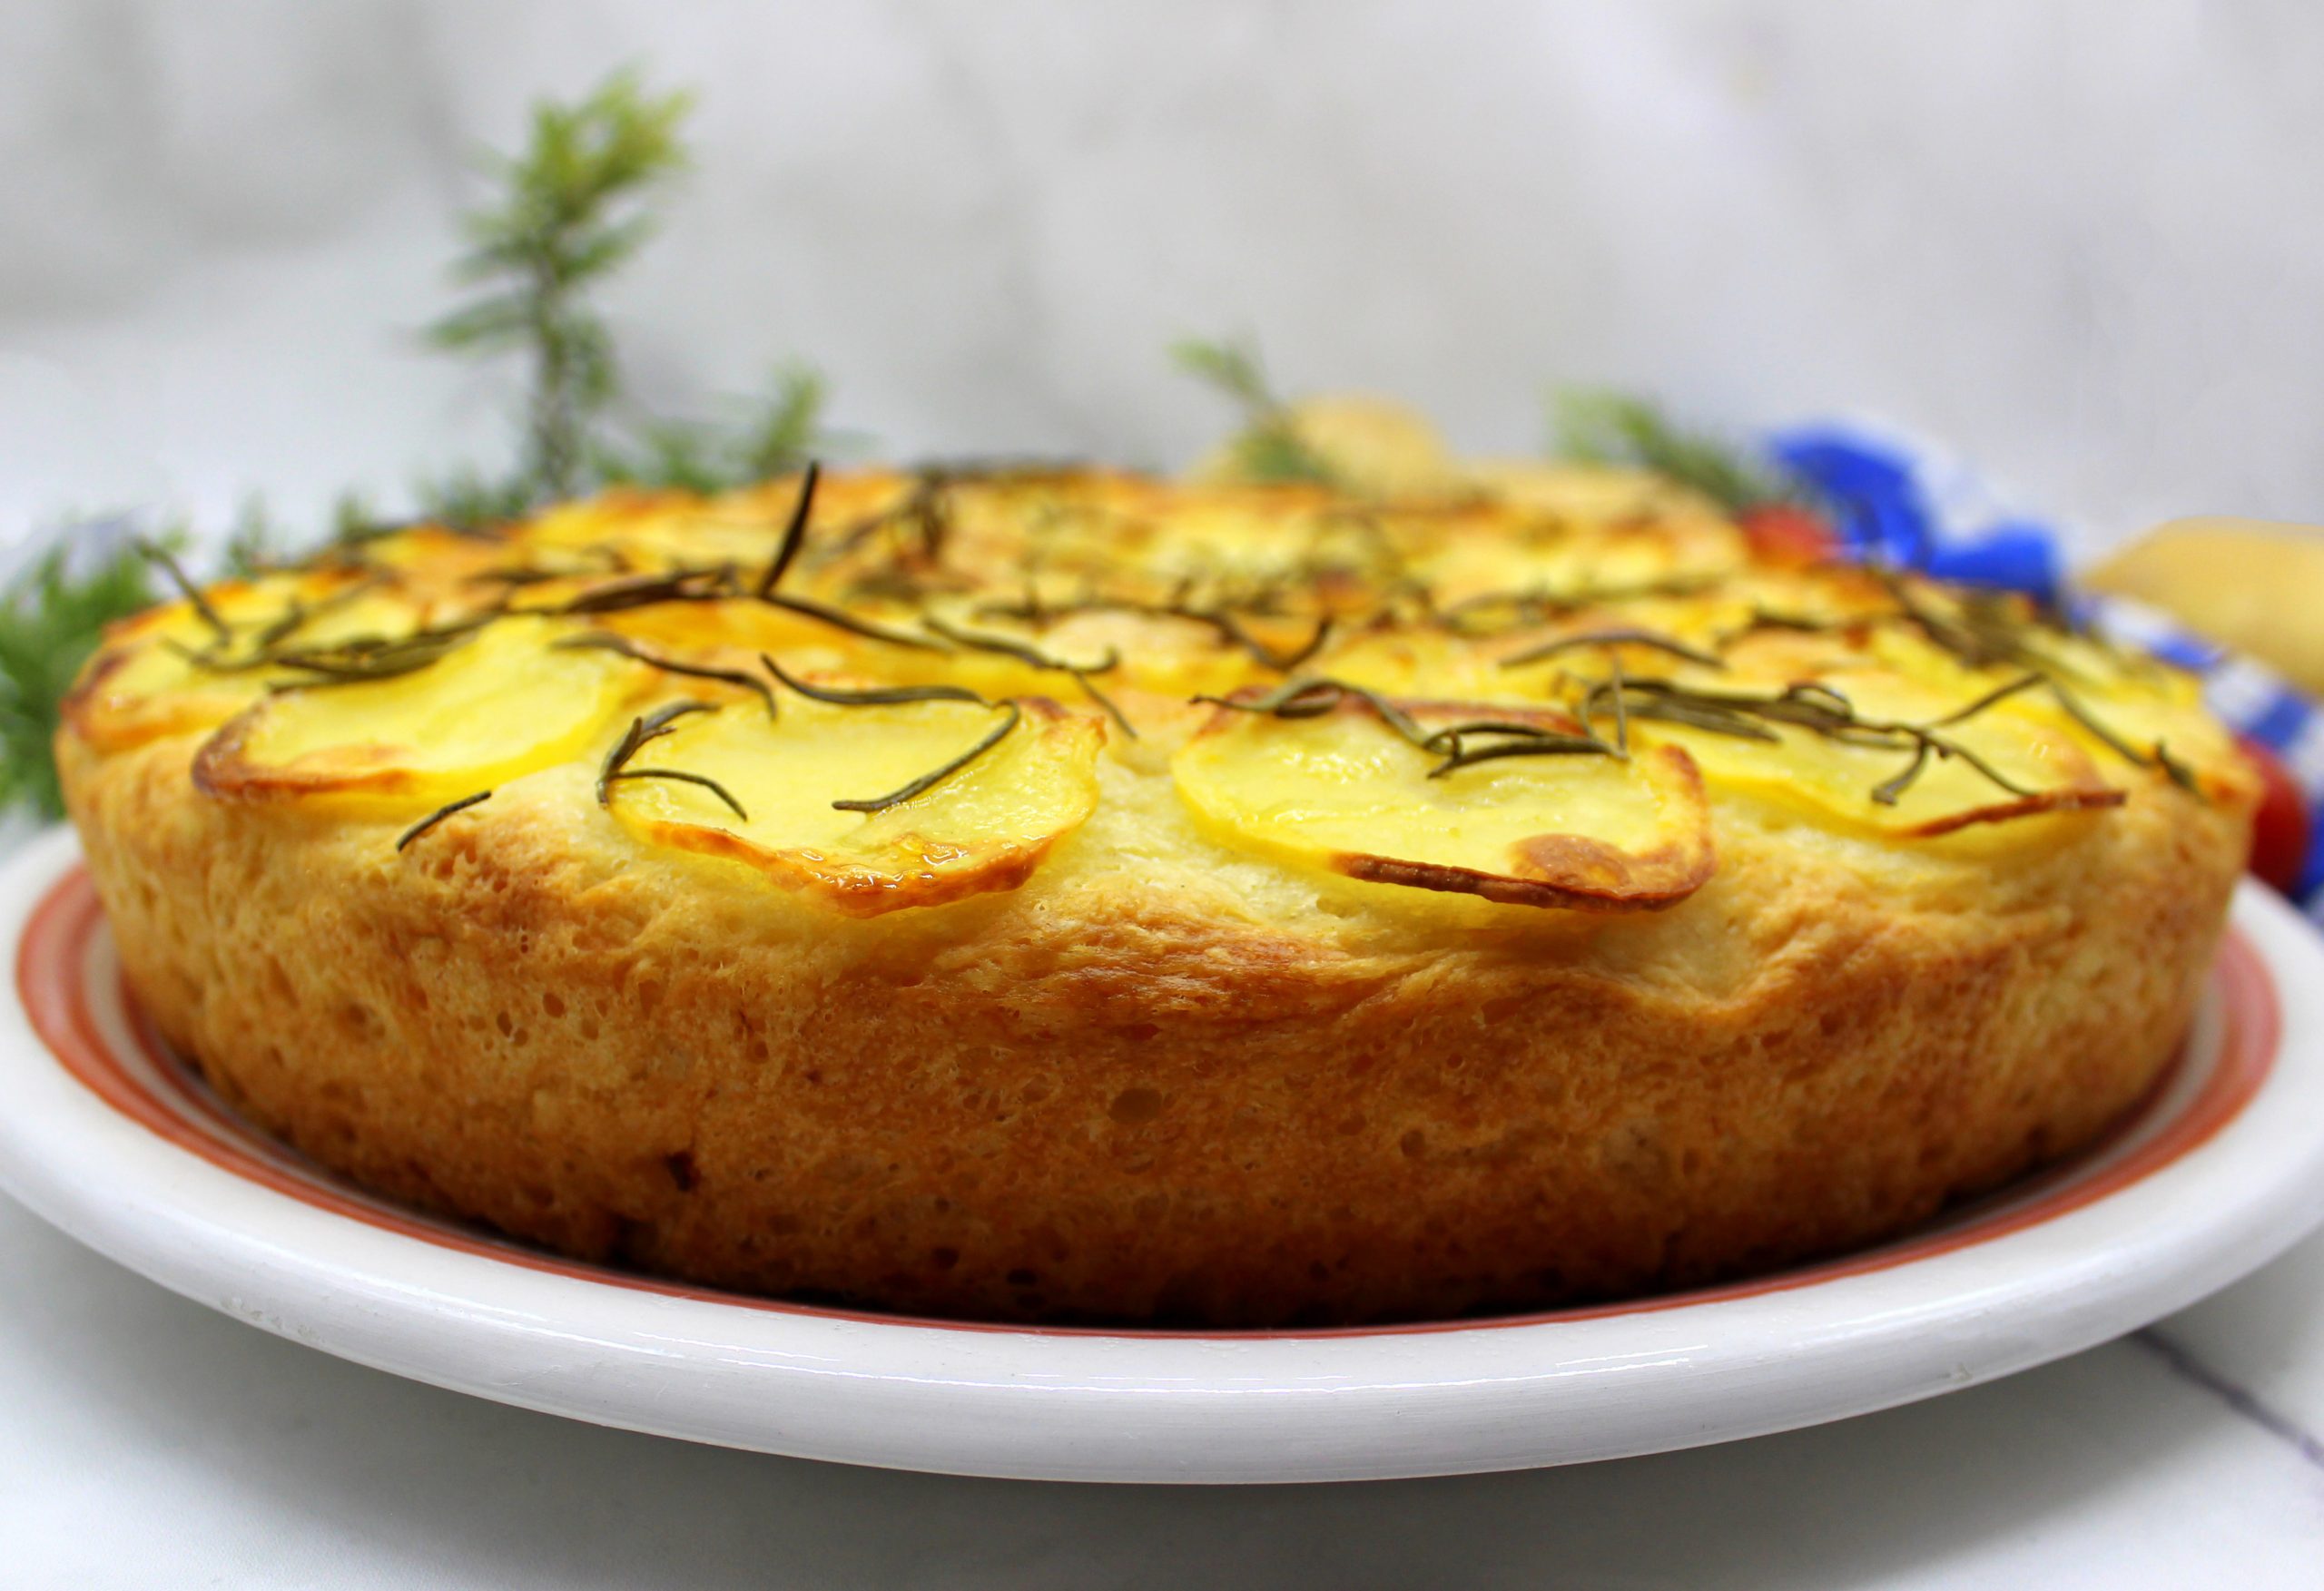

The Italian Focaccia with potatoes and rosemary is, as you already understood, topped with potatoes and rosemary. In addition, the topping contains also salt and olive oil to make the potato layer even more flavorful. But the topping is not the only place where the potatoes exist! They are hidden also in the dough of the bread. When it comes about Italian Focaccia with potatoes and rosemary, I always prefer to make it thick, because I really love how soft it is. Literally, like a cloud! But if you prefer thinner focaccia, you can simply choose a bigger baking tray for it, without increasing the amount of ingredients.
How to make Italian Focaccia with potatoes and rosemary
The preparation process altogether is quite long, because you need to let the dough rise two times. But the time that you will need to directly work with the ingredients is quite small. So, basically this Italian Focaccia with potatoes and rosemary is a dish that will test your patience, but won’t exhaust you. And, of course, once it’s ready, already the first bite will make you forget all the time spent on waiting. So, let’s get to the point! You need to start by making the dough. That means mixing together all the ingredients except raw potatoes, rosemary and half of the amount of oil and salt. Why? – Because these four ingredients will serve as topping of your focaccia. When mixing starts to be difficult, knead the dough until it’s homogenous. Then let it rise in a warm place for two hours.
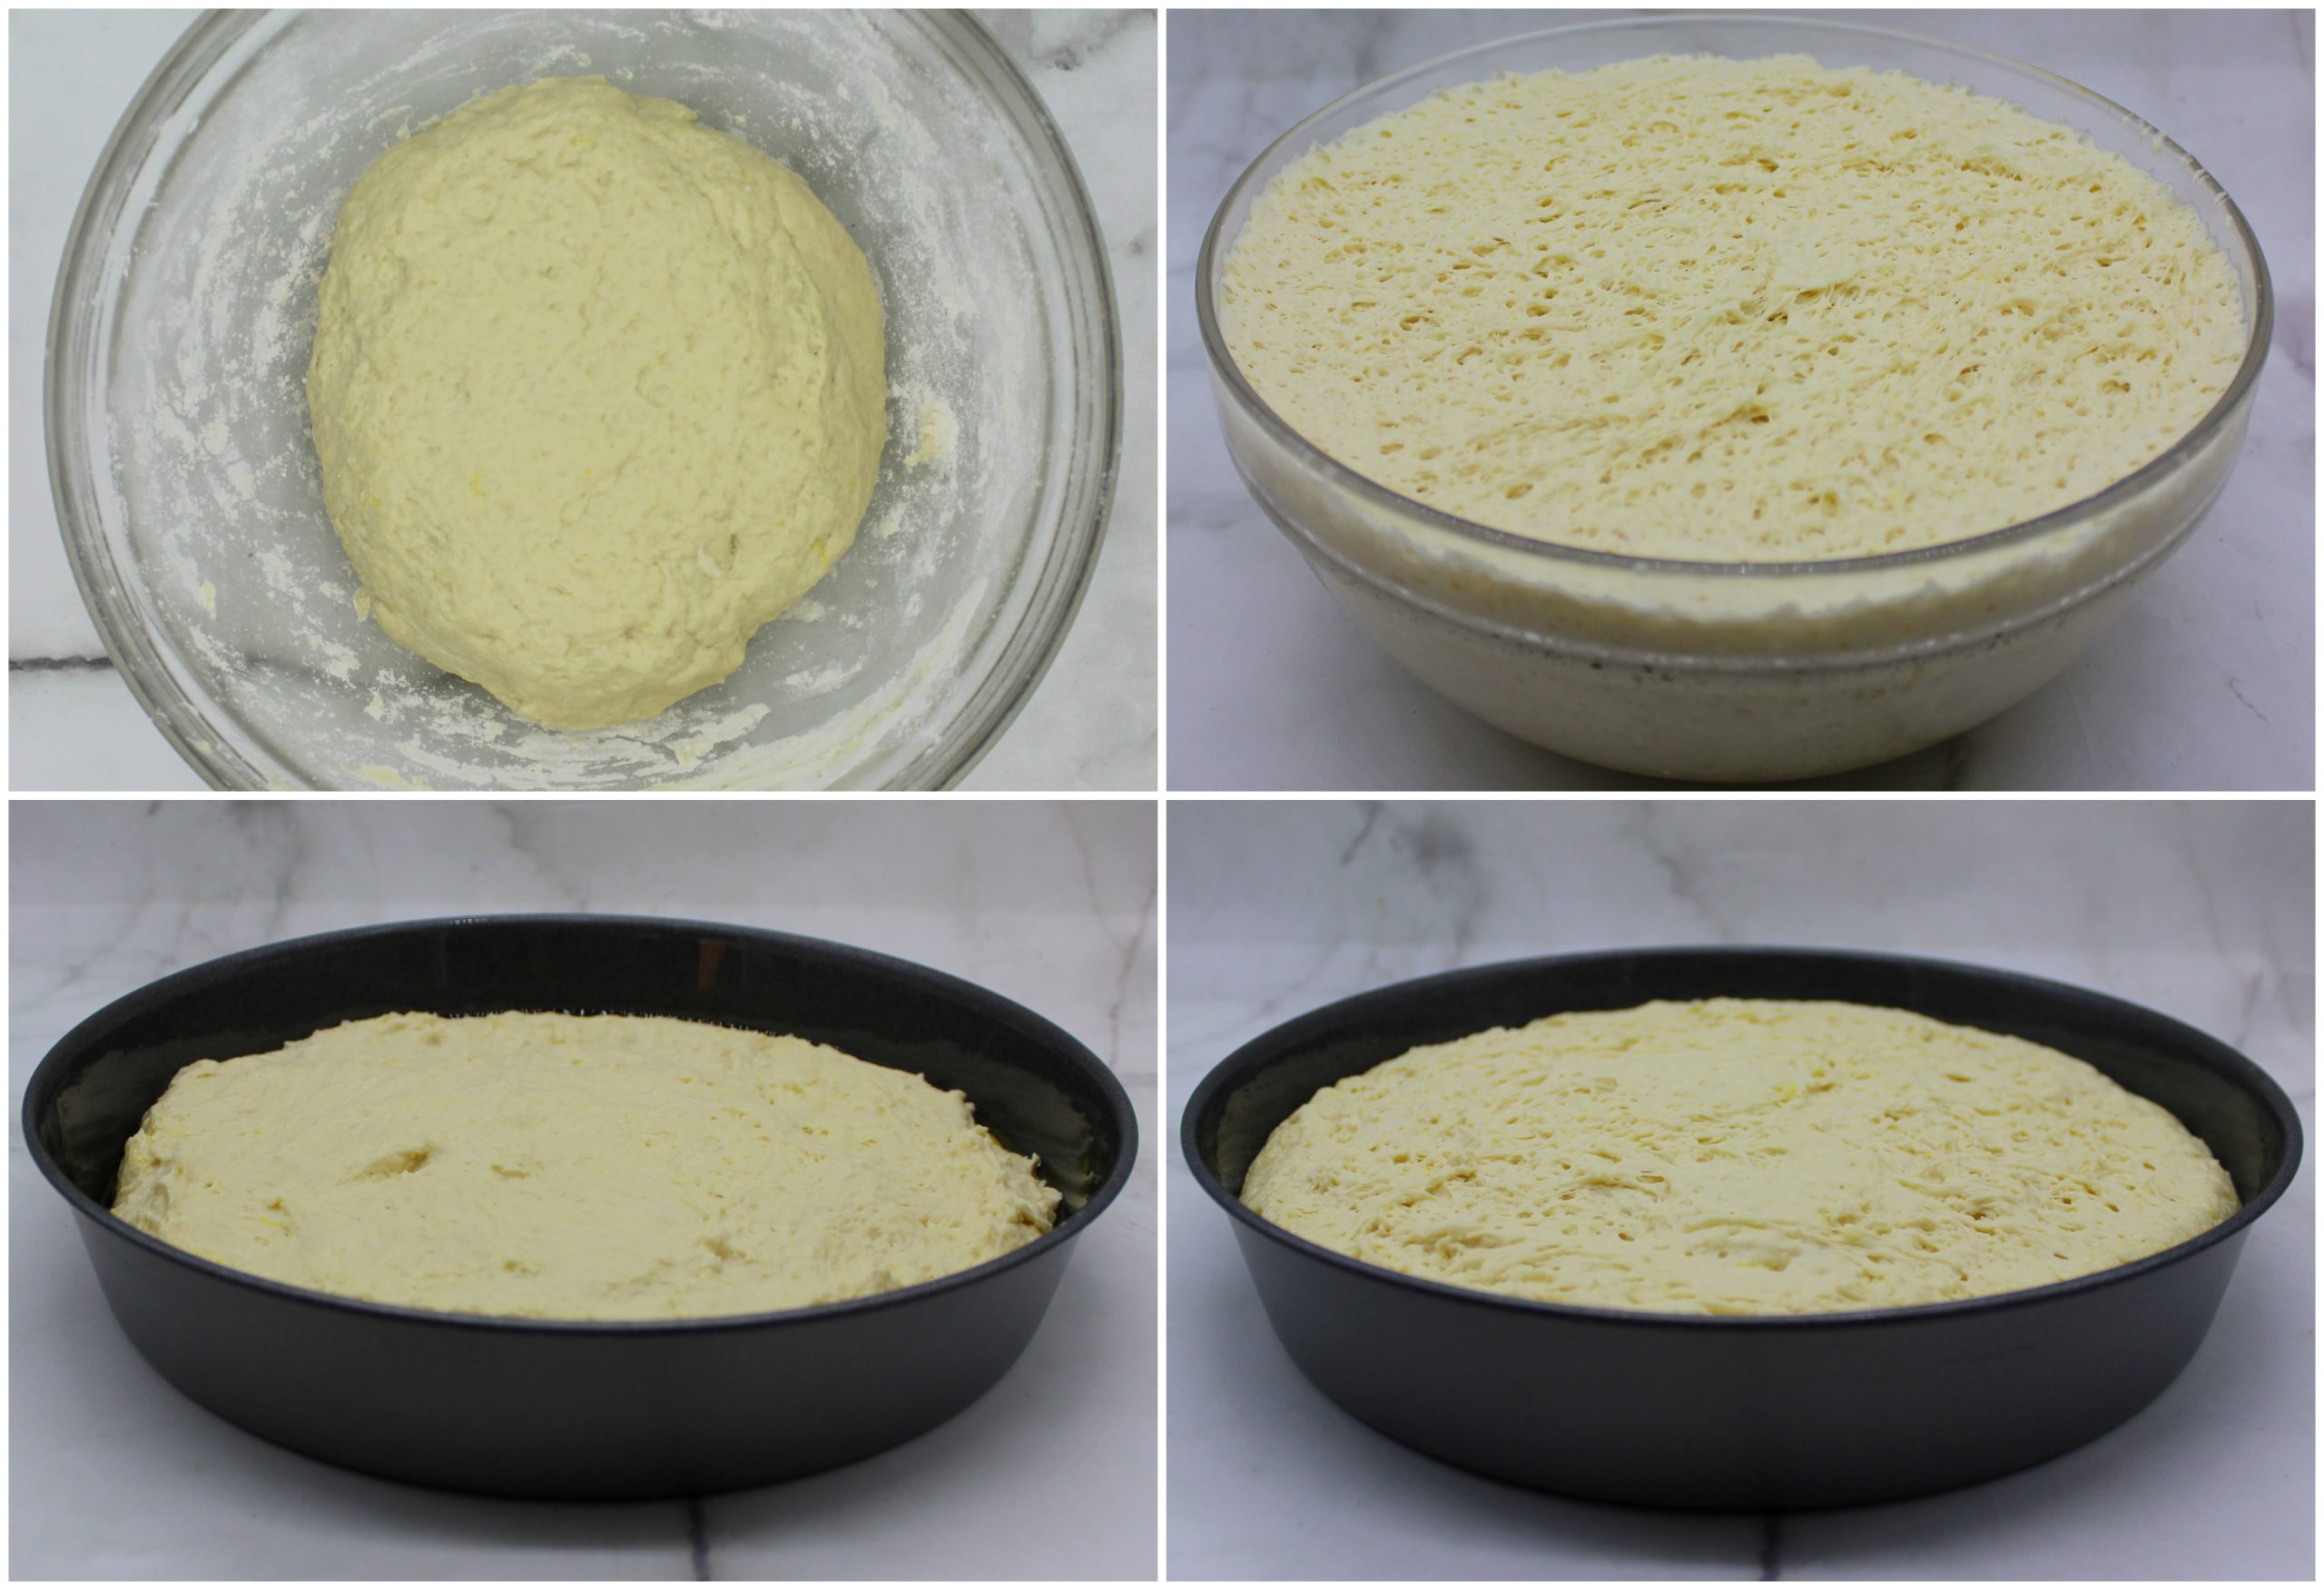
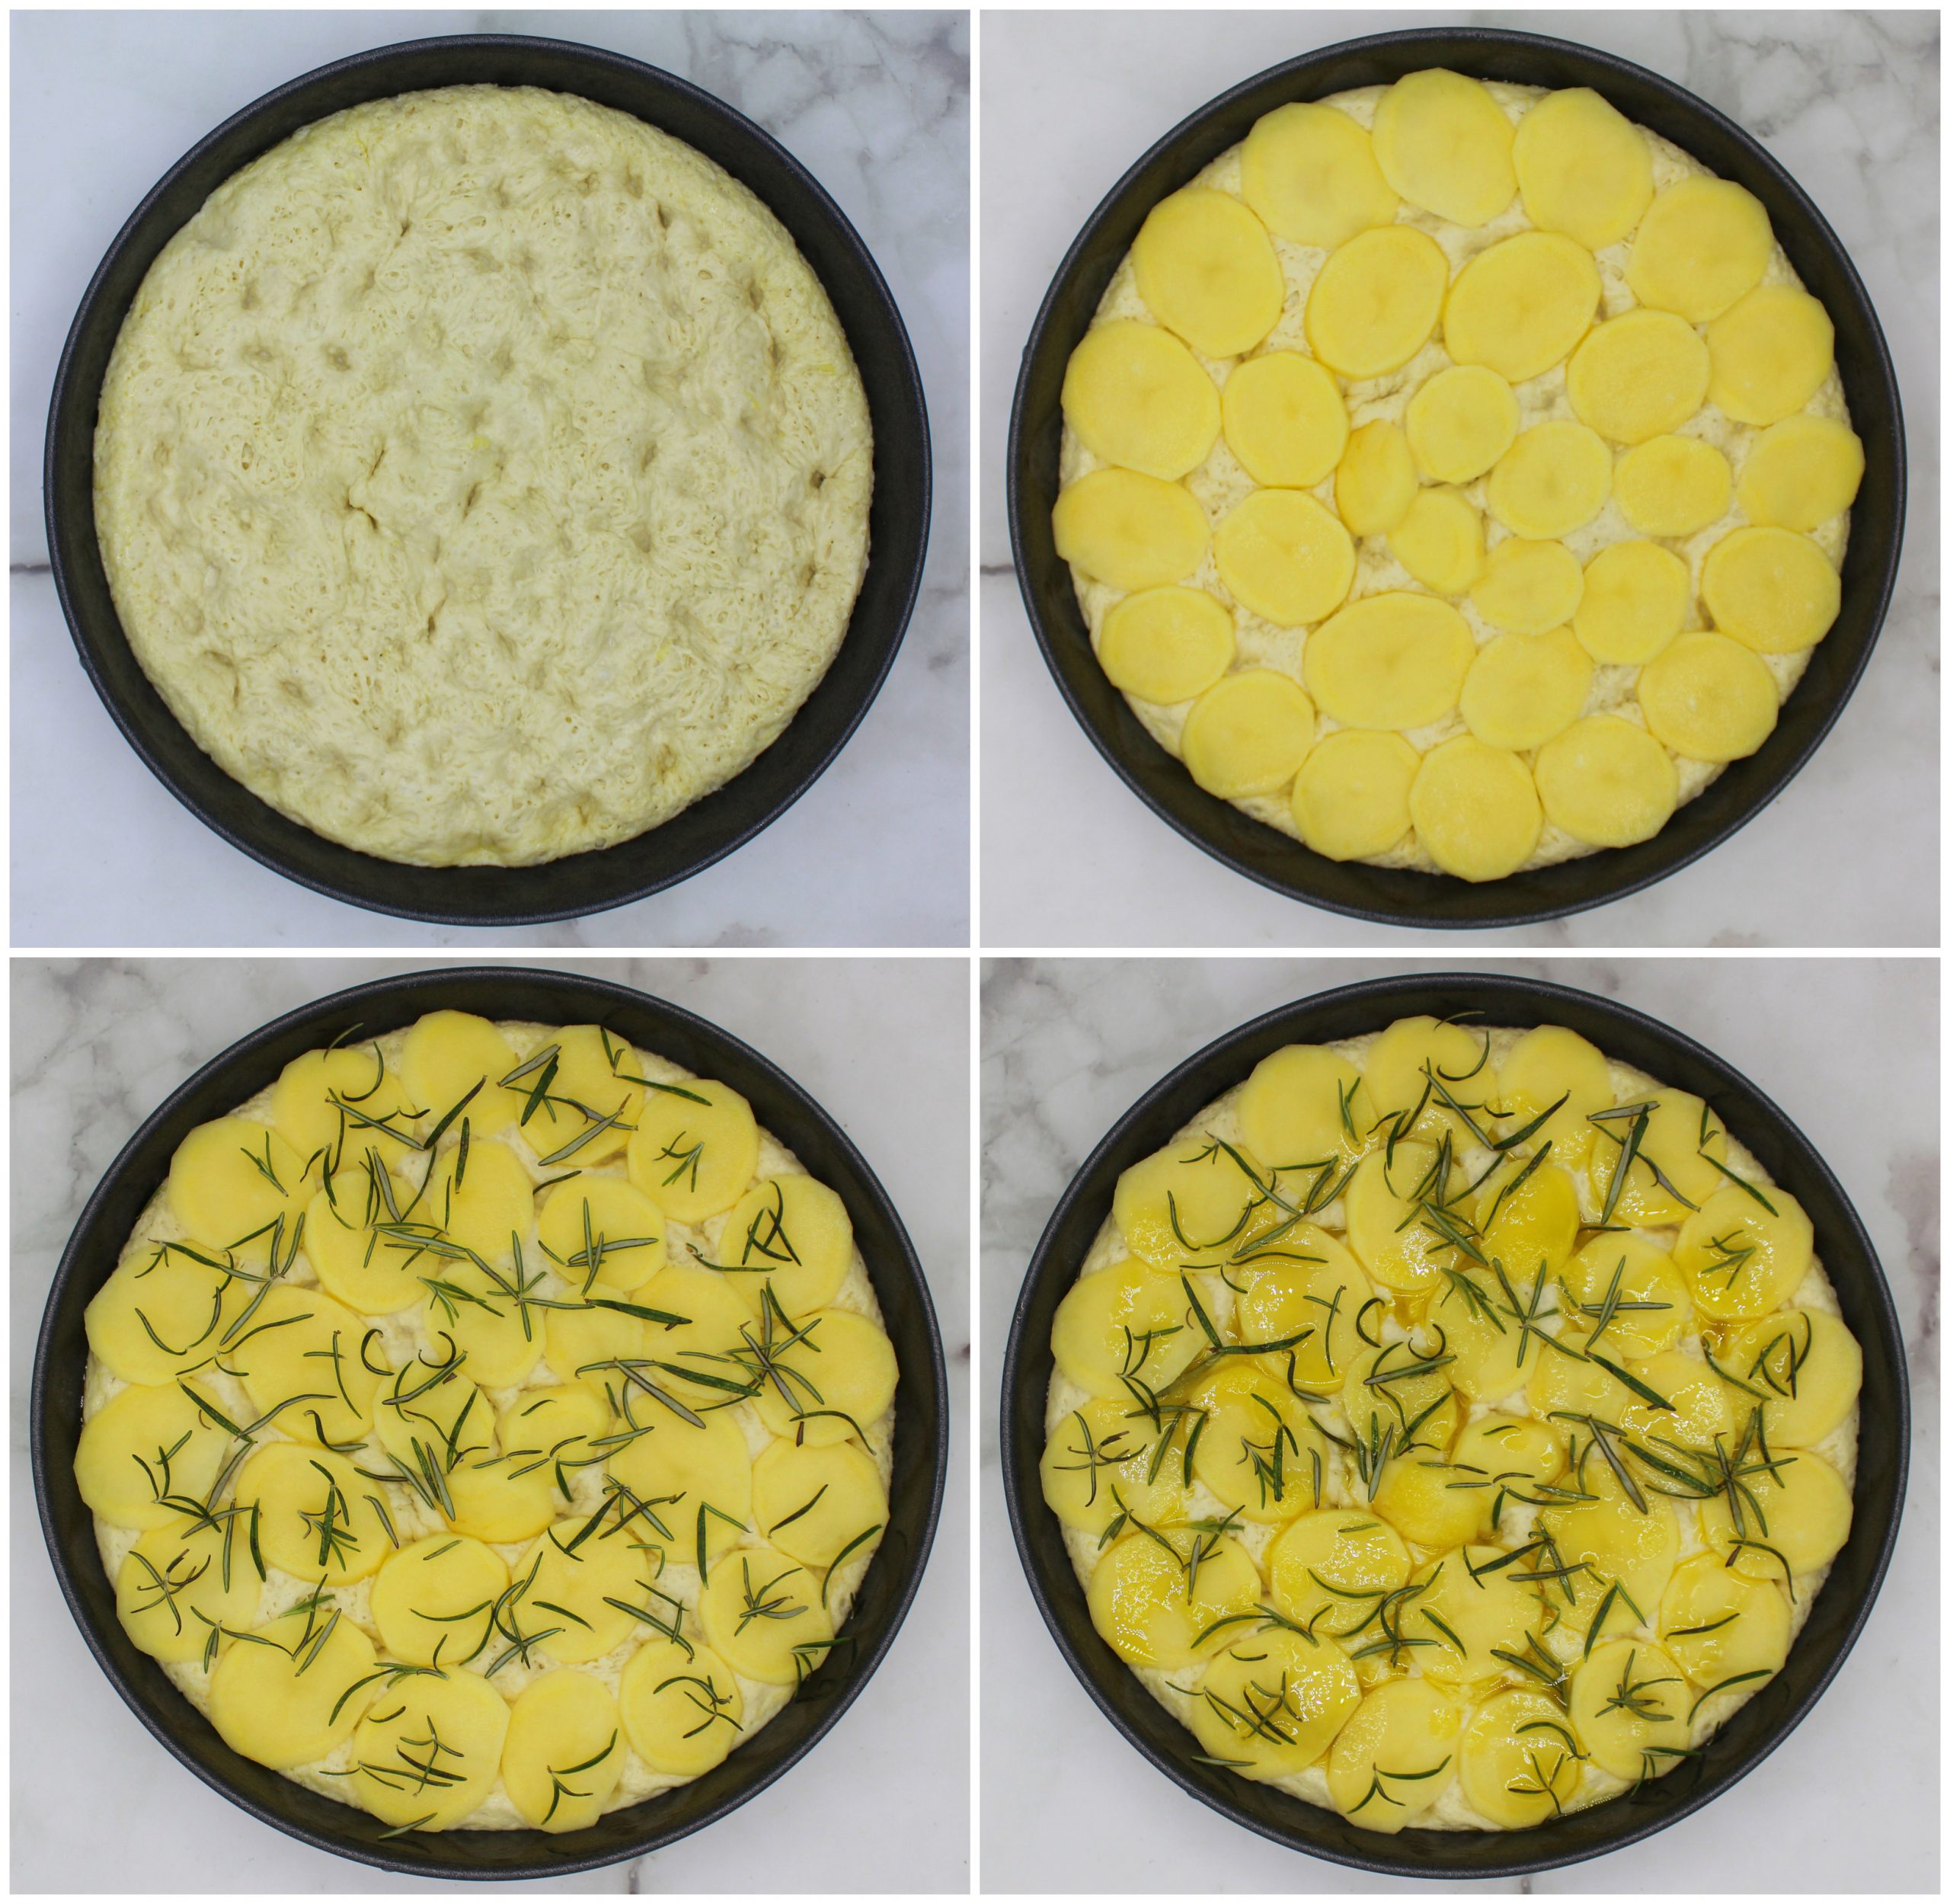
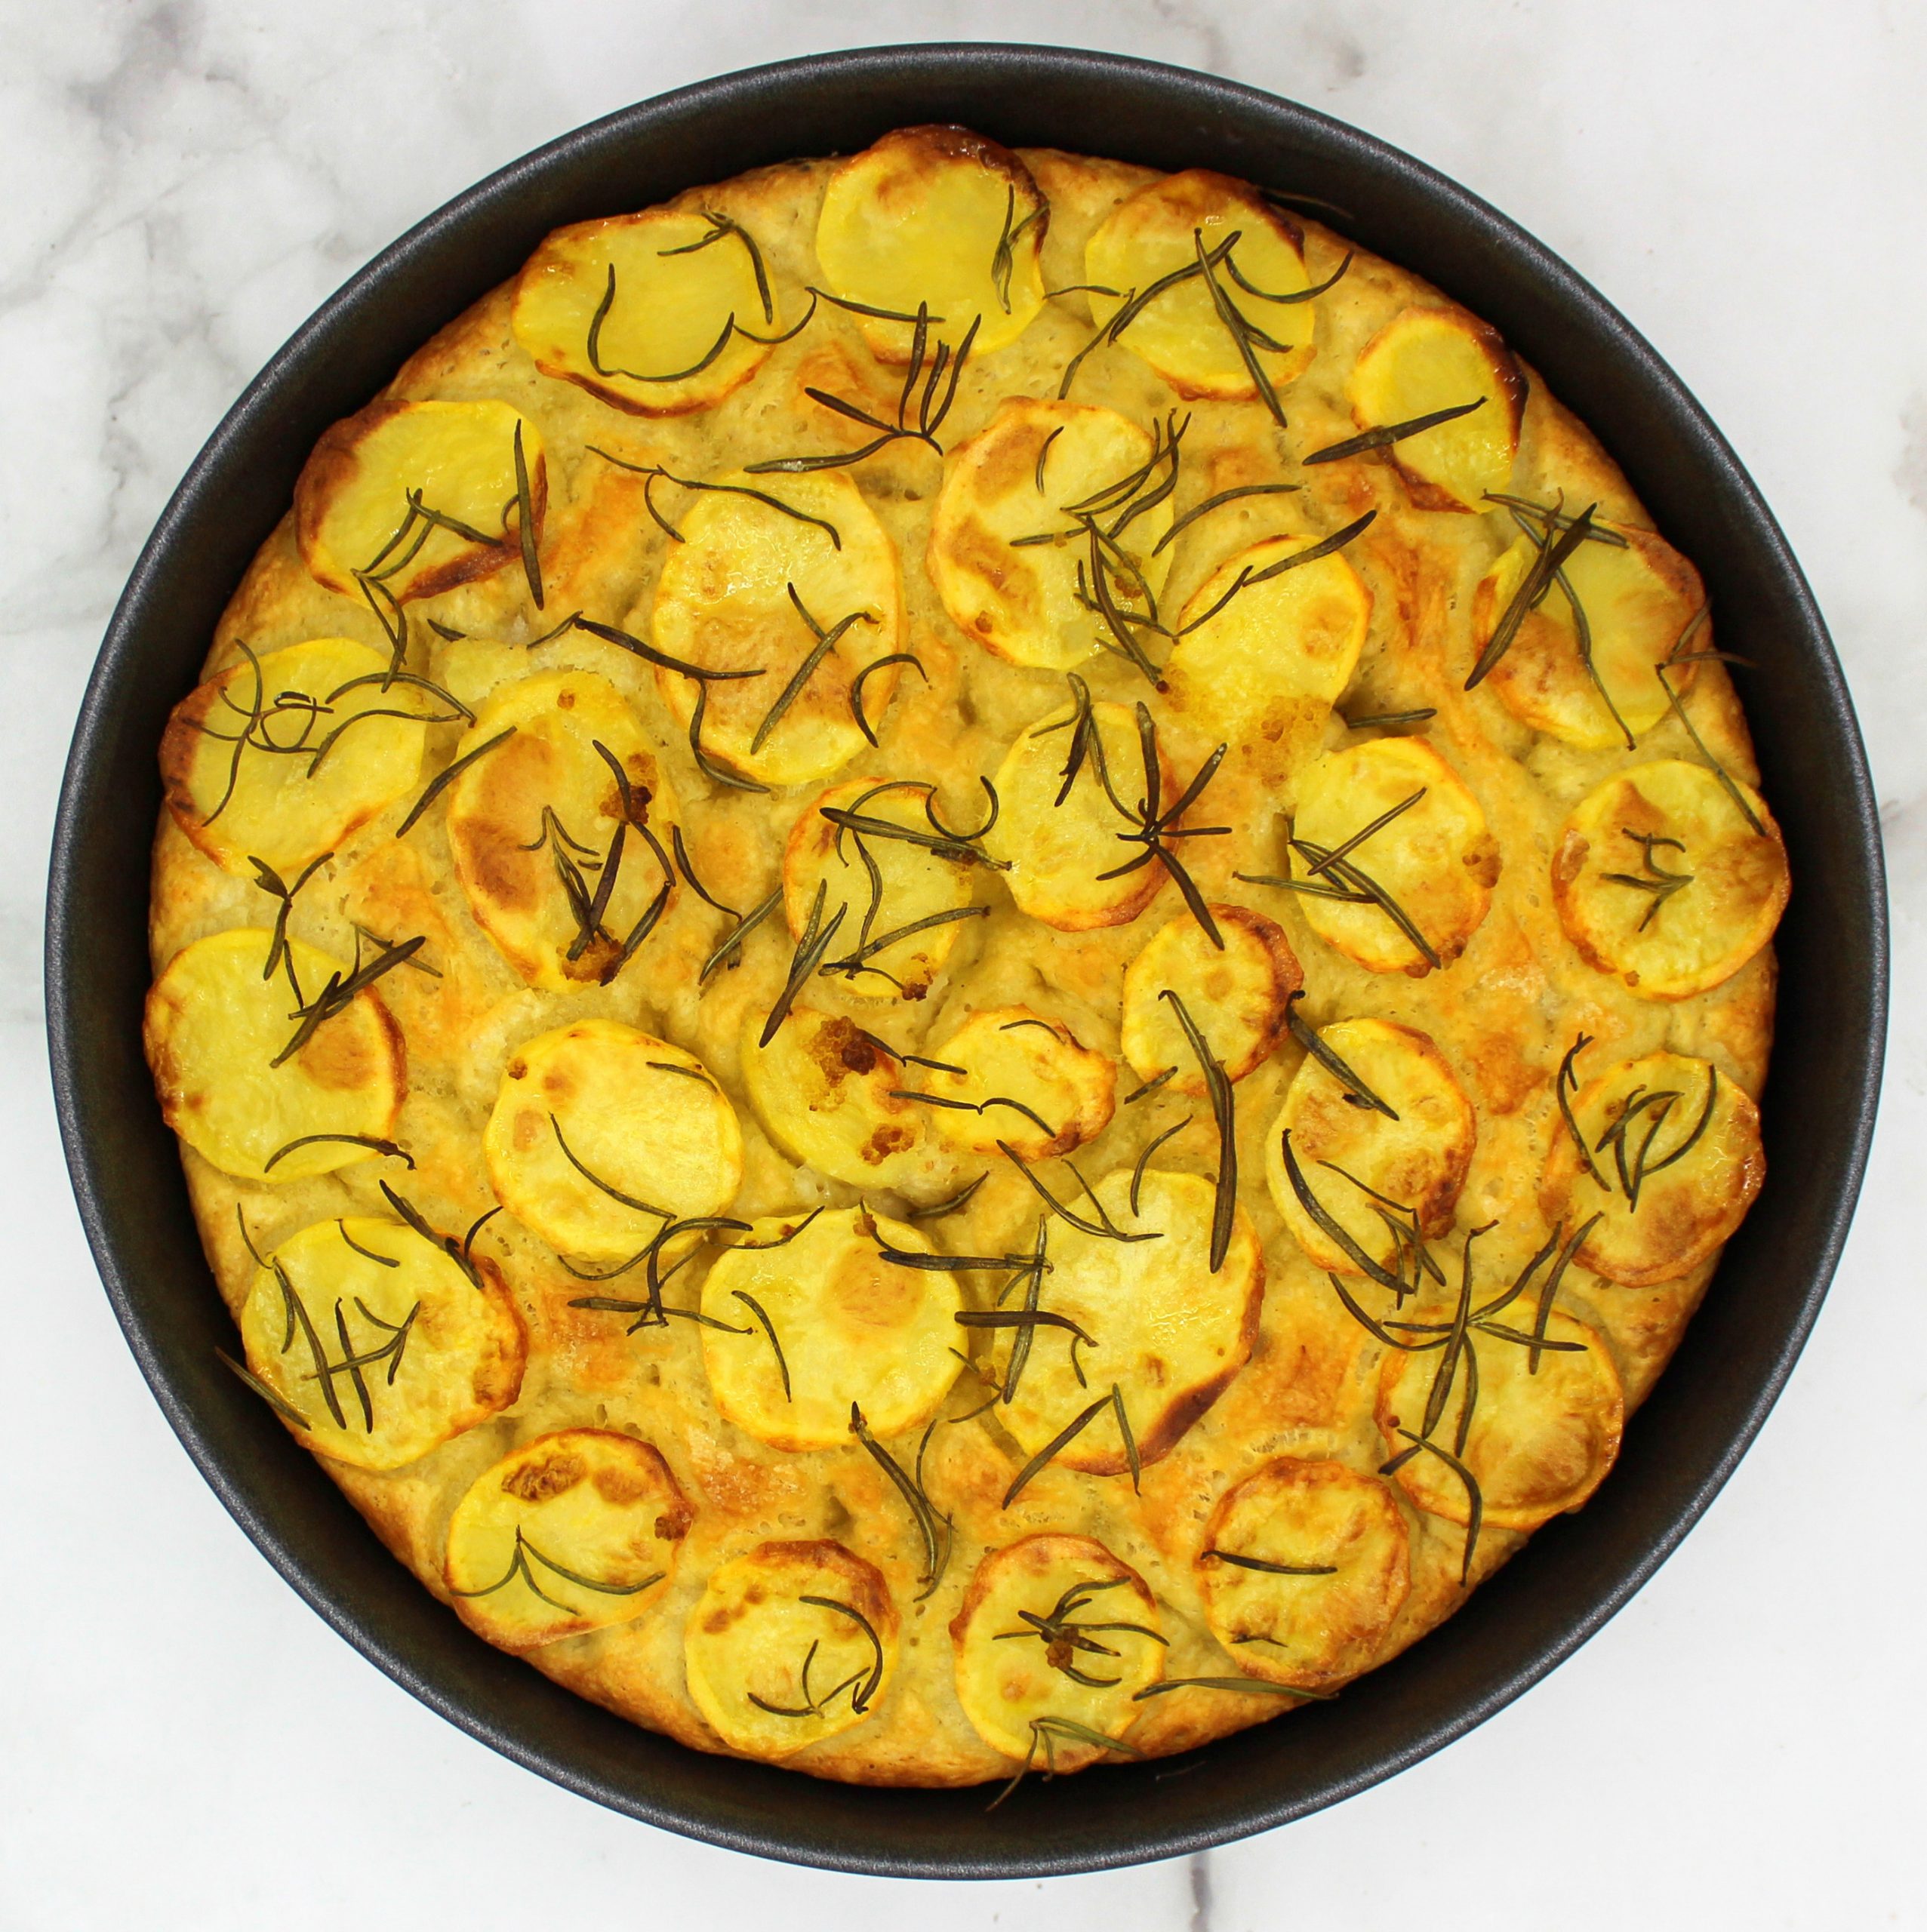
Two hours later the dough should be at least doubled in size. Then it’s time to transfer it to your chosen baking tray, even it out and let it rise again for 40 minutes. After that you must poke the surface of the dough with your fingers in such a way creating small dimples. Then, thinly slice the potatoes, place them over the dough, sprinkle over some fresh rosemary and pour over everything the mixture of oil and salt. After that, the only thing that is missing is the baking itself. Bake the Italian Focaccia with potatoes and rosemary for about 40 minutes. Once it’s ready, you’ll see that the borders of the potato slices have become golden brown. You can serve your focaccia both warm and cold. It tastes great in both versions.
Vegan dishes from Italian traditional cuisine
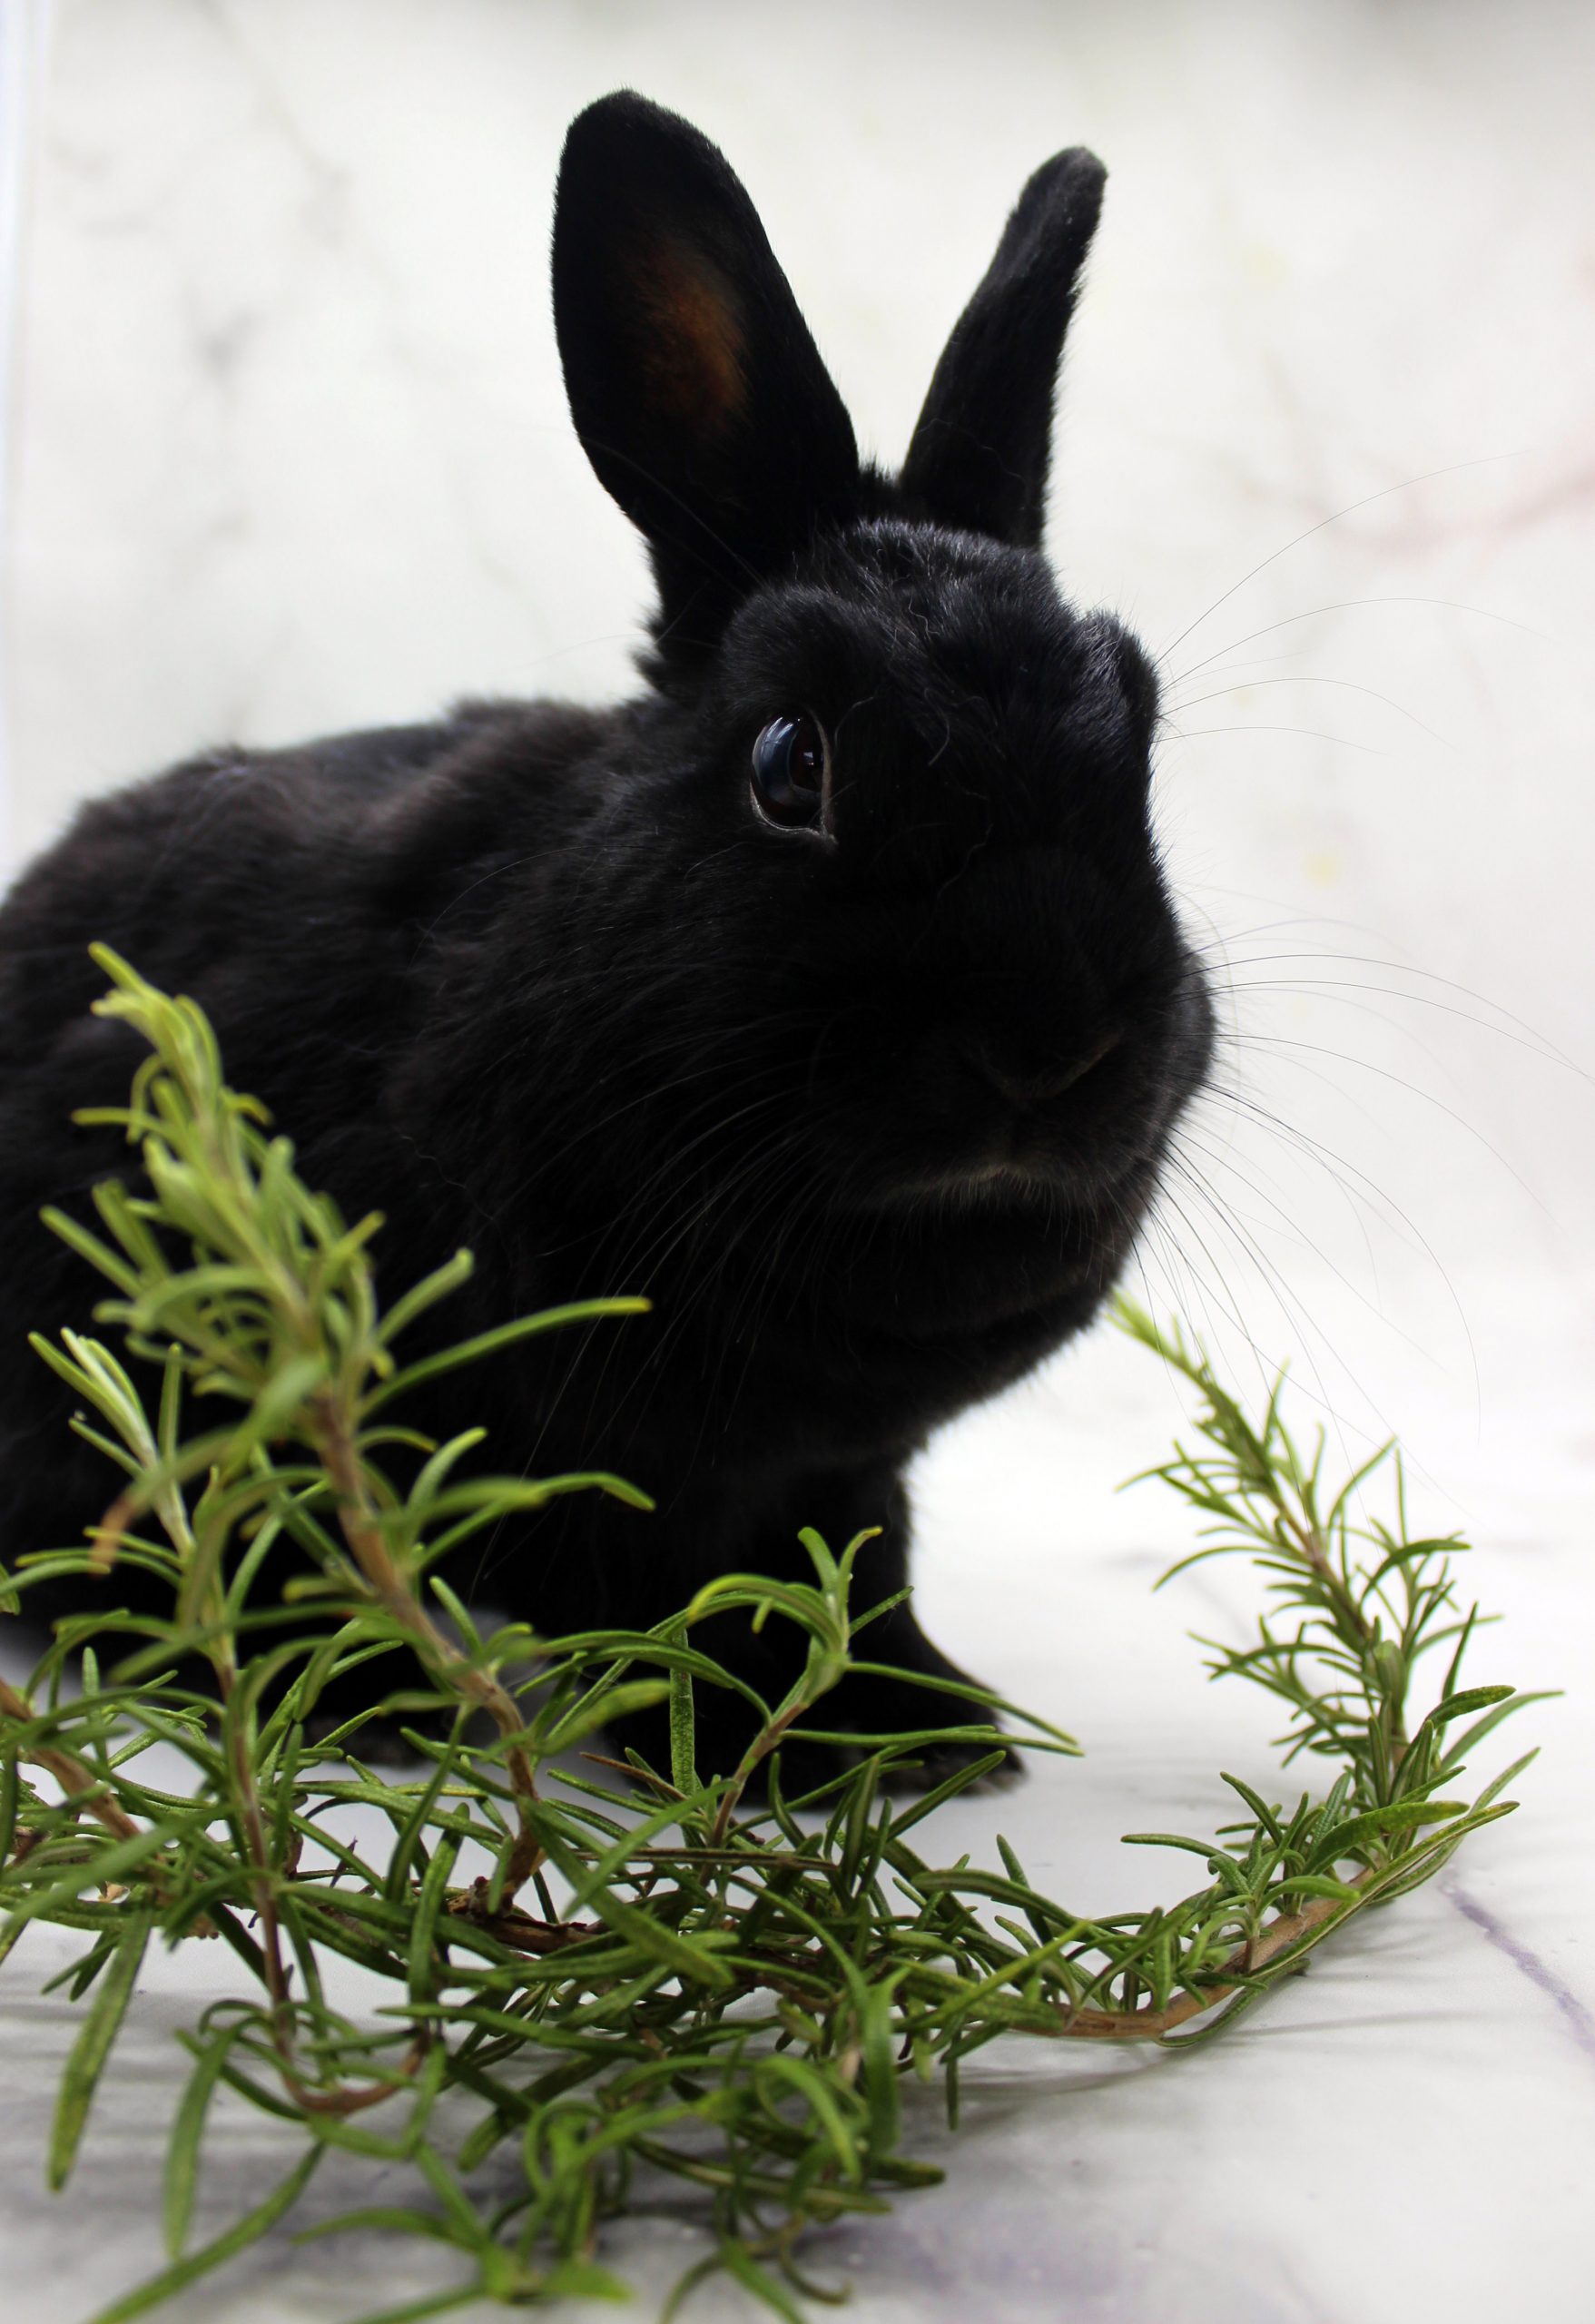
In general, the Italian focaccia usually is vegan. In some places people add lard to it. Then it’s obviously not vegan anymore. But even if you need to veganize some dishes from the Italian traditional cuisine, in most cases it’s quite easy. For example, I’ve made vegan version of pesto. And stuffed Italian pasta known as cannelloni. But some traditional Italian dishes are vegan already from the get-go. For example, Cecina or traditional Italian chickpea flour flatbread. There are so many ways how to adapt dishes to your own liking. The only thing that is necessary, is the willpower to experiment. It’s obvious that my bunny boy Specky cannot cook. But sometimes he’s even too lazy to do things that he’s able to do. Like, being the bunny-model. That’s why this time I needed to ask for Specky’s girlfriend’s help to be my model. And I think she did wonderful!
In my opinion this recipe is perfect for rainy days when you are forced to stay at home. And with this recipe you can also discover a new way how to use such and ordinary food product as potato! So, fill your home with a delicious home-made bread aroma from this Italian focaccia with potatoes and rosemary that is:
-
vegan
- soft
- fluffy
- easy to make
- flavorful
- filling
- with a thin crispy border
- and simply yummy!

Let me know, if you try this recipe! Leave a comment or even more – make Specky happy! Snap a picture of your masterpiece and post it on Instagram or Facebook by tagging @bunnymommycooks. And feel free to let your animal family members join in the picture!